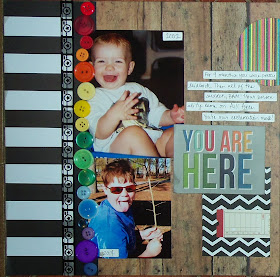
I recently developed photos from Spring Break and noticed that in one photo my son was sticking his tongue out. It reminded me of a photo I had taken of him when he was just one year old.
I thought it would be fun to make a layout comparing the two pictures.
Today I'm going to walk you through the steps to make this layout.
Yours will look similar, but not exact as you'll be using your own supplies.
When I plan these tutorials, I intend for you to use supplies you have on hand
rather than having to go out and buy new.
If you're anything like me, you probably have a surplus of supplies just waiting to be used.:)
Here's what you need to create this layout:
one piece of 12"x 12" pattern paper
one piece of 3"x 12" pattern paper
one piece of 3"x 4" pattern paper
one strip of 1"x 12" cardstock
one strip of 1"x 12" pattern paper or decorative tape
15-20 buttons (enough to span 12")
white cardstock for journaling
title block or letter stickers for the title
scrap of pattern paper cut into a 3" circle
two photos
adhesive
paper trimmer
Adhere the 3"x 12" piece of pattern paper along the left edge of the 12"x 12" pattern paper.
Adhere the 1"x 12" strip of cardstock next to the pattern paper.
Place two photos one on top of the other slightly overlapping the cardstock strip.
I got my title block and my 3"x 4" piece of pattern paper from this 12"x 12" piece of paper.
I love this style of paper that provides titles and journaling cards.
Place the 3"x 4" piece of pattern paper in the lower right corner of the background.
Place your title slightly overlapping the photos and the pattern paper.
Line your buttons up along the cardstock strip.
I varied mine so they weren't in a perfect line.
Place your pattern paper half circle in the upper right corner.
Write your journaling on the white cardstock.
Cut it into strips and adhere it above the title block.
I intended for the layout to be done after this step, but I just felt like something was missing.
So I added a 1" strip of pattern paper along the left edge of the cardstock strip.
Now it feels finished!
Hope you enjoyed this tutorial. Thanks so much for stopping by and God bless.
But I will sing of Your power;
Yes, I will sing aloud of Your mercy in the morning;
For You have been my defense
and refuge in the day of my trouble.
Psalm 59:16
This post is linked to G'Day Saturday, It's Overflowing, I Heart Naptime, Handmade Hangout, and Daisy Cottage Designs.


No comments:
Post a Comment