Monday, September 30, 2013

Mini Album Monday#15- Just Add Photos!

Today's featured mini album is so minimal that you can hardly call it scrapbooking!
No cardstock or stickers needed!
 
 
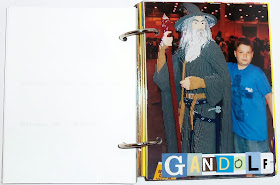
A few months ago, I took my boys to Lego Fest. As you can imagine, I took LOTS of photos. Too many for a simple layout. I knew I wanted to put them in their own mini album, but I didn't want to spend a lot of time on it.
 
 
I started with two Lego pirate hats and two pamphlets (that we got while we were there- for FREE),
a stack of photos, and two office binder rings.
Later on, I used office label stickers and a few sets of small letter stickers.
 
I got this idea from this rockin' blog.
 
 
 For the front and back covers of the album, I cut the pirate hat into four pieces measuring 4"x 6".
I sandwiched two pieces back to back for the front and did the same for the back.
 
 
For my first page, I cut up part of the front of the pamphlet.

 
Then I started adding photos.
On most of the photos, I placed an office label then used different letter stickers for my caption.

 
I didn't put anything on the backs of the photos. That's part of what keeps this book so simple.

 
I placed two holes in every page. On the backsides of the photos, I used hole reinforcers.


On some photos, I added a little journaling.

 
Here's another part of the pamphlet. It described one of the displays that we saw.
I placed this right before the photos of my boys checking out these displays.

 
Here's the very next page: the photo of my son is horizontal.
I placed letter stickers in the corner that say, "Look."

 
I didn't add a label to every page. There are several photos without them.

 
At the very end, I used just one journaling card to include details that
I hadn't covered earlier in the book.

 
On the inside of the back cover, I added this figure that I cut out of the pamphlet.
 
Using the pamphlet allowed me to have extra elements that matched the theme without me having to go buy some.

 
The back cover matches the front.
 
 
I fit 38 photos, five different pieces of  the pamphlet, and one journaling card in this album.
Quick and easy!
 
If you like this, come back next week and see how I put a twist on this album.
 
Thanks for stopping by and God bless.
 
Holy and awesome is His name.
Psalm 111:9


Friday, September 27, 2013

Tea Towel Pillow With Tutorial

I've got a darling pillow to share with you today. It's made from a vintage tea towel.

 
This is the front. It's a map of Lancashire Coast and Lake District.
I love the bright colors on the towel!
.
 
Here's the back.
I used this red ruffle trim to bring out the red in the fabric.
 
I got this tea towel at an estate sale for $2.
 
 
To make it into a pillow, I first cut it in half.
 
 
Then I pinned my trim around the edge of one half and ran it through my sewing machine.
 
Sometimes when I make a pillow, I just pin the trim in between the two pieces of fabric
and sew it all at once.
This trim was so thick, I wanted to be able to see what I was doing.
 
 
Once the trim was attached, I pinned the two halves of the fabric---right sides together.
I sewed all around the edges leaving about six inches along one side.
Then I turned it inside out and filled it with cotton stuffing.
To finish it off, I used an invisible hand stitch to sew the hole shut.
 
 
I'm nowhere near the seamstress I'd like to be, but I think this turned out pretty cute!
 
If you like this pillow, you may want to check out this one I made from a pinto bean bag.
 
 
Thanks for stopping by and God bless.
 
Yes, I will help you,
I will uphold you with My righteous right hand.
Isaiah 41:10
 

Thursday, September 26, 2013

Thrifty Thursday #86

     Whoo! We have had a busy couple of weeks in school (we do online public school). I haven't had much time to do any fun shopping- just grocery shopping.
     The other day, I snuck in a quick stop at my favorite thrift store right before taking my son to his drum lesson. He actually sat in the car with his homework while I shopped!
     I had wandered around and found a few items and was heading to the cash register, when I spotted a basket at the checkout that said, "Vintage Postcards." They had me at vintage. :)

 
Aren't they gems?

 
I wanted to get the whole basket, but there were a LOT of postcards. I couldn't justify that big of a purchase even at the reasonable price of fifty cents per card.
So I settled for my favorite eleven cards.
 
 
The backs are just as charming with the old script and beautiful postage!
Whatever I decide to do with them, I'll have to be sure that both sides are able to be viewed.

 
I was drawn to this old platter. I thought it was so unusual with the black trim. I've never seen an one like this before. Naturally, for only a buck, I decided that I needed it.

 
I almost passed this lace up because I already have quite a collection of lace. But I had a long talk with myself and decided that I would be a fool to pass up over five yards of 3 1/2" wide lace for $.75!

 
I fell in love with this tiny silver plated platter. It's tarnished, but so beautiful. I love the trim around the edge and the tiny size.
 
This doesn't seem like much, but I was thrilled with what I did find. My sweet son even offered to sit outside another thrift store if I wanted to shop some more.
 
I wish you luck with your secondhand shopping this week! Thanks for stopping by and God bless.
 
And He said to me, "My grace is sufficient for you,
for My strength is made perfect in weakness."
2 Cor. 12:9
 

Wednesday, September 25, 2013

Layout of the Week #69- Using Brads on a Layout

     Recently I came across my stash of brads as I was sorting some of my scrapbooking supplies.As most longtime scrapbookers do,  I've got them in nearly every color. I haven't used brads in . . . I don't know how long. So I pulled a few of them out to complete today's layout.

 
Here's the layout we'll be making.

 
To create it, you'll need:
one piece of 12"x 12" cardstock
two strips of pattern paper (measurements below)
one sticker in your desired theme (I used a circle punch to punch out a piece of pattern paper)
letter stickers for the title
small cardstock for your journaling
brads
adhesive
paper trimmer

 
Trim one pattern paper strip to 1 1/2" x 8" and trim the second one to 1"x 8".
Adhere them to either side of the cardstock 1/2" from the sides and 1 1/2" from the top.
I placed the thicker one on the left. No real reason for this other than to give it a little variety.:)

 
Trim your photos so they fit in between the strips. I used five pictures.
You could use four 4"x 6" photos as well.

 
Place your title in the lower right hand corner of the layout.
I slightly overlapped my photo with some of the letters.

 
Write or type your journaling on a small piece of coordinating cardstock. If you like, trim your journaling into strips. Adhere them in the lower left corner.

 
Now it's time for your one sticker--- or you can do as I did, and use a circle punch to create your own embellishment. I just chose the section of paper that I liked and punched it out.
Isn't that little haunted house cute?

 
Adhere it to the upper right corner slightly overlapping the right photo and paper strip.
Now to prepare the placement of the brads, use a push pin to pre punch your holes.
 
 
Place brads in the pre punched holes.
I also placed three brads next to my journaling.
TA-DA! Not too brad, huh?
 
If you'd like to get caught up on your scrapbooking or stay caught up, and you enjoy simple scrapbooking, please stop by every Wednesday for a step-by-step tutorial.
 
Thanks so much for stopping by and God bless.
 
Be not dismayed, for I am your God.
I will strengthen you
Isaiah 41:10


Tuesday, September 24, 2013

Recipe of the Week #86- Italian Chicken


Italian Chicken
2 lbs chicken, boneless
1 onion soup mix
1/4 cup Italian dressing
1 tsp garlic salt
1/4 cup water

Put chicken in Crock Pot. Sprinkle onion soup mix and garlic salt on top. Then top with dressing and water. Cook on low for 6-8 hours. Shred meat and serve on buns.

This was some of the best chicken I've ever eaten! It was so good, my hubby and one of my sons skipped the buns and just ate the meat. This is another easy recipe that tastes fantastic!

Thanks for stopping by and God bless.

Blessed is the man whose strength is in You
Psalm 84:5

This post is linked to Skip to My Lou, My Girlish WhimsCheerios and Lattes, and Between Naps on the Porch.

Monday, September 23, 2013

Mini Album Monday #14- Child's Milestones Album

     I have two sons who delight me to no end. My older one is very easy going and always has been. He was an extremely happy baby and a delightful toddler. Even today, he's very even-tempered, sweet, and creative. He is always ready to lend a helping hand. He is a lot like my husband.
     My younger son, on the other hand, has taught me much patience. He is a character- and he always has been. We've never known what he would say or do. This boy has challenged me at every step. He's also very loving. He has an extra dollop of sweetness to balance out his. . . spunk.
     I made this book to show how much he grew in one year. When you read his accomplishments, they may seem like small things, but I remember them as being really big. :)

 
The title of this book is, "Look How Far I've Come This Year."
On the cover, I placed large letters that spell out Look, and I tied a small tag to one of the letters that says my son's name.
I used a matchbook style album.
The cover is pretty basic with just one piece of pattern paper, chipboard letters, and one piece of  ribbon tied around the edge.

 
The first page of the book says the whole title.
I covered 3/4 of the page with pattern paper. I printed the title out from the computer and placed colorful eyelets at the corners.

 
I used the first layout as my dedication page. There's a photo of my son on the left.
On the right is a little note I wrote to him that says:
Ethan, you've grown up so much over this past year. You're not my baby anymore. Everyday you do or say something new. You are such a creative and smart little boy. This book is celebrating how far you've come this year from age 3 1/2-4 1/2.

 
For each layout, I covered both sides of the background pages with pattern paper 3/4 of the way. On the left I adhered the paper at the top so the background page peeks out at the bottom. On the right page, I did the opposite by placing the pattern paper at the bottom of the page. That left room for my title at the top.
 
The title says, "You write your name and everybody else's too!"
The journaling says:
Last year when signing your name, you made a big E with extra lines that sort of resembled the bottom of a rake. You got very frustrated when I tried to work with you on writing
the rest of your name.
This year, you not only write your name legibly, but you can write all the
family members' names, too.

 
When I planned this book, I made a list of the milestones my son had accomplished, then took photos to show each point.
 
The title says, "You wear socks with your shoes."
The journaling says:
Last year I had the hardest time getting you to wear socks with your shoes. You absolutely refused. So every school day, you wore tennis shoes with your bare feet. Let me tell you, it only took about a week before your shoes started smelling awful. I tried, Daddy tried, and even Uncle J. tried to convince you to be a big boy and wear socks. You refused.
This year, you didn't even challenge me about it. You put on your own socks and shoes before school Your shoes don't smell nearly as bad!

 
On each layout, I placed a photo on the left side that goes with the journaling.
 
The title says, "You enjoy drawing."
The journaling says:
Last year, you took very little time with your pictures. Your drawings of people consisted of a
head (without a face), arms, and legs.
This year, you take more time and add more detail. Your people have eyes, ears, fingers, and sometimes even hair. We love to see your delightful pictures!

 
I placed one embellishment at the bottom corner of each photo.
 
The title says, "You take your time when coloring."
The journaling says:
Last year you were a speed colorer. You didn't care what the finished product looked like. Sometimes you just used one color for a whole page.
This year you take your time coloring. You color inside the lines and choose appropriate colors for things. You make beautiful pictures!

 
For each title, I used letter stickers for one word, then used my own handwriting for the rest.
 
The title says, "You can ride a bike."
The journaling says:
Last year, you couldn't even ride a trike.
This year you quickly became a tricycle master, and after riding your trike so hard that you broke it, you moved up to a bigger and tougher bike. Although you still have training wheels, you ride like you're in a race.

 
I chose a set of pattern papers to use in this book.
They were so busy, I felt I didn't need much else on the pages.
 
The title says, "You play well by yourself."
The journaling says:
Last year you always had your brother around, so you had a constant companion.
This year with Sam starting Kindergarten, you have had to learn to play by yourself. At first it was difficult for you. You were ready to go pick up Sammy by 9:30 in the morning, even though he wasn't done until 2:40. But you've gotten much better. If you have a string or a rubber band, you stay entertained for quite some time.

 
For each journaling card, I typed the stories, then printed them out. Then I just trimmed them to fit in my album.
 
The title says, "You know how to spell some words."
The journaling says:
Last year the only word you could spell was your own name.
This year, you have developed a keen interest in writing. We are constantly spelling something out for you to write. Many of your pictures have captions. We get written apologies from you when you've broken something or poked somebody with your plastic sword. We always know they're coming because we've spelled them out to you, but it still melts our hearts when we see your little boy handwriting spelling out your feelings.

 
This is a pretty basic album. You can see that I used the same layout on every page. There weren't many steps to complete it.
 
The title says, "You can use the computer by yourself."
The journaling says:
Last year, we would not have even let you sit by the computer without constant supervision.
This year, you are such a big boy that you can play games all by yourself. It's fun to watch your little hand moving the mouse.

 
  This album would be easy to reproduce. You could do milestones that your child accomplishes in his or her first year, second year, or even his or her senior year of high school (a page for homecoming, SATs, Prom. . .).
 
The title says, "You are so thoughtful."
The journaling says:
You've always been a sweet boy, but his year you have become so thoughtful. You make personal creations for everybody. You make beautiful hand drawn birthday cards. You make love notes. At Christmas, we stood in line for over thirty minutes so you could give Santa the beautiful picture you made for him.

 
My son is twelve now, but I still love reading this book and remembering
what he was like at this age.
 
The title says, "You are so grown-up"
The journaling says:
I am so proud of the young man you're becoming. You've grown so much so quickly, and I look forward to watching how much you grow over this next year.
Always try your hardest and be your best. Love, Mommy

 
For the last page of the book, I added one final photo of my son.
 
There are lots of pre-made albums out there. You could easily take photos of your child and make an album like this. You'll treasure it always- I promise!
 
Thanks for stopping by and God bless.
 
Blessed are all those who wait for him.
Isaiah 30:18