Thursday, June 30, 2016

Thrifty Thursday #222

Well, I made my last visit to my favorite thrift store.
I found out a couple of weeks ago that they're closing down.
I am seriously bummed about it.

I did get one last awesome score from there.
Check it out. . .

it's an old slide projector.
It's in great shape.
It still works, but needs the part that holds the slides.


The case is even in great shape.


I guess it had been in the store awhile- how I missed it, I'll never know.
The original price was $65. Then it went down to $50. Then it went down to $17.50.
When I walked into the store, the lady told me that everything was half off the marked price.
So I was thinking that half of $17.50 is $8.75, so I'd offer $5 for it.
Before I could even get all the words out of my mouth, the lady said,
 "Oh that old thing? I'll take a dollar for that. I should pay you to take it."
A dollar! That's what I paid - with a big smile on my face.


At first, I thought my hubby could try to turn it into a lamp, 
but he says he's reluctant to do so since it still works. 
I'll keep you updated on what we decide.


I popped into the sister store right next door and got these three uniquely shaped bottles for fifty cents each. I only bought three, but there were at least twelve of them.
They sat in a bag for a few days after I bought them. When I took them out to take pictures of them, I wish I had gotten more. Unfortunately when I went back to the store, they were all gone.

That's it for this week. I'm going to have to expand my resale shop horizons
since I'm down a store now (sad face).

Thanks for stopping by and God bless.

Oh, give thanks to the Lord, 
for He is good! His mercy endures forever.
Psalm 118:1

This post is linked to Blue Willow House, The Crafted Sparrow, Crafts a la Mode,
and The Cottage Market.  http://thecottagemarket.com/2016/07/a-morning-cup-of-joe-9.html

Wednesday, June 29, 2016

Layout of the Week #134

Every other Wednesday, I post a tutorial to make a quick and easy scrapbook page.
I intend for it to help you get some of your photos scrapped and also allow you to use up scrapbook supplies you have on hand. Just follow these easy instructions.
Today's Layout of the Week uses several different pattern papers.
 

Here's the layout we'll be creating.
Yours will look slightly different as you'll be using your own supplies.


To make it, you'll need:
one piece of 12"x 12" pattern paper
one piece of pattern paper measuring 6"x 12"
one piece of pattern paper measuring  3 1/2"x 12"
one piece of pattern paper measuring 6"x 8 1/2"
two pieces of pattern paper measuring 1/2"x 12"
decorative tape
letter stickers for your title
journaling card (a note card will do)
adhesive


Place the 6"x 12" piece of pattern paper 2 1/2" from the top of the background paper.


Place the 1/2" x 12" strips along either side of the pattern paper you just adhered.


Place the piece of pattern paper measuring 6"x 8 1/2" about one inch from the right edge of the background paper. This will be your photo mat.


Now place the 3 1/2"x 12" strip along the left edge of the photo mat.


Add your photo to the mat.
I used a 5"x 7" vertical photo.
You can replace this with two vertical 4"x 6" photos.


Using your letter stickers, place the title in the lower right corner of the photo mat.
I placed my stickers on an office label.


Place two strips of decorative tape on opposite corners of the photo (upper right and lower left).


Adhere your journaling card to the left of the photo on the center piece of pattern paper.
I printed mine onto white cardstock and cut it into strips.

What do you think?
Easy breezy, huh?

Thanks for stopping by and God bless.


For His merciful kindness is great toward us, 
and the truth of the Lord endures forever.
Psalm 117:2

Tuesday, June 28, 2016

Recipe of the Week #227 - Mexican Pizza

Mexican Pizza
1 cup refried beans
2 Roma tomatoes, diced
2/3 cup shredded cheese
2 green onions, sliced
1/3 cup enchilada sauce
4 tortillas (6 or 8 inch)

Preheat oven to 400 degrees. Grease a hot skillet and heat the tortillas, flipping them frequently so they don’t burn. They should be nice and crispy. Heat the refried beans. Place two tortillas on a baking sheet and spread 1/2 cup of refried beans onto each tortilla. Top with the remaining tortillas. Pour half of enchilada sauce on top of each tortilla and spread around. Add half of the chopped tomato on top of the sauce. Add 1/3 cup of cheese on top of each tortilla. Add half of the green onions on top of the cheese. Bake for 8-10 minutes or until cheese is melted. Allow to cool for a few minutes, then cut with a pizza cutter.

These little fellas are so tasty! They taste a lot like the Mexican Pizzas I used to get from Taco Bell. I wasn't sure what my hubby would think of them since they don't have meat, but he loved them- he ate two whole pizzas!

Thanks for stopping by and God bless.

Love must be sincere. 
Hate what is evil; 
cling to what is good.
Romans 12:9

This post is linked to Wake Up Wednesday, Gingersnap Crafts, Simple Nature Décor,
 and Plucky's Second Thought.

Monday, June 27, 2016

Cute Little Crochet Coasters

This project has been on my to-do list for the last month.
So finally, I sat down with some Fixer Upper reruns and got to it.


How cute are these crochet coasters?!?


Wait until you hear how simple it is to make these. . . 
I started with a size F crochet hook, 
cotton yarn (Lily Sugar n' Cream yarn in a variegated color),
and Alene's Tacky Glue. 

You start with a chain (the most basic of crochet stitches, I believe),
and start winding it into itself.
I used a toothpick to apply the glue to the edges as I swirled the chain around in a circle.
You should keep going until your circle is about 3 1/2" across.
When you get it large enough, you just cut off the excess and tuck the little strands under the coaster with some more tacky glue. Then you use that end to start winding the next coaster.
I had mine sitting on wax paper to keep from getting glue all over the table. 
I let them dry for a bit on the wax paper, then peeled them off 
and set them upside down to continue drying.
 

I'm tickled pink with how cute they turned out.
I think a set of these would make a great gift.

Thanks for stopping by and God bless.

He who pursues righteousness and love 
finds life, prosperity and honor. 
Proverbs 21:21

Friday, June 24, 2016

Flashback Friday: Patriotic DIY's

It's the last Friday of the month,and that means we're gong to flashback
 to previous DIYs all keeping in the same theme.

This month I'm featuring patriotic projects since the Fourth is right around the corner.

(Does anybody else feel like this month just flew by?)


I totally love how these centerpieces using Pepsi cans turned out.
Go here to read more about them. 


I used a bit of fabric, lace, and a fabric flower to put together this patriotic cap.


For this project, I adhered two small flags to the outside of a glass vase.


This patriotic banner was made using paint chips and small flags 
attached to twine using tiny clothespins.
Cute and easy!


This simple project was made covering jars with sequined wristlets
that I found at a thrift store. If you have a daughter who has outgrown some of these,
this is the perfect way to use them!

Follow the links to read more about these projects.

I hope you all have a delightful weekend!
Thanks so much for stopping by and God bless.

Rejoice in the Lord always. 
Again I will say, rejoice!
Phil. 4:4

Thursday, June 23, 2016

Thrifty Thursday #221

I got some very sad, disappointing news when I went into my favorite thrift store this week.
It's going to be closing at the end of the month!
I am so bummed!
It turns out that the owners own the secondhand shop next door and can only afford to keep one of the shops open. I wish they'd close the other one instead. . . .

Of course, there are several other resale shops in town, they're just not as good as this one.
It's clean and organized and run by senior citizens.
I'm hoping they'll bring those gals over to the other shop and let them work their magic.

Anyway, my finds this week are from two different trips to the thrift stores.
Ironically, the first three are from the other thrift store- not my favorite one.


I love vintage paper products and games.
Therefore, I simply cannot pass up a Bingo game.
While this one isn't too old, it had Bingo cards that can be used for projects.
It was only fifty cents.


I also picked up this awesome weather book from the fifties.


All the images look like pencil drawings.
I paid fifty cents for this, too.


I also found these lovely file folder labels.
They're old enough that the directions say, "Place this side in typewriter."
They were only a quarter.
I'll use these in scrapbooks and Junk Journals.

I got this wooden Lazy Susan for $4.
I can't decide if I'm going to turn it into a desk organizer like this
or if I'm going to paint it like this.


These plastic bobbins came in packs of three for ten cents.
I picked up two packs.
I thought they might look cute in a glass dish.

So, did you find anything good this week?

Thanks so much for stopping by and God bless

Seek the Lord while He may be found,
call upon Him while He is near.
Isaiah 55:6

Wednesday, June 22, 2016

Lovelies That I Love

I hope you're all having a great week.
Are you feeling like you may need a little break?
Then you're in the right place. Take a look at these cute lovelies I've found online.


I cannot tell you how much I love these stacking name rings.
I love the font and the handmade look of the rings.
What a great way to wear a mother's ring!


I think this embroidered dress is so darling.
It's a perfect summer look.


I always love to have a cute notebook to carry in my purse.
The next time I'm at Hobby Lobby, I'm going to have to pick up this one.


Sometimes instead of carrying my whole purse, I like to carry a wristlet.
How much do you love this one?
It's so bright and cheerful.


I think this wooden plaque is delightful- I love the quote and I love the bike image.

Sigh. Wasn't that a nice break?

I'm not affiliated with these companies; I just like their stuff.

Thanks for stopping by and God bless.

Be anxious for nothing,
but in everything by prayer and supplication,
with thanksgiving,
let your requests be made known to God.
Phil. 4:6

 This post is linked to Skip to My Lou, Crafts a la Mode, Tatertots and Jello,
and Plucky's Second Thought.

Tuesday, June 21, 2016

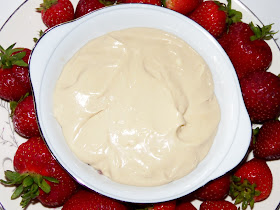
Recipe of the Week #226- Easy and Delicious Fruit Dip


Easy and Delicious Fruit Dip
1 package of cream cheese, softened
1/2 cup brown sugar
1 tsp vanilla

Mix the ingredients together and serve with your favorite fruit.

How easy is this? Wait until you try it- the dip is so good, you don't even need fruit. Of course, the fruit just makes it better! I served it with strawberries the first time, but next time, I think I'll try a variety of fruits.

Thanks for stopping by and God bless.

Do all things without complaining and disputing.
Phil. 2:14
This post is linked to Between Naps on the Porch, Wake Up Wednesday, The Girl Creative, 
and My Girlish Whims.

Monday, June 20, 2016

Mini Album Monday #76- Travel Album Made From File Folder

In the midst of this already hot summer, I thought we could take a look at
 a travel themed mini album.
We've always done most of our traveling during the summers which is kind of crazy when you consider how hot it gets here!


The cover is half of a file folder cut in half.
(I just love making albums out of office supplies!)


The inside cover has a strip of pattern paper and a label sticker stamped with the phrase
"This belongs to".
The first page is just a piece of 8 1/2"x 11" piece of cardstock cut in half
with a strip of pattern paper along the long edge.


The next page is part of a pattern paper with a map design.
I cut out a bracket on the outside edge.
The tab towards the bottom is actually a stamp sticker folded in half around the page.

I always like to add tabs to my pages to make them easier to turn.
 

On the back of the map paper, I added a stamp that has the definition of travel.
The next page is another half sheet of cardstock with a bit of pattern paper.
I added a ticket folded over the edge. You'll notice that I use tickets quite a bit.


In between the next two pages, I added this tiny pink card that says, "Remember."
It just gives a bit of space to add a story.


The next full page is a sheet of ledger paper turned sideways.
I added a stamp at the top that says, "Notes".
The embellishment is just a circle punch with a stamp on it.


The next page is another small one: it's an old postcard.
I can leave the photo that's printed on it or just cover it with my own photo.


I thought the backside of the postcard would be a cool place to add journaling.
The next page is another piece of cardstock with a strip from an old map.


To give this cardstock a bit of a different look, I used a scalloped border punch
 along the outside edge.


Here's another piece of ledger paper.
I figure this will leave lots of room for journaling or can be covered with photos.


What mini album would be complete without a paint chip?
The embellishment is part of a map punched out with a circle punch.


I covered the back of the paint chip with pattern paper.
The next page is taken from a French travel guide. I adhered it to a piece of cardstock.
I added a ticket at the bottom corner with a clip at the top to add mementos.


The last page has a notebook page border compliments of another punch.


The final page is half of a manilla envelope added to hold mementos from our trip.


I also added an envelope on the inside of the back cover which could hold mementos or a photo cd.


Here's the back cover. (I just love this travel themed paper.)

The beauty of binding this book with office rings is that extra pages/pamphlets/other memorabilia
 can be hole punched and added right into the book.

Stop back by on the next Mini Album Monday to see this book full of photos and memories!
Thanks for stopping by and God bless.
Giving thanks always for all things to God the Father
in the name of our Lord Jesus Christ.
Eph. 5:20