Friday, November 30, 2012

A Little Paradise At Christmas

     Recently my brother took a trip to Florida and he brought back sand and lots of seashells. Normally, I'm not a beach-y decor kind of gal, but I wanted to do something to do with them.
 After browsing through ideas on Pinterest, this idea was born. . .

 
beach balls!

 
I found the glass Christmas balls at the thrift store the other day.
 
 
If you'd like a little bit of paradise on your Christmas tree this year, all you need to make these are
clear Christmas balls
sand
tiny seashells
funnel
 
Remove the caps from the ornament. Use a funnel to fill the balls almost halfway full of sand. Drop tiny seashells onto the sand. Put the caps back on and add ornament hangers. That's it!
 
     A set of these would make a nice Christmas gift- especially for that special someone who loves the beach!
 
     Thanks for stopping by and God bless.
 
If any of you lacks wisdom, let him ask of God, who gives
to all liberally and without reproach, and it will be given to him.
James 1:5


Thursday, November 29, 2012

Thrifty Thursday #44

     Earlier this week, I took a few minutes of "me time" (which I seem to need now more that we homeschool!) and headed to the thrift stores. This is the second week in a row that I had a project in mind and found what I needed- how great is that?!


One project I am planning will need lots of Christmas balls. I had intended to pick some up at the dollar store, but found all these for $2.25 which is half what I would've paid at the dollar store.

 
Found this brand new pack of gift tags from Ikea- never been opened- for fifty cents. They had six packages- if I was still teaching scrapbooking classes, I would have picked them all up. Instead I got just this one pack.
I bet it costs more than fifty cents at Ikea!:)

 
This brand new pack of light clips was only fifty cents. I'm hoping my hubby will hang lights outside this year- can't do it for cheaper than this!

 
I have been needing a cute white scarf. I think I will use this to make a t-shirt scarf like this.

 
This book was printed in the fifties. Got it for a quarter. . .

 
and look at the graphics. They just don't make them like this anymore!

 
Got this one because I can't pass up an old textbook- especially when it's only a quarter!

 
This roll of curling ribbon was a nickel- just in time for the gift wrapping season.

 
I have another project that I want to try that needs clear ornaments. Voila!
(You can see the project here.)

 
This old atlas was a dime. I like to keep old maps on hand for projects.

     Good luck with your secondhand shopping this week! Thanks for stopping by and God bless.


So then, my beloved brethren, let every man be
swift to hear, slow to speak, slow to wrath
James 1:19
 
 
     This post is linked to My Repurposed Life, Apron Thrift Girl,  and Be Different Act Normal.

Wednesday, November 28, 2012

Layout of the Week #35- Using Journaling Stamps

     I don't know about any of you, but I cannot resist a cute set of stamps. I have a basket full of them on a shelf. Many of them are journaling stamps. I always think that a cute journaling stamp may help me come up with something to say on my layout (hasn't yet, but I'm still hoping!).
     If you have a set, get it out and give this layout a try.


You can create a layout similar to this using your own pattern paper and embellishments. Just follow these easy steps.


To create this layout, you'll need:
one piece of cardstock for the background
one piece of pattern paper measuring 5" x 12"
one strip of pattern paper measuring 1/2" x 12"
journaling stamp(s)
ink
letter stickers for the title
pen
trimmer
adhesive


First place the paper measuring 5" x 12" along the bottom edge of the cardstock.


Next place the strip measuring 1/2" x 12" along the top of the pattern paper.


Now place 2-3 photos in a column about 1" from the left edge of the cardstock.


Use your journaling stamp to stamp along the right edge of the photos. You can use the same stamp for this or alternate with 2 or 3 different ones.


Now add your title at the bottom right corner.

 
Add your journaling on the stamped lines. Feel free to add a few embellishments.
Ta-da! We're done!

 
Here is another example where I used circular journaling stamps around the paper which I then highlighted with some paint. I also used a square and rectangle stamp in the lower right corner for more journaling.


     For my Layout of the Week series, I try to come up with simple layouts using directions that are easy to follow. I usually post a tutorial every Wednesday. If you have gotten into a scrapbooking slump or simply just fallen behind, try my tutorial. You could complete one page a week!

     Thanks for stopping by and God bless.

Casting all your care upon Him, for He cares for you.
1 Peter 5:7
This post is linked to Happy Hour Projects, Todays Creative Blog, Craft-O-Maniac,  and 52 Mantles.

Tuesday, November 27, 2012

Recipe of the Week #45- Million Dollar Spaghetti


Million Dollar Spaghetti
1 lb. of ground beef
1 can of spaghetti sauce
8 oz of cream cheese
1/4 cup of sour cream
1/2 lb. of cottage cheese
whole stick of butter
8 oz. spaghetti noodles
bag of sharp chedder cheese

     Preheat oven to 350. Cook noodles according to the instructions on the bag. While you brown the beef, mix cream cheese, cottage cheese, and sour cream- mix these well. Drain beef, then add the spaghetti sauce.
     Place a few pats of butter on the bottom of a 9"x13" baking dish. Add half the noodles and spread across the pan. Pour the creamy white mixture on top of the noodles. Then add the rest of the noodles and place a few pats of butter on top of the noodles. Now pour the red sauce with meat on top and spread over the noodles. Bake for 30 minutes. Remove the pan, cover with cheddar cheese, then bake for another 10-15 minutes.
    
     Note: I used a regular size jar (24 oz) of Prego instead of a can.

     My family loved this recipe- my hubby said it was the best spaghetti he'd ever eaten! The creamy layer adds a lot!

     I got this recipe from here.

     Thanks for stopping by and God bless.


Do not be overcome with evil, but overcome evil with good.
Romans 12:21
 
 
This post is linked to Craft-O-Maniac and Skip to My Lou.

Monday, November 26, 2012

Earrings Turned Necklace and Ring

     I have had this pair of heart earrings with a quote inscribed on them for awhile, but never worn them. I'm pretty much a silver hoops kind of girl. I hated that these were just sitting because they're really cute. So one day while digging through my jewelry box, I thought, how about if I turn them into a necklace and ring set?

 
This is how they turned out.

 
This is what I started with.
I clipped off the earring hoops and sanded the back where they were attached.

 
For the necklace, I glued on a bale (which is a flat piece that attaches to the back of the charm and has a loop to connect it to a necklace) with some E-6000 glue. I let it sit for 24 hours before I placed it on a necklace.

 
For the ring, I simply glued the charm to a ring back.
So very simple- and cheap!
Cute necklaces like this are all over the web and usually cost a pretty penny. Now I have a ring and a necklace for the price of one pair of earrings!
 
This would be a great gift idea for Christmas. You could buy one pair of earrings and have two gifts! You could make two necklaces or two rings or a necklace and a ring. . .
I, personally, would love to receive something like this as a gift.:)
 
Thanks for stopping by and God bless. 


Do not forget to entertain strangers, for by so
doing some have unwittingly entertained angels.
Hebrews 13:2


This post is linked to Brassy Apple , Between Naps on the Porch, Five Days Five Ways and Making the World Cuter.

Friday, November 23, 2012

Framed Monogram

     Sometime ago I covered a paper mache letter with an old Colorado map. You can see it here. I intended to give it to a friend as a gift, but I felt it was missing something. So I took an old black frame, roughed it up with some sandpaper, and removed the glass. Then I used spray adhesive to attach burlap to the back of the frame (the part that is usually covered by a photo). Using spray adhesive again, I placed the map letter right in the center.

 
     For the ribbon, I made two holes in the back of the frame before adhering the burlap. I ran the ribbon through the holes, then tied it at the top.
 
     Quick and easy- and it somehow looks more complete this way, I think.
 
     Thanks for stopping by and God bless. 


Now faith is the substance of things hoped for,
the evidence of things not seen.
Hebrews 11:1

     This post is linked to The CSI ProjectHappy Hour Projects, WTFab, Funky Junk Saturday, and Embracing Change

Thursday, November 22, 2012

Gobble, Gobble

    From our house to yours, we you all have a happy and blessed Thanksgiving!


Every good gift and every perfect gift is from above
James 1:17

Wednesday, November 21, 2012

Layout of the Week #34- Cutting Photos into Circles

     Back when I first started scrapbooking, cutting photos into shapes was a big thing. There were all sorts of templates you could buy to help. Then shaped photos became a big no-no. Recently though, a photo cut tastefully into a circle has come back in vogue. That's what we'll be doing on our layouts this week.

 
You can create a layout similar to this using your own pattern paper and embellishments. Just follow these easy steps.


To create this layout, you'll need:
one 12"x12" piece of pattern paper
one piece of coordinating pattern paper trimmed to 5 3/4" x 8 1/4" (I used a page out of an old hymnal)
one piece of pattern paper measuring 6" x 1 1/2"
six 1" circles cut from paper that coordinates with your background
one 6" doily (got mine in a pack of 25 at the dollar store)
something to cut your photo into a circle (I used a Coluzzle; you could just trace around a saucer or Tupperware lid)
letter stickers for the title
paper for journaling
paper trimmer
optional: buttons


First adhere the pattern paper measuring 5 3/4 " x 8 1/4 " about 1" from the left side and 1" from the bottom of the background. Don't place adhesive on the left edge of this paper as we'll be sliding something underneath it in the next step.

 
See- the left side isn't glued down.
 
 
Now take your six 1" circles and place them halfway under your pattern paper. I started at either end and worked my way to the center. You may need to overlap them a little bit.

 
Once you adhere all the circles, you can place some adhesive on the back of the pattern paper to adhere the left side of the pattern paper.

 
Now adhere your doily overlapping your pattern paper.

 
Trim your photo into a circle and place it in the center of the doily. The doily acts as a frame.

 
Now take your strip of pattern paper measuring 6" x 1 1/2" and trim a notch off of each side.  Then cut it in half.
Line each half up so they are pointing notch side out from either side of the photo.

 
Print or write your journaling on a 2 1/2"  strip of cardstock and adhere it to the right side of the paper. I cut my journaling into boxes and alternated them.
Place your title across the bottom of the photo.
 
Optional: I used a label maker to print out a few words which I placed in the bottom right corner of the background and the top left corner of the smaller piece of pattern paper.


Here's where the optional buttons come in- see where I placed them? Right on either side of the photo.
That's it: we're done! Quick and easy, right?
 

     Thanks for stopping by and God bless.


Blessed is every one who fears the Lord, who walks in His ways.
Psalm 128:1
This post is linked to I Heart Naptime.

Tuesday, November 20, 2012

Recipe of the Week #44- Rolo Cake Mix Bars


Rolo Cake Mix Bars
1 box yellow, vanilla, or white cake mix, dry
5 oz evaporated milk
1/4 cup melted butter
40 Rolo candies, unwrapped and cut in half

Preheat oven to 350 and grease a 9"x13" pan. Using a mixer, beat cake mix, evaporated mik, and butter until combined. Mixture will be thick and sticky.
Divide batter in half and press into the bottom of the pan. Bake until just set, about 8-9 minutes.
Remove from oven and place Rolo candies carmel-side down on top. Drop remaining batter in teaspoon size amounts on top of Rolos.
Bake for 20-24 minutes until top begins to golden.
Cool completely before cutting into squares.

I saw this recipe and thought, I like cake- and I like Rolos. This outta be great! I was right. It is! My hubby and the boys loved it!

I found this recipe at cookiesandcups.com.

Thanks for stopping by and God bless.

Heaven and earth shall pass away,
but My Words shall not pass away.
Mat. 24:35
This post is linked to Be Different Act Normal and Todays Creative Blog.

Monday, November 19, 2012

Thanksgiving Centerpieces

     Over the weekend I had the opportunity to help decorate for the Thanksgiving dinner at our church. When I was asked to help, I was at a loss. Now, if you've read my blog for any length of time, you know that I am not a fancy girl. I live with 3 males- we just don't do centerpieces at my house.  I can fumble my way around playing with scrapbooking paper, but table centerpieces?
     Luckily, my good friend was in charge and she was full of ideas. I just followed her directions. We did seven different tablescapes and each one was as cute as the next. Take a look. . .

 
This is a Crepe Myrtle branch with five holes drilled out for tea light candles.

 
These floral arrangements were placed in two large Ball jars. The four small jars on either side are full of rice with tea light candles peeking out of the rims.

 
I love the look of the pecans in the water. The raffia was the finishing touch!

 
My friend got a slew of pumpkins for free from a local garden center that was getting rid of them after Halloween. The pumpkins finished off our harvest arrangements perfectly.
 
 
The candlestick holders are made of acorns. We had quite a few of them (they were made by the kids in Children's Church). You'll see them in other arrangements as well.

 
Here we have three cakestands filled with acorns. They each have tealight candles in them. (We later went back and replaced the acorns with a mixture of dried split peas and blackeyed peas for more color contrast.)
I don't know if you noticed, but all the table runners are made from burlap with tea-stained lace on the ends. Absolutely beautiful!

 
Each tealight has a little bit of trim wrapped around the outer edge-so easy.
Each cakestand was made by gluing a candlestick to a plate. You can see a tutorial on how to do that here.

 
This is a platter with acorns, pumpkins, and a couple of acorn candlesticks. One pumpkin is placed up on a small pillar.

 
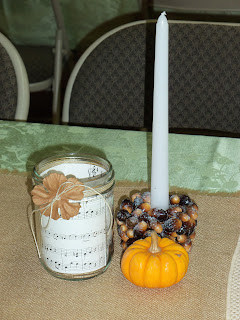
Here we have three Mason jars with battery operated tealights and two acorn candlesticks.

 
Here's a close up view.
To make the decorative Mason jar, just trim sheet music to fit inside the jar. Then wrap the mouth with ribbon or twine and a flower. Because the sheet music is inside the jar, you will need to use a battery operated tealight candle.
To make the acorn candlesticks, place acorns in an old plastic container, add enough Elmer's Glue to make them stick together, then place the candlestick in the center. This way it will dry with a hole for the candlestick. Super cute and super easy.

 
For this large jar with the three pillar candles, my friend layered different dried beans, coffee beans, and popcorn kernals. Once again, a very easy and very affordable decoration.

 
Finally, my friend made letter stencils with her Cricut and used them to paint on the burlap flags.
Super cute, huh?
 
So many different centerpieces that were not only cute, but affordable as well. That speaks to my creative and frugal sides!
 
I have to say, I learned quite a bit about putting together centerpieces. Now I may be able to bring a little fancy into my house:)
 
Thanks for stopping by and God bless.

And whatever you do, whether in word or deed, do it all in the name of the
Lord Jesus, giving thanks to God the Father through Him.
 Colossians 3:17

This post is linked to Brassy Apple, Craft-O-Maniac, Between Naps on the Porch, Skip to My Lou, and Making the World Cuter.