Thursday, April 30, 2015

Thrifty Thursday #164

I always think it's so crazy when I pop into the thrift stores
and actually find something that I was going there for.

I mean, what are the odds?

First things first, I got these darling teacups for a quarter apiece.
I simply cannot pass up old teacups when they are so pretty and so cheap!
Someday I'd like to learn to make candles in teacups.


I got this wire candle holder for $.75.
I don't plan to use it for a candle holder, though.
I'm going to flip it upside down and use it as a plate stand.

I'm helping to plan a graduation party and need different items to raise dessert dishes.
Imagine my surprise when I came across this---


and this plant stand which will become a plate stand.
I paid $1.50 for it.
It matches the first one.
Crazy, huh? 
That's some good thrifting mojo!


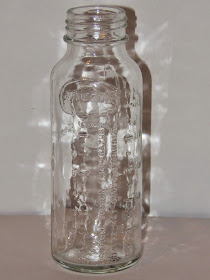
I also picked up this glass baby bottle for fifty cents.
Last weekend, I helped to set up for a baby shower.
We put daisies into glass baby bottles.
Take my word for it, it was cute!


I have always loved bangle bracelets.
I got this wooden one for a dollar.


You're probably looking at this thinking, ""What in the world?"
It's pom pom trim - a huge bag of it for $2.
I'm thinking it will work for the graduation party decor.

That's four items that I bought for party decor and three just for fun.
I'm so glad I stopped in to the thrift store when I did!

Thanks for stopping by and God bless.


Make me walk in the path of Your commandments, for I delight in it.
Psalm 119: 35

Wednesday, April 29, 2015

Layout of the Week #108

Every time I do a Layout of the Week, I tell you that it's going to be quick and easy.
Well, this week's layout takes the cake on that!
Because we'll utilize white space to balance out photos, we won't have much to do.
I like keeping things simple:)


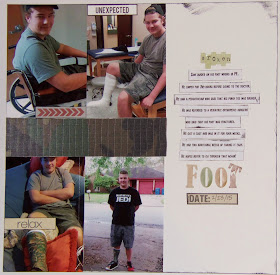
Here's the layout we'll be creating.


Here's what you'll need to make it:
one piece of 12"x 12" cardstock
one piece of pattern paper measuring 2"x 7"
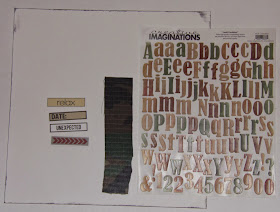
letter stickers for the title
3-4 embellishments in your theme (I used word stickers)
4 vertical photos measuring 3 1/2" x 5"
adhesive
paper trimmer

There's no need to go out and buy new supplies to make this layout.
Just use what you have on hand.
It's a great way to use up what you've got!


Place your photos on the left side of the page leaving a 2" space in between them.


Place your 2"x 7" piece of pattern paper in the space between your photos. 

I wanted to use camouflage paper to match my son's cast, but I didn't have any.
Instead, I cut a strip of camo fabric out of an old pair of shorts.


Place your title on the right side.

I spread out my two words so I would have room to place my journaling.


For your journaling, you can either write in between your title
or print it out from the computer.

I printed mine, then cut it into strips and inked the edges before adhering them.


Now place your embellishments overlapping your photos.
I placed one at the top of the upper left photo,
one at the bottom of the upper right photo,
one in the middle of the lower left photo,
and one right under the bottom word in the title.

My layout is about my son breaking his foot, so in the title, I took the last letter of the title and cut it off at a zigzag then placed it like it was broken off from the rest of the letter.

That's it.
Simple, simple, simple.

Hope you enjoyed it.

Thanks so much for stopping by and God bless.

And I will delight myself in Your commandments, which I love.
Psalm 119:47

Tuesday, April 28, 2015

Recipe of the Week #167- Banana Bread

Banana Bread
1 yellow cake mix (without pudding)
1 3/4 oz box instant banana pudding
1 cup water
1/4 cup veggie oil
4 eggs
3 ripe bananas, mashed
1 tsp vanilla

Beat eggs until pale and thick. Add cake mix, pudding mix, oil and water. Mix well. Fold in mashed bananas. Pour into 2 loaf pans. Bake at 350 for 45 minutes.

I actually was able to make three loaves from this mix. It's a tasty and moist bread. Banana bread doesn't last long around this house!

Thanks for stopping by and God bless.

Set your minds on things above,
 not on things on the earth.
Col. 3:2


This post is linked to It's Overflowing, Skip to My Lou, and What's On the List?

Monday, April 27, 2015

Personalized Burlap Banner DIY

I recently got the opportunity to make a burlap banner for a baby shower.


The baby's name is Hedessah.
Obviously we couldn't find a pre-made banner for her:)


I used this photo as inspiration to make my banner.


I started by making a triangle template.
I took a square 6"x 6" piece cardstock and made a fold  right in the center at one end.
Then I cut from that mark to the opposite two corners creating a triangle.
Once I had this, I used it to draw triangles with a Sharpie marker on a large piece of burlap.
I cut just inside the lines.


I made a total of 10 triangles- one for each letter of the name and two for hearts.
Then I used foam stamps and acrylic paint to paint the letters and hearts.


Once the paint dried, I used my glue gun to attach the burlap triangles to a long strand of twine.
I left a little bit of space in between each triangle.
 I added 3-4 fabric strips in between each triangle.


It turned out better than I thought it would.
As a matter of fact, I am thinking of making another one for a graduation party that
I'm helping to prepare for!

If you like this look, but would rather skip the step of cutting out your own pennants,
you can actually buy pre-cut burlap triangles at Hobby Lobby.
 Then all you have to do is stamp the letters and glue the pieces to twine.

Thanks for stopping by and God bless.

Now may the Lord of peace Himself give you peace always in every way. 
The Lord be with you all.
1 Thes. 3:16

This post is linked to Plucky's Second Thought, Tip Junkie, and Between Naps on the Porch.

Friday, April 24, 2015

A Peek At My "Old" Furniture

Every Thursday, I show you what I've found while secondhand shopping.
I often repurpose these items.
Some of my favorite projects are furniture pieces.
I have several pieces of furniture in my house that actually started off as "trash."


The couch in my living room was made from three old doors (that I got for free).
Isn't this sofa cool?
My hubby and boys made it for me. They're the best.

Sitting in front of that couch is this coffee table. . . 


which is a chalkboard trunk!
I got the trunk at the thrift store for less than $5.


Also in the living room is this cute little end table made from an old Texas Instruments wooden case.
(I got the case at a resale shop and the rocker at an estate sale.) 


This sweet turquoise bench sits in my front entry.
I bought it for around five dollars at a yard sale and painted it.


This lovely lady sits in my kitchen.
It's a an old pew that I got for free, then recovered.

 I love these old pieces. They have such charm- and they certainly are unique!
My teenage boys, on the other hand, are not fond of my "old" stuff and often give me a hard time about my taste in decor.

What about you? Do you prefer old or new?

Thanks for stopping by and God bless.

Now may the Lord direct your hearts into the love of God
 and into the patience of Christ.
2 Thes. 3:5


Thursday, April 23, 2015

Thrifty Thursday #163

Today's find was actually given to me as a "thank you for helping" gift.
Since it's old and beautiful and didn't cost me anything, I thought it would fit with Thrifty Thursday.


It's a beautiful old pitcher.
 I just love the color.

I went over to my friend's house to help her tidy up. Before I left she handed me this. She said it belonged to her mom. I refused, but she insisted. So I now have this beautiful heirloom.

Definitely worth the time it took to help her clean.

Thanks for stopping by and God bless.

Give me understanding, and I shall keep Your law; 
Indeed, I shall observe it with my whole heart.
Psalm 119:34


Wednesday, April 22, 2015

Lovelies That I Love

As a frequent thrift store and curb shopper, I love the hunt of great finds.
Along with that, comes the fun of figuring out what to do with those things.
I thought I'd show you a few items that are useful for distressing and repurposing . . .


This magazine will blow your mind- they have the best upcycled projects!
After reading it, you'll be so inspired that you'll have to head to the nearest resale shop or yard sale - I'm not kidding!


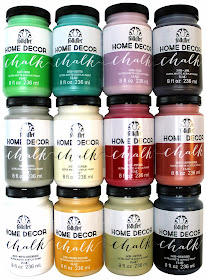
 Chalk paint gives pieces such a pretty finish.
It is easy to layer and distress and can be used on many types of surfaces.


After painting furniture, especially with chalk paint, you'll want some to use some furniture wax.
It's a protectant sealer.


When you re-do furniture, you need a good supply of sandpaper and a great palm sander.  
I've found that this Precision File Set is awesome for getting in tight spaces.


This kit has all sorts of stuff for distressing all in one place.
If you're just wanting to get the feel of different products before committing to buying a whole lot of them, this may be for you.

Well, are you itching to get to work?
Repurposing items isn't just fun, it's also a great way to honor Earth Day!
(I didn't plan for this post to coincide with Earth Day; it was just a happy accident!)

Thanks for stopping by and God bless.


But as for you, brethren, 
do not grow weary in doing good.
2 Thes. 3:13

This post is linked to Too Much Time on My Hands, I Heart NaptimePlucky's Second Thought.

Tuesday, April 21, 2015

Recipe of the Week #166- Crock Pot Cheesy Chicken Enchilada Chili

Crock Pot Cheesy Chicken Enchilada Chili
20 oz chicken breasts or thighs cut into 1" pieces
1 can corn, drained and rinsed
1 can black beans, drained and rinsed
1 can enchilada sauce
2 Tbsp taco seasoning mix
2 cups Colby-Monterrey Jack cheese
Chopped green onions and sour cream, if desired
tortilla chips

Spray Crock Pot with cooking spray. In Crock Pot, mix chicken, corn, beans, enchilada sauce , and taco seasoning mix. Cover and cook on low heat for 8 hours or high for four hours.

Stir in one cup of cheese. When serving, top with green onions, sour cream, and remaining cheese. Serve with tortilla chips.

This is mmm-mmm good! My whole family liked it. It is such an easy dish and truly does taste like enchiladas.

Thanks for stopping by and God bless.

For His merciful kindness is great toward us, 
and the truth of the Lord endures forever. 
Psalm 117:2

This post is linked to Between Naps on the Porch, Ivy and Elephants, and My Girlish Whims

Monday, April 20, 2015

Mini Album Monday #52- Coin Envelope Album

Today's featured mini album is a unique one.
It's very tiny and has no photos!

I used coin envelopes for the pages.


For the title, I painted a large 2 with a foam stamp.
Then I added a narrow strip of pattern paper,
a small flower, and a word strip that says just.
This makes the title, "Just 2."


I used a total of 12 coin envelopes that measure 2 1/4"x 3 1/2".
I took a piece of pattern paper measuring 3 1/2" x 5 3/4" and scored every 1/4" to make 
an accordion fold. Then I attached each envelope to a fold.
I wrapped a piece of ribbon along the binding and attached it to the inside of the covers.
It ties at the edge to keep the book closed.


In the first and back envelopes- the covers- I placed a small piece of chipboard to make them sturdy.
Then I sealed them closed.
For the rest of the envelopes, I cut off the flap and used a small circle punch to make a tab 
which makes it easier to pull out the cards.
In each of the inside envelopes, I placed a piece of white cardstock measuring 2 1/8"x 3 1/2".


On each of the interior envelopes, I placed a journaling prompt.
The cards on the inside are for the answers.


Each of the prompts asks for two things:

two everyday things I couldn't live without
two of my favorite songs
two things I worry about
two things I want to do before I die
two stores I shop at
two things that scare me
two snacks I could eat every day
two people I'd be lost without
two nicknames I've been given
next two places I want to go on vacation


I find journaling is easy to do with prompts.
I got the journaling prompt from this book.


 Each interior page has a narrow strip of pattern paper and a small flower.


I tried to keep it simple, but cute.


I think this kind of album is so easy to complete as it is very simple
and the journaling is do-able.
You can sit down in a couple of hours and complete it.

I think it's nice to document things about me for my kids to have someday.
I know I'd treasure a book like this about my mom or mom-in-law.

Thanks for stopping by and God bless.

Make me understand the way of Your precepts; 
so shall I meditate on Your wonderful works.
Psalm 119:27

Friday, April 17, 2015

Envelopes Made From Maps

Do you guys send out letters or cards anymore?
I 've made a goal to start sending out more cards to my loved ones.
I think it's lovely when I receive an actual card- they're just so special in this age of technology.

I thought that one way to make these cards even more special
would be to make cool envelopes for them.


I decided to use pages out of an old atlas to make some envelopes.


Here's how I made the envelope.
My card measures 5 1/2"x 8".
I set the card at an angle in the lower left corner of the page.


Next, I folded up the bottom making sure it reached just above the center of the card.


Then I folded in the left side.
 I trimmed it so that the top edge of that flap lined up with the left corner of the card.
Then I did the same thing with the right side.


At that point, I trimmed the excess paper off to create my top flap.


It ended up about 13 1/4"' from the top point to the bottom point
and 15 1/2" from the left point to the right point.


 My envelope fits tightly around the card, but that isn't necessary.
As long as your card is covered, I think it's ok if it turns out slightly larger than the card.


I folded in the two sides and the bottom and used tape to hold them together.


Then I used a glue stick to close the top flap being careful not to get any where the flap
 may come into contact with the card. 


Because it's a busy print, I placed a label on the front for the address.


I'd be pretty excited to get a map envelope in the mail!
Don't you think these things would even put a smile on the face of a postal worker? 

Thanks for stopping by and God bless.

The grace of our Lord Jesus Christ be with you.
1 Thes. 5:28

This post is linked to The Crafted Sparrow, My Repurposed Life, Funky Junk, and I Heart Naptime.