Thursday, January 31, 2013

Thrifty Thursday #53

     This week, I stopped into a thrift store that I don't often go to. It's not for lack of trying on my part, because I stop by, it just isn't open very often. This day it happened to be open. The fellow running the store told me that due to poor management, the store is closing. No real surprise there, huh?
      He also told me that he was open to making deals. So when I saw this lovely frame, I asked how much he wanted for it. He said $5. In my mind, that wasn't making a deal. I set the frame down. I think he could tell by the look on my face that I never pay $5 for a frame- not even a big one and this one was an 8"x10". So he said that he'd throw in four books- with the frame for $5. I still wasn't on board. Then I thought about how this poor guy is just trying to sell what he can before he loses his lease. So I agreed.
     Good thing this frame is beautiful!!
 
 
I love the woodwork on it. It will look fantastic spray painted a pretty color.
 
 
I had already picked up these two books which is why he made the offer that he did.
The book on the left was published in 1933. Honey Bunch- Her First Big Adventure. Isn't it cute? I think it may become a scrapbook.
The book on the right I picked up just because I like how it looked (and because I needed four books). It was published in 1905. I probably won't cut this guy up.
 
 
My final two book choices were these:
The Secretary's Handbook published in 1954 because you can never go wrong with an old handbook of any kind
and
Ferdinand which I got because I had never read it before. It's a really cute story. I'm going to read it to my boys even though they're going to think they're too old for it.
 
     I am actually going to miss this thrift store. Even though I didn't shop there much, when I did, I always found good stuff.
 
     Good luck to you and your thrifting adventures this week. Thanks for stopping by and God bless.

 
I will sing to the Lord, because
He has dealt bountifully with me.
Psalm 13:6
 
This post is linked to 52 Mantles, Apron Thrift Girl, and Junkin' Joe.
 

Wednesday, January 30, 2013

Layout of the Week #42- Using Junk Mail

     Last week I showed you how you could use an envelope that you received in the mail on your layout. This week we'll incorporate bits and pieces of junk mail. Usually, I just quickly sort through my mail, most of which ends up in my recycling pile. As I sift through it, it seems a waste that I don't even read most of it. Before trashing it this week, I actually went though it for this project.


Here's the layout we'll be creating.
When I plan the theme for layout of the week, I intend for you to be able to use products that you already have rather than having to go out and buy them. And who doesn't get junk mail?
 
 
To create this layout, you'll need:
one 12"x12" piece of pattern paper or cardstock for the background
letter stickers for the title
several pieces of junk mail
themed stickers for whatever you're scrapping (optional)
adhesive
paper trimmer
 
 
To begin, you need to cut between 36-38 1" squares from your junk mail (I ended up using 37 one inch squares). 
If you have a 1" square punch, that will work great. If not, you'll have to use your paper trimmer which is what I did. This is a good step to do while watching TV. I cut mine out while the kids did silent work at school (we home school).
Ink the edges if you'd like.

 
Now lay them out in the shape of a heart slightly overlapping . It's best to lay them out before gluing to make sure you get the look you want. You can lightly draw a heart on the background in pencil if that makes it easier. It doesn't have to be perfect though. Mine isn't. :)
Once you get them the way you want them, glue them down.
The junk mail gives it a very eclectic look. I trimmed all sorts of things-if you look, you'll see the ATandT logo, a hamburger, a street map, the inside of a privacy envelope, and even a couple "No Postage Needed If Mailed In The United States."

 
Now place your photo or photos on the right side of the heart. Mine are lined up with the center of the heart. I trimmed two 4"x6" photos. You could do that, too, or use a vertical 4"x6" or 5"x7" photo.

 
Place the title to the left of the photos about midway down the background inside the heart.
I used larger script letters and small tile stickers which I though mimicked the tiles of junk mail.

 
Add your journaling below the title. I wrote right on the background paper.
Optional: Then place a couple of your themed stickers. I put three word stickers at the bottom left corner and one tag sticker overlapping the photos.
 
And now we're done! Hope you like it! It's a little something different, I think.
 
    For my Layout of the Week series, I try to come up with simple layouts using directions that are easy to follow. I usually post a tutorial every Wednesday. If you have gotten into a scrapbooking slump or simply just fallen behind, try my tutorial. You could complete one page a week!

     Thanks for stopping by and God bless.

I meditate on your precepts and consider your ways.
I delight in your decrees; I will not neglect your word.
Psalm 119:15-16

    
This post is linked to Shabby Creek Cottage and Embracing Change.

Tuesday, January 29, 2013

Recipe of the Week #52- Pizza Stuffed Shells


Pizza Stuffed Shells

1 lb beef
garlic salt
1 jar pizza sauce
1 (8 oz) pkg cream cheese
12 large pasta shells
2 cups mozzarella cheese

Brown beef. Sprinkle with garlic salt. Drain grease. Add about 1/2 -3/4 cup pizza sauce. Add cream cheese. Cover and simmer until cheese is melted.
Set aside and allow to fully cool.
While beef is cooking, cook pasta shells.
Pour enough pizza sauce to cover bottom of 9"x13" dish. Stuff each shell with meat mixture. Place shells in baking dish and cover the tops of shells with the rest of the pizza sauce.
Cover and bake at 350 for 30 minutes. Uncover, sprinkle cheese on top. Bake another 10 minutes.

This is a modified version of the taco stuffed shells I made here. I thought, if taco meat tastes good in these shells, pizza meat would be awesome! And it is! I usually stick to a recipe and make few if any alterations. This is one time when I went off the beaten track and discovered something great:)

Thanks for stopping by and God bless.

It is better to put trust in the Lord
than to put confidence in man.
Psalm 118:8
 
 
This post is linked to Today's Creative Blog and Tip Junkie.

Monday, January 28, 2013

This Bracelet Rules!

     I am a magnet for unique pieces of jewelry. I love scrolling through Pinterest to find unusual pieces. It's unbelievable some of the things that ladies use to turn into jewelry- silverware, thimbles, tiny glass vials. . .

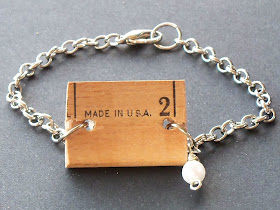
     Today I'm showing you a bracelet that I made using an old wooden ruler.

 
I sawed off a little more than 1".


Then I used my Cropadile II to punch holes centered on either side. I used jump rings to attach a chain. At the back of the chain I attached a fastener. The finishing touch was the dangly pearl which you can see how to do here. The hardest part of this piece was sawing the ruler. (After I was done, my hubby said he would've done it for me.) Other than that, it's a very simple piece to make.


     If you like this, you may like the ruler necklace I made here. I think this would make a unique teacher gift. My neighbor is a teacher and I made her both a ruler necklace and bracelet as a birthday gift.

     Thanks for stopping by and God bless.

Trust in the Lord with all your heart,
and lean not on your own understanding;
in all your ways acknowledge Him,
and He shall direct your paths.
Proverbs 3:5-6

This post is linked to Brassy Apple, Funky Junk, Sassy Little Lady, My Girlish WhimsCraft-O-Maniac, Skip to My Lou, Making the World Cuter, Tater Tots and Jello,  and Between Naps on the Porch.


Friday, January 25, 2013

On My Craft Table Now

     Today I'm showing you a project that I've been working on - actually off and on for awhile now. It's a baby girl themed scrapbook. I started this several months ago, then I unintentionally set it aside. Just this week I brought it out again and pretty much finished it up. Here's how it turned out. . .


I used an old book for the cover. This was a Reader's Digest book that I got for a dime. Kinda cute and girly, huh?
For the title, I used a fabric rosette, a shipping tag, letter stickers, and a pair of brackets.
Here are the interior pages. It was nice to work with girly pink papers and embellishments- I don't get to do that often!
Brace yourselves- this post is very photo heavy. If you don't want to see every page in this mini album, feel free to scroll to the bottom of the post. :)

On the right is one of two envelopes that I added so there's room for mementos.


The page on the right is out of an old parenting book.


Almost all the embellishments are attached with staples on the edge of the page so photos can be slipped underneath them.


I tried to add lots of places for journaling.


The page on the right is from an old storybook.


Can you ever go wrong with wood grain paper?


This is a vintage Bingo card. (One of my favorite things!)


The page on the right is from an old child development book. Love the graphics!


The tag on the top of the right page came out of a pack of new scrapbook embellishments that I got at a thrift store!


The page on the right is from an old reading textbook.


The page on the right is actually an envelope that I covered with a vintage pattern.


Just open the flap and you'll find lots of space to tuck do dads.


Here's the back cover. I used a strip of a reproduction Sears ad for dolls on the inside of both the covers. Back here I placed a vellum envelope.

     All the old books, ledger paper, Bingo card, vintage pattern, and one pack of embelllishments, I got at either a thrift store or yard sale. If you are a fellow scrapbooker, don't turn your nose up at secondhand shopping. . . look at the kinds of things you can find to incorporate into your projects!

     I've given these type of scrapbooks as gifts before. I love making them. I just hope that it's easy enough for the recipient to use. My intentions are that all she has to do is add photos and bits of journaling. I always bind these books with office rings so that extra memorabilia can be added or pages can be rearranged.

     What do you think? Would you be excited about this as a gift or would you feel overwhelmed? Please leave me a comment- I'd really like to know your thoughts.

     Thanks for stopping by and God bless.

I will praise You, O Lord, with my whole heart;
I will tell of all Your marvelous works.
Psalm 9:1


This post is linked to Funky Junk, I Heart Naptime, Happy Hour Projects, Shabby Creek Cottage, My Girlish Whims, and Too Much Time on My Hands.

Thursday, January 24, 2013

Thrifty Thursday #52

     It's one of my favorite days of the week- Thursday. . . wanna see my haul this week?

 
I saw this half full box of envelopes for $1 and stopped dead in my tracks. I love envelopes- does that make me sound weird?
I could go on a shopping spree at an office supply store and fill a cart- and I don't even work in an office!
Honestly, though, I would love to go into an office supply store with the challenge of creating a scrapbook. I would be on Cloud Nine. Anybody know of a challenge like this? :)

 
Got this brand new pack of six styrofoam balls for fifty cents. I don't have a use for them right now, but give me a little time. I'll come up with something. In the meantime, I'll put them in one of my craft supply drawers and they won't even take up much room.

 
Got this more than half full spool of tulle for a dollar. Who can't use tulle? It works great in craft projects and even looks beautiful wrapped around a gift.

 
Found this old Fiesta Ware saucer for a quarter. Love that shade of green!
My mother-in-law used to collect Fiesta Ware, so I'll think of her when I use it.

 
It's hard to tell in this picture, but this set of three saucers and a small bowl is adorable! It was only a dollar for all four pieces! If you've stopped by on Thrifty Thursday before, you're probably thinking that I have more than enough tiny China plates. And you're right- I do. So I have now started a collection for one of my good friends. I so love to have a reason to buy cute plates!
 
Good luck to you and your thrifty adventures this week. Thanks for stopping by and God bless.
 
But I have trusted in Your mercy;
my heart shall rejoice in Your salvation.
Psalm 13:5
 
This post is linked to My Repurposed Life


Wednesday, January 23, 2013

Layout of the Week #41- Using Mail on Your Layout

     Hi All! I'm here (late tonight) with my weekly installment of the Layout of the Week where we're going to use an envelope that came in the mail- right on our layouts.

 
Here's the layout we'll be creating.
 
 
To make this layout, you'll need:
one piece of 12"x12" pattern paper
two pieces of coordinating pattern paper
envelope from the mail (any size)
sticker sheet with whatever theme you'll be scrapping
any extra embellishments you'd like to add (I added two tickets)
paper trimmer
 adhesive

 
First, take a strip of your scrap pattern paper measuring 1" x 12" and adhere it to the bottom of the background pattern paper.

 
Then, cut the other pattern paper to the same length as your envelope and 2" wide. Adhere it to the inside flap of the envelope. Mine is wide enough to tuck into the envelope a little ways.
 
 
Then turn your envelope over and trim around the rounded corners.

 
Adhere the envelope at a diagonal in the upper left corner of the background paper.
See how the paper on the inside of the envelope gives it a boost of color- and cuteness?

 
Now add your photos. I made my top one straight, but skewed my other two. I placed them closer to the right hand side of the layout rather than centering them.

 
Now place your title right at the bottom of the photos along the edge of the bottom strip of pattern paper. You can use a pre-printed title like I did or just use letter stickers (like I usually do).

 
The envelope will provide you with room for mementos, extra journaling, or more photos.
I opted for photos and matted them on regular kraft cardstock.
The tabs were just two stickers off the sticker sheet I was using. If you don't have tab stickers, use a regular sticker and place it halfway off the mat which will make it look like a tab. Then rub a little baby powder to the sticky part on the back. The powder will undo the stickiness.

 
Place your do dads into the envelope. Add a little journaling to the outside of the envelope. I also added some ink to mine to tone down the stark whiteness.
Place an embellishment on the top two photos. I used part of a ticket and a sticker on the bottom outside corners of the top two photos.
That's it! We're done!
 
     Now run out to your mailbox, grab and envelope, and give this a try!:) I'm planning to have part two of this tutorial next week with ideas for using junk mail in scrapbooking.
 
     If you enjoyed this tutorial, please stop by every Wednesday for my Layout of the Week. Just imagine, if you follow along, you could complete one layout a week this whole year.
 
     Thanks for stopping by and God bless.
 
Freely you have received, freely give.
Matthew 10:8

This post is linked to Five Days Five Ways and 52 Mantles.


Tuesday, January 22, 2013

Recipe of the Week #51- Brownie Pudding Surprise


Brownie Pudding Surprise
3 cups cold milk
2 packages (4 serving) chocolate pudding
1 tub French Vanilla Cool Whip
1 pkg brownie mix- prepared according to instructions, cooled, and cut into 1"squares
1 pt raspberries (optional)
 
Mix milk and pudding until well blended. Stir in 1 cup Cool Whip. Reserve the rest of the Cool Whip for layering.
In a large serving bowl, cover the bottom with a layer of the 1" brownie squares.
Then cover with half the pudding mixture, half the raspberries, and half the Cool Whip.
Repeat the layers.
Refrigerate for 1 hour before serving. Enjoy!
 
Note: French Vanilla Cool Whip seems to be a seasonal item, so I have made this with regular Cool Whip and it's still tastes great. I usually omit the raspberries.
 
This is a favorite treat at our house. My thirteen year old has requested it for his birthday dessert for about eight years straight! I mean, how can you go wrong with brownies, chocolate pudding, and Cool Whip?!
 
Thanks for stopping by and God bless.
 
In the Lord I put my trust
Psalm 11:1


Monday, January 21, 2013

Snowflake Mobile

     My grandma loves to crochet. Whenever she comes to see us, she brings her yarn and crochet needles and make doilies while she visits. She has given all of her grandchildren a crocheted afghan. 
     Many years ago, she gave my parents a set of crocheted snowflakes, then my mom gave them to me to use as Christmas tree ornaments. This year while hanging them on my tree, I thought there had to be something more I could do with them.
     Hence, my snowflake mobile . . .


     In addition to my grandma's six snowflakes, I also used three tiny crocheted doilies that I got at a thrift store.
     First, I used fabric stiffener on all of them.
     Then, using ribbon, I tied them to a small metal embroidery hoop. Have you ever seen one of these before? I hadn't til a lady from church gave me a couple. How cool are they? I love the metal look, so I didn't even consider covering the hoop.
     To finish it off, I tied three lengths of tulle to the hoop, then tied them together at the top so the mobile can be hung.

 
     I think this will be pretty hanging throughout the winter- especially since we don't get real snow here!
     If you like the idea of using an embroidery hoop for a mobile, take a look here and here where I used them to display photos.

     Thanks for stopping by and God bless.

I will be glad and rejoice in You;
I will sing praise to Your name,
O Most High.
Psalm 9:2

This post is linked to Skip to My Lou, Making the World Cuter, Between Naps on the Porch, and Craft-O-Maniac.


Thursday, January 17, 2013

Thrifty Thursday #51

     Man, do I love going to yard sales and thrift stores. I remember going to yard sales with my Nana when I was little. She'd haggle over prices and be so pleased with her purchases. One time she actually talked a lady down from $.25 to $.10 for a sweater. I do believe I got my thrifty (cheap?) gene from her.
     If she were still around, I think she would get a kick out of this weekly adventure of mine.
     Here's what I got while I was out and about. . .

 
I found this dinner plate for $1. I loooovvveee the print on it!
A few weeks ago, I found a couple of saucers that had this print along the outside and they look like they may have come from the same set.
With the flower print on the inside, I just think this one is so beautiful!

 
Found another dinner plate for $1. I now have seven in my set.
Last summer I stayed at a bed and breakfast, and the owners served our meals on mismatched dinner plates. I thought it was so charming! As I sat there at their dining table, I decided that I needed a mismatched set of china of my own. So, if you come over to my house for dinner, take a look at your plate. Then look at your neighbor's plate. Then think to yourself how long it took me to find that many different dinner plates!

 
I found this wire basket for $2. I've been needing a smallish wire basket like this. Why, you ask? Well, to be honest, I picked up an old croquet set out of my neighbor's trash, and I needed a basket this size in which to place the balls. It looks cute, cute, cute, I tell you. I'll have to do a blog post and show you what I do with all this junk stuff that I buy.
 
 
I found this unopened pack of scrapbook embellishments. It is girl-y and I only have boys, but I'm working on a baby girl scrapbook for a friend and I thought these would work nicely for that project.
 
 
I'm glad you stopped by to see what kind of secondhand scores I picked up this week. Good luck with your thrifty outings this week. Thanks for stopping by and God bless.
 
For everyone who asks, receives,
and he who seeks finds,
and to him who knocks, it will be opened.
Matthew 7:8
 
 
This post is linked to Apron Thrift Girl and Shabby Creek Cottage