Tuesday, September 30, 2014

Recipe of the Week #138- White Chocolate Chip Lemon Cookies


White Chocolate Chip Lemon Cookies
2 sticks margarine, softened
2/3 cup brown sugar
1/2 cup sugar, plus extra for rolling dough balls through
1 egg
2 tsp lemon extract
2 1/4 cups flour
3/4 tsp soda
1/2 tsp salt
1 pkg white chocolate chips


Beat margarine and sugar until creamy. Add egg and lemon extract and beat until fluffy. Combine dry ingredients in a separate bowl. Then add to the wet mixture. Add in the white chocolate chips.
Roll into balls and roll through sugar. Place on cookie sheet. Bake for 10-11 minutes at 350.

These cookies are a favorite at my house! The extra bit of sugar on the outside really makes a difference.

Thanks so much for stopping by and God bless.

For I am not ashamed of the gospel of Christ
Romans 1:16
This post is linked to Skip to My Lou, It's Overflowing, and Natasha In Oz.

Monday, September 29, 2014

Mini Album Monday #39- 30 Days of Lists Album part 1

I've really enjoyed the 30 Days of Lists challenge.
Earlier this month I showed you the blank mini album that I put together for this project.
Today I'm going to show you the first fifteen days of the challenge.
 
 
The cover is a game card from a Poker Bingo game that I got at the thrift store.

 
The second page is a flash card- also purchased at the thrift store.
On some of the pages, I wrote right on the page itself. On other pages I used cute journaling cards.

 
This page is three shipping tags taped together with decorative tape.
I got the tags at an estate sale.

 
The third page is just a playing card- as you guessed, I bought it secondhand too.

 
I covered the back of the playing card with some pattern paper.
The next page is just a page out of a thrift store book with a little bit of pattern paper at the bottom.
Are you seeing a trend with me using items I've bought secondhand?

 
I used a Guest Check as the journaling card on the page to the left.
I didn't use the backs of all the pages- just some of them.

 
The page on the right is one of my favorites- it's a page from a baseball coach planner.
Got that planner at a yard sale.

 
The page on the right is some ledger paper.
The card stapled to it is from an old deck of playing cards.

 
On each list, I stamped which day of the challenge it was.

 
I used some letter stickers and stamps, but mostly used hand writitng to keep this project simple.

 
The journaling card on the right is part of a time card.

 
The journaling card on the left is a bridge score sheet- bought at an estate sale!
 
This is only half of my book. Come back the Monday after next and I'll show you the rest of it.
So much of this album is paper products that I bought secondhand. Pretty cool, huh?
Nothing like a little trash to treasure!
 
Thanks for stopping by and God bless.
 
Train up a child in the way he should go,
and when he is old he will not depart from it.
Proverbs 22:6


Friday, September 26, 2014

Junk Banner

Earlier this year, while on my annual girls' trip,
we drove through Brenham, TX which is full of antique stores.
We stopped at a couple, and at one of them, I bought these awesome old letters for a sign.
I happened to pick up the letters j, u, n, k.
Since I love junk, I thought making a banner would be fitting.

 
I backed the letters with some vintage looking scrapbook paper.
Then my hubby drilled some holes through the corners.
I tied them to a piece of twine using strips of muslin.
 
Pretty cool, huh? Especially draped over an old door:)
 
Thanks for stopping by and God bless.
 
Do not sorrow, for the joy of the Lord is your strength.
Neh. 8:10
 
 This post is linked to My Repurposed Life, Funky Junk, and My Salvaged Treasures.

Thursday, September 25, 2014

Thrifty Thursday #136

Wanna see my thrifty finds this week?
 
 
I fell in love with these glass baby bottles.
They were a quarter apiece.
I bought four in each size.
There were lots more that I could've gotten, but I wasn't for sure what to do with them,
so I figured a few would be fine until I do know what to use them for.

 
It's hard to see here, but there are measurements right in the glass.

 
I got these five records for a dime each.
Two are from the Sound of Music and one from Mary Poppins- two classic films!

 
I got this brand new box of 100 envelopes for a dollar.
I'll be making some scrapbooks with these!

 
My last purchase is this brand new package of transparency frames for a quarter.
Love them!
 
I'm really thinking that I need to start either an Etsy store or an Ebay store to sell some of my treasures. This would justify some of my purchases:)
 
Thanks for stopping by and God bless.
 
The rich and the poor have this in common,
the Lord is the maker of them all.
Proverbs 22:2
 
 This post is linked to Embracing Change, Junkin' Joe, and Too Much Time on My Hands.


Wednesday, September 24, 2014

Layout of the Week #95

I have to say that when it comes to scrapbooking, I am a random scrapbooker.
I don't scrap my photos in order.
There's really no rhyme or reason to my choices.
 I just grab whatever photos will fit on my layout.
 
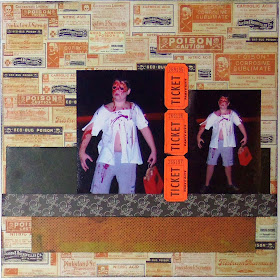
For today's Layout of the Week, I chose pictures from last year's Halloween.
See. Totally not chronological.
 
 
Here's the layout we'll be creating.
Yours will look slightly different as you'll be using your own products,
but the framework will be the same.

 
To make it, you'll need:
one piece of 12"x 12" pattern paper
one pattern paper strip measuring 1"x 12"
one pattern paper strip measuring 1 1/2"x 9 3/4"
one pattern paper strip measuring 3"x 11 1/2"
one pattern paper strip measuring 1"x 6" (I used three tickets for this one)
journaling card (I used a Bridge score card -a note card would work as well)
stickers in your theme
title sticker or letter stickers for your title
pen
adhesive
paper trimmer
two vertical photos
optional: two types of decorative tape
 
 
First, adhere the paper strip measuring 1 1/2"x 9 3/4"
about 1" from the bottom of the page.

 
Now adhere the piece of paper measuring 3"x 11 1/2"
just above the first piece.

 
Place the 1"x 12" strip of pattern paper along the top edge of the first piece you adhered.
It will overlap the second piece.

 
Place your first photo just above the middle strip of paper
about 1" from the right edge of the background paper.

 
Place your second photo along the edge of the middle pattern paper.
It should be about 3/4" to the right of the first photo.
 
Don't fully adhere the left edge of this photo.


Place your 1"x 6" strip of pattern paper vertically between the two photos.


Place your journaling card slightly behind the left photo.
 
Wait to write on it until you place the embellishments.
That way you won't end up covering up some of your writing.

 
Place 3-4 stickers at the lower left corner of the left photo.
Place one sticker at the upper right corner of the right photo.
 
I also placed word stickers along the corners of the top left corner
and bottom right corner of the background.

 
Place your title sticker along the bottom of the right photo.

 
Write on your journaling card.
optional: Place a strip of decorative tape along the bottom of the journaling card
and above the left photo.
 
We're done!
 
Stop by every other Wednesday for a new layout tutorial.
 
Thanks for stopping by and God bless.
 
Blessed be Your glorious name,
which is exalted above all blessing and praise!
Neh. 9:5


 This post is linked to Daisy Cottage Designs, Craft-O-Maniac, and Ivy and Elephants.


Tuesday, September 23, 2014

Recipe of the Week #137- Slow Cooker French Dip Sandwiches

Slow Cooker French Dip Sandwiches

1 3lb beef brisket
1 pkg (1 oz) onion soup mix
1 can beef broth
8 sandwich buns

Spray slow cooker with cooking spray. Place beef in cooker. In a small bowl, mix the soup mix and broth. Pour over beef.
Cook on low for 8-10 hours.
Skim fat from liquid. Remove beef and cut across the grain into thin slices or shred the beef.
Serve on sandwich buns with the broth for dipping.

This is the BEST French Dip sandwich I've ever had- even those I've eaten at restaurants!
It made for an easy and delicious meal. We'll be having this on a regular basis around here:)

Thanks for stopping by and God bless.

Among the gods there is none like You, O Lord;
nor are there any works like Your works.
Psalm 86:8

This post is linked to The Dedicated House, My Girlish Whims, and Between Naps on the Porch.

Monday, September 22, 2014

My Fall Wreath

Earlier this year, I made a very simple wreath for my front door.
The base was a grapevine wreath, then I added a few dollar store flowers and a chipboard letter.
I just love seeing it every time I come home.
 
Since today is the first official day of fall (although it's still nearly 90 degrees here),
I decided to make my wreath match the season.
 
 
Here it is.

 
Here's how it looked before I changed out the flowers.
 
I removed my brightly colored flowers which came with alligator clips attached.
Then I got my fall colored flowers and leaves and used my glue gun to attach them to alligator clips.
 
The alligator clips work great so that I can use the same wreath throughout the year.
 

I clipped the new flowers to the wreath and I was done.
Simple, really.
 
All the flowers came from the Dollar Tree.
The wreath came from Michaels (with a coupon).
The chipboard letter came from Hobby Lobby (with a coupon).
This project cost less than $12 for both the summer and fall versions!
I love an affordable project!
 
 
On that note, I'll say, "Happy fall, y'all!"
Thanks for stopping by and God bless.
 
I will sing of the mercies of the Lord forever;
with my mouth will I make known Your faithfulness to all generations.
Psalm 89:1
 
 This post is linked to It's Overflowing, Skip to My Lou, and Natasha In Oz.


Friday, September 19, 2014

5 Minute Ring DIY

Would you like to make a piece of jewelry in five minutes?
Well, follow me and you'll have a new ring before you know it. :)
 
 
Here's the ring I made.
Yours will look like whichever pendant you choose.

 
To make one you need a ring blank,
a necklace pendant,
and E-6000 glue.
 
Using wire cutters, cut the necklace loop off the pendant.
Then apply E600 glue to the ring blank and place it directly on the
center of the backside of the pendant.
Allow to dry for 24 hours.

 
Voila! A brand new ring!
 
Wouldn't these make great gifts?
 
Thanks so much for stopping by and God bless.
Have a great weekend!
 
 
He who follows righteousness and mercy
finds life, righteousness and honor.
Proverbs 21:21


Thursday, September 18, 2014

Thrifty Thursday #135

Happy Thursday, my thrifty friends!
Did you stop by to see what treasures I dug up during my weekly thrift store run?


I got this matching dinner and salad plate set for $1.25. The bright red color beckoned me.
I like to keep nice plates on hand for when I take a dessert to a friend- that way they don't have to return the plates to me. Somebody is going to love these! :)


One of the thrift stores in town relocated to a brand new building at the end of the summer. I don't go there as often as I used to go to their previous location which is strange because the
new one is much nicer.
Anyway, I did stop in and take a look around. 
I picked up these three books for fifty cents apiece.
They're now in a stack to be turned into junk journals (their covers and some interior pages will be made into scrapbooks like these)
I think the dictionary and thesaurus will make especially cute covers.


 This is the third incomplete set of small foam balls that I've gotten for a dime.
I now have enough to make a cute garland.


While out and about last Saturday morning, I stopped into one yard sale.
I got this 6" beautiful beige lace.
I think it may get turned into lacy boot socks.


I couldn't pass up this bag of random crocheted pieces- I especially love the flowers in front.
It was priced $1 and labeled as "Nana's work."

That's it for this week. Swing by every Thursday to see what I've found.
Happy treasure hunting to you all.

Thanks for stopping by and God bless.

Let my prayer come before You; incline Your ear to my cry.
 Psalm 88:2
 

Wednesday, September 17, 2014

Lovelies That I Love

This week's features are some of my favorites. . .
items that I love, items that I'd truly like to have.
 
I love anything made by Beth Quinn Designs.
Isn't this necklace fabulous?
This website has so many different beautiful choices- they'd make great gifts!


How beautiful is this ring by The Vintage Pearl?
I love that you can have your own message written on it.
You can find it here.
They have all types of jewelry- much of it customizable.


I know I've shared one of Selina Vaughn's grain sack purses before,
but a list of my favorites wouldn't be complete without including one of these:)
I think this one would be perfect for me because I grew up in Iowa- the tall corn state.
You can it here


I. Love. Clogs.
For real. 
I've wanted a pair for my whole adult life.
How darling are these clogs?
 
 
I also love vintage typewriters.
Twice I've had one of these within my grasp, but just didn't have the money at the time to buy them.
What a beauty.
Such a shame that I missed out.
 
What do you think? Are any of my favorites your favorites?
 
P.S. My hubby could actually use this post as my Christmas wish list. . . (hint, hint)
 
Thanks so much for stopping by and God bless.
 
He who pursues righteousness and love finds life, prosperity and honor.
Proverbs 21:21


Tuesday, September 16, 2014

Recipe of the Week #136- Soft Baked Reese's Pieces Butterscotch Cookies

Soft Baked Reese's Pieces Butterscotch Cookies
 1 1/2 sticks unsalted butter, melted
1/2 cup sugar
3/4 cup brown sugar
1 egg plus 1 egg yolk
2 tsp vanilla
1 tsp baking soda
1 1/2 tsp cornstarch
1/2 tsp salt
2 1/4 cups flour
3/4 cup butterscotch chips
1/2 cup Reese's Pieces

Mix the flour, baking soda, cornstarch, and salt. Set aside.

In a larger bowl, whisk the melted butter and sugars. Whisk in the egg, then the egg yolk. Whisk in the vanilla. Add the dry ingredients to the wet and stir. The dough will be soft, but thick. Fold in the butterscotch chips and the candy. Chill the dough for 2 hours.

Roll the dough into balls, about 3 tablespoons of dough each. The balls should be taller than they are wide to ensure that the cookies will bake up thick. Only place 6-8 balls on a cookie sheet. Bake the cookies for about 11-12 minutes. They will look soft and under baked- they should continue to bake on the cookie sheet. Allow to cool on the cookie sheet for 10 minutes.

These cookies were delicious. My hubby's favorite candy is Reece's Pieces, so I knew he'd love them. I love how thick and soft they were. These are a repeat recipe at my house!

Thanks for stopping by and God bless.

In the day of my trouble, I will call upon You, for You will answer me.
Psalm 86:7

This post is linked to Ivy and Elephants, Between Naps on the Porch, Glitter, Glue, and Paint,
 and Plucky's Second Thought.

Monday, September 15, 2014

Mini Album Monday #38- Pet Memorial Album

I think scrapbooking is so important . . . as I've said more than once before.
There are so many details that would be forgotten if I hadn't written them down somewhere.
Details like this...
 
Nearly six years ago, we got our first family dog- a yellow lab puppy.
We all fell in love with her right away.
We'd had her for two weeks when we went to my in-laws to celebrate Christmas.
An ornament got knocked off the tree and fell to the floor.
Every piece was picked up but one.
The puppy found it and swallowed it.
It still brings tears to my eyes to think about it.
 
 
I made this book shortly after that happened- and I'm so glad I did.
Now we'll always have this memory of our first family dog.
 
 
I trimmed a piece of kraft cardstock to 8 1/2" high and 9" wide.
Then I folded it in half.
My title says, "You left paw prints in our hearts."
 
 
I lined the inside of the cardstock with a doghouse print paper.
Then I used a piece of denim measuring 5 1/2" x 9" and sewed it onto the cardstock to make two pockets. I sewed all around the outer edge of the entire piece and straight down the center.

 
The pocket on the left holds a tag for journaling.
The journaling says, "You were an early Christmas present for the boys. We picked you up on a Friday night while they were staying at Nonny's. We couldn't wait for them to get home on Saturday morning. We put you into a box and when they opened the lid, there you were.
They were so excited! You captured all of our hearts right away.
You were 8 1/2 weeks old when we got you. You took lots of naps, loved to eat and cuddle, and growled at Mommy a lot. You started picking up potty training quickly.
We took you with us to Grandma's house to celebrate Christmas. We were mortified when you got a hold of that Christmas ornament. It took only a second, then it was all over.
We'll never forget you, though- our first big dog. You left paw prints in our hearts.


The second pocket has eight photos held together with a ball and chain. I trimmed a piece of clear tablecloth as the protective cover and stamped her name on it.


Both the journaling tag and the photos have a small round tag with a paw print
to carry through the paw print theme.


The back matches the front. The top paper has tiny paw prints on it.
 
 
Thanks so much for stopping by and God bless.
 
 Give ear, O Lord, to my prayer; 
and attend to the voice of my supplications.
Psalm 86:6