Showing posts with label scrapbooking. Show all posts

Monday, August 1, 2016

Mini Album Monday #78- Large Envelope Album

Oftentimes I come across different office supplies in my second hand shopping
and I always pick them up.
I especially love to find envelopes in different sizes.
I recently went to an estate sale and bought some large 10"x 13" white envelopes.
I couldn't wait to turn them into a mini album.

Here's the cover.
I got the Hello Life card out of a package of Tim Holtz journaling cards.

I used three envelopes and cut them in half which gave me six pages.
The outside two are my covers. I cut a piece of chipboard to fit inside them
to give the covers some stability.


I placed the open sides of those envelopes to the left so that the open side would be in the binding.


The rest of the envelopes have the open sides to the right, so they can act as pocket pages.


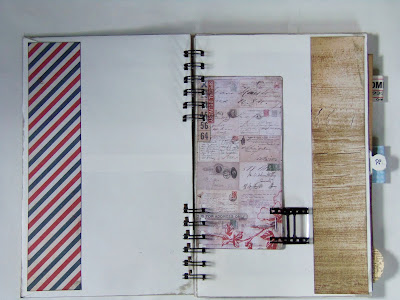
I added a strip of decorative pattern paper to the outside edge of each white page.
In between the pages I added smaller pages.
 

Each smaller page flips over to reveal the opposite side envelope.


Each envelope has a piece of cardstock in it which gives more room to add memories.


I bound it with my Bind-It-All machine.

I had such a good time making this album. It was easy and went together very quickly.

Have you ever created an album out of office supplies?

Thanks for stopping by and God bless.
 
 But the Lord is with me as a mighty, awesome One.
Jeremiah 20:11

This post is linked to That DIY Party, Sugar Bee Crafts,
I Gotta Create, and The Crafty Blog Stalker.

Wednesday, July 27, 2016

Layout of the Week #136

 Hello my friends!
It feels like a good day to scrapbook, doesn't it?
Well, that's fantastic because scrapbooking is just what we're about to do. . .


I'm going to show you how to create this layout in just a few easy steps.
Yours will look similar, but not exact as you'll be using your own supplies.


To make it, you'll need:
one piece of 12"x 12" cardstock 
one piece of 11 1/2"x 11 1/2" pattern paper in a subtle print 
one piece of pattern paper measuring 2 1/2" x 12"
two strips of pattern paper or decorative tape measuring 1/4"x 12"
letter stickers for the title
three horizontal photos
10-14 embellishments of varying sizes
adhesive
 

To begin, place the 11 1/2"x 11 1/2" piece of pattern paper on the center of the cardstock.


Trim your three photos to 5"x 3 1/2".
Adhere them in a column about 1" from the left edge of the pattern paper.
Leave a bit of space in between them. 

These are my parents- aren't they cute?


Now place your strip of pattern paper measuring 2 1/2" x 12" a little more than an inch 
from the right edge of the pattern paper.


On either side of that strip, add your 1/4" strips of pattern paper or decorative tape.


Using your letter stickers, place your title vertically on the strip of pattern paper.
I used larger letters since I had a short title.


My letter stickers were plain black, so I added three tiny flowers to the 0, A, and S. 

Now we'll add the rest of the embellishments in embellishment clusters on each photo. 
Use 3-4 embellishments in each cluster.
Here's how I did mine.


 At the bottom right corner of the top photo, I layered two flowers and a small tag that says, 
Savor the moment. I added a sparkly heart in the center of the top flower.


On the bottom left corner of the middle photo, I placed a medium size flower and overlapped the edge of it with a pre-printed ticket. Then I put a glittery heart in the center and added a silver bird.


On the bottom photo, I used a cloud punch and overlapped it with another pre-printed ticket.
Then I added another sparkly heart.

Embellishment clusters are pretty easy. The main thing is that you want to overlap 
each item to make them all look unified.


That's it!
Did you notice that I didn't add any journaling? That's because all I was going to say was that my parents celebrated their 30th anniversary. I figure the title covered that.:)
It is very rare for me to not have journaling on a layout- it just doesn't feel right to me.
If you'd like to add journaling, place it in the lower left corner of the layout 
slightly overlapping the photo.

I sure appreciate you scrapping with me! See you every other Wednesday for a new layout tutorial.

Thanks for stopping by and God bless.

Oh give thanks to the Lord, 
for He is good! 
For His mercy endures forever.
Psalm 118:29

Monday, July 18, 2016

Mini Album Monday #77- Travel Album

Last month I showed you a mini album that I made using half of a file folder.
Today I'd like to show it to you stuffed full of photos and memories.

Warning: this post is very photo heavy!


The pattern paper that I used on the cover had the word travel printed on it.
I added the word journal that I had printed off from a label maker.

I used this album to document a summer's worth of travel memories.


At the very beginning of the book, I added a pamphlet.
That's the beauty of having an album that is bound with office rings: you just have to punch holes in whatever you want to add.

I actually added quite a bit to this album as I was putting in the photos.

 
It's always nice to pre-make an album before I need it
 so that all I need to do is add photos and journaling.


For the next page, I added a park map and put photos on it.


I like to get pressed pennies when we take trips.
This book includes several. The first one is in the lower right corner of the pamphlet.


Here is another park map.
It worked out adding the extra pages because it gave me lots more room for photos.


I always keep tickets when we go places.
Here I stapled a ticket to a pamphlet.

 
The page on the right was originally the second page in the book.
But I added so many extra pages that it is now the seventh page.


I like adding pamphlets to my albums. That way they're right next to our photos from that place. 


I used this photo as a pocket and placed tickets behind it.


The tiny green card contains a pressed penny on the front. . . 


and another on the back.
The next page is a piece of ledger paper. I used it to add stories about our trips.


The next page is a paint chip. I used a photo as a pocket here, too.


The next two pages are just pieces of plain cardstock with a few embellishments added.


You can see how many photos I was able to include in this album.


Here's a second piece of ledger paper.


When we're on trips, I always try to keep a notebook handy so that I can jot down funny or memorable things that happen on our trip.


I use random items like tickets as page tabs
which I like to have when I make an album with different size pages.


I love going back and reading the journaling.
It's surprising show much of that stuff I would forget if I hadn't written it down


The final page is half a manila envelope which gave me room to add extras.
I put more pamphlets in here.


On the inside of the back cover, I added an envelope so that I could include a photo CD of pictures from this summer.


The back cover matches the front.

That's it, folks.
Have you ever done a summer album to document your activities?

Thanks for stopping by and God bless.

And let the peace of God rule in your hearts,
to which also you were called in one body; and be thankful.
Col. 3:15

 This post is linked to Between Naps on the PorchThe Dedicated House,
I Gotta Create, I Heart Naptime, and Plucky's Second Thought.
 

Wednesday, July 13, 2016

Layout of the Week #135

I hope you're all having an awesome week.
For this week's Layout of the Week,
I decided to take a look back at a layout I did featuring my hubby's gardening.
I used actual seed packets on it.


Go here to see a step-by-step tutorial on how to make this layout.

Thanks for stopping by and God bless.

But above all these things put on love, 
which is the bond of perfection.
Col. 3:14

Wednesday, June 29, 2016

Layout of the Week #134

Every other Wednesday, I post a tutorial to make a quick and easy scrapbook page.
I intend for it to help you get some of your photos scrapped and also allow you to use up scrapbook supplies you have on hand. Just follow these easy instructions.
Today's Layout of the Week uses several different pattern papers.
 

Here's the layout we'll be creating.
Yours will look slightly different as you'll be using your own supplies.


To make it, you'll need:
one piece of 12"x 12" pattern paper
one piece of pattern paper measuring 6"x 12"
one piece of pattern paper measuring  3 1/2"x 12"
one piece of pattern paper measuring 6"x 8 1/2"
two pieces of pattern paper measuring 1/2"x 12"
decorative tape
letter stickers for your title
journaling card (a note card will do)
adhesive


Place the 6"x 12" piece of pattern paper 2 1/2" from the top of the background paper.


Place the 1/2" x 12" strips along either side of the pattern paper you just adhered.


Place the piece of pattern paper measuring 6"x 8 1/2" about one inch from the right edge of the background paper. This will be your photo mat.


Now place the 3 1/2"x 12" strip along the left edge of the photo mat.


Add your photo to the mat.
I used a 5"x 7" vertical photo.
You can replace this with two vertical 4"x 6" photos.


Using your letter stickers, place the title in the lower right corner of the photo mat.
I placed my stickers on an office label.


Place two strips of decorative tape on opposite corners of the photo (upper right and lower left).


Adhere your journaling card to the left of the photo on the center piece of pattern paper.
I printed mine onto white cardstock and cut it into strips.

What do you think?
Easy breezy, huh?

Thanks for stopping by and God bless.


For His merciful kindness is great toward us, 
and the truth of the Lord endures forever.
Psalm 117:2