Friday, June 29, 2012

Record Your Summer Memories

     I wanted to show you a couple of ways that I have recorded memories from our past summers. I like to be able to incorporate stuff into my scrapbooks (pamphlets, maps, smashed pennies. . .) in addition to our photos. Here are three of my books.
  
For this one, I cut the cover off of an old book- I loved the embossed picture on here. It's bound with a chain.

Every page is different- above you can see a paper sack and part of a baseball card holder.

Here's a piece of graph paper and a paint chip.

Here's a map and a decorative file folder

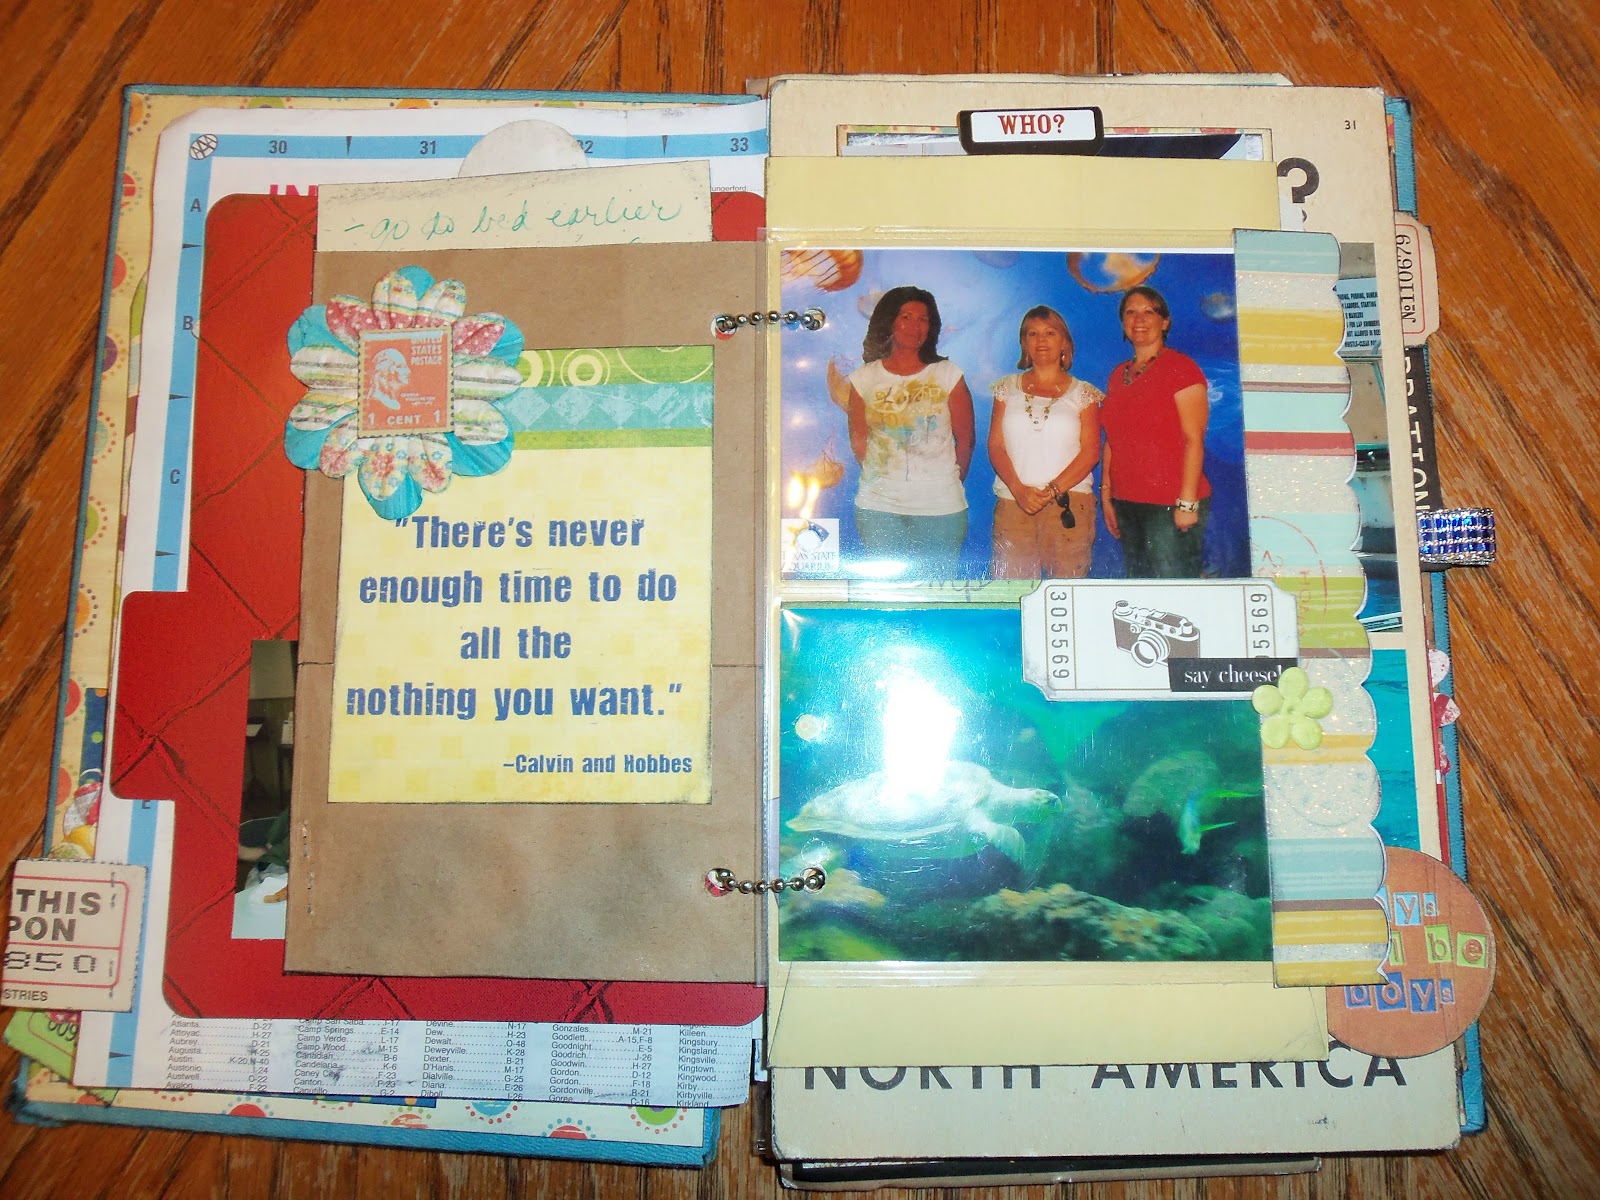
This album is made from part of a file folder- I cut a file folder in half, then in half again. I love this colorful paper!
I bound this with rings so I could add to it easily. Above you can see the back of a pamphlet.

See the smashed penny that we made at the park?

Here I cut an envelope in half to make room to store stuff.

This album was made from part of a Capri Sun box. Doesn't it look summer-y?

When I cut the box, I left an extra flap so I could fold it up for a pocket. The other page is vellum with summer words printed on it.


     I'd love to hear how you all record your summer memories.
     Thanks for stopping by and God bless.

Whenever I am afraid, I will trust in you.
Psalm 56:3
This post is linked to
Today's Creative Blog
toomuchtime


Thursday, June 28, 2012

Thrifty Thursday #23

     Top of the Morning to you all! (read with an Irish accent)
     My thrifting this week brought in mostly books, but wait til you see them!
     My favorite thrift store was having a book sale again- all books for a dime! I love it when they do that!
I totally fell in love with the Castaways in Lilliput. The cover underneath is in great shape, but I will even use the jacket for something- love that picture! I think I'll read it before I cut it up.
The book on the left is only 4" x 6 1/2"- I love the compact size. I think it will make a cute little scrapbook.

I got these Reader's Digest books simply for their covers. I mentioned before that the ladies at our church have a scrapbooking group and we'll be making a recipe themed album with these. I now have enough that everybody will be able to choose their own cover color.

I love this cover with the butterflies.


These books are from the sixties. I just bought them cause they're cute and old. 

     My hubby and I were the last customers on the last day of an estate sale on Saturday. I got an old atlas, this rockin' old map, and the book below for only a quarter! After seeing the few items that were left at the sale, my hubby and I wished that we would have gotten there earlier.
Copyright 1962. Beautiful condition. Don't know what I'm going to do with it, but I am a proud owner:)

     Thanks for stopping by and God bless.

Faith is being sure of what we hope for and certain of what we do not see.
Hebrews 11:1

     This post is linked to Craft-O-Maniac.

Wednesday, June 27, 2012

Layout of the Week #19- Scrapbooking with Tags

     Hello! I've been thinking about what to use in our layout of the week. After bouncing a few ideas around, I latched onto this one- shipping tags! About a year ago, I was at an estate sale and I happened upon a large envelope full of shipping tags- needless to say, I was delighted:) I got the tags for next to nothing. The lady running the sale probably wondered what that silly girl was going to do with a lifetime supply of tags.

     Today, I'm going to use them on a layout. Now, if you would like to make this layout and you have not come across any tags in your daily activities, you can find some at any office supply store. Or you could make your own by cutting a small rectangle than trimming off the corners on one side.
You'll need:
1 piece of 12"x12" cardstock
1 piece of  12"x12" pattern paper
1 strip of coordinating pattern paper 1/2" by 12" long
tags
letter stickers for the title
scrap paper for the journaling
adhesive
paper trimmer

First, you need to trim 1" off the top and left side of the pattern paper. Adhere it to the center of the cardstock. Ink the edges if you'd like.

Then across the center of the layout, you need to adhere the tags. Rather than place them in a straight line, I placed mine at different levels. To keep them going across level, I placed a ruler along the bottom of the lower ones.

Now take 3 more tags and place them in the upper left corner.

Take 3 or 4 vertical photos and place them across the page so the tags are peeking out from under them.

Add your title to the lower right side of the photos. Add 2 smaller photos to the lower right side of the layout and place your journaling on the lower left corner. Ta-da! Pretty simple, huh?
For this layout, I used larger shipping tags and taped them together (on the back) to make a 12"x12" background.

Here is one more example of using tags as embellishments- they're just peeking out from behind the photos.

     Thank you all for stopping by and God bless.

I sought the Lord, and He heard me and delivered me from all my fears.
Psalm 34:4

This post is linked to


Today's Creative Blog


Tuesday, June 26, 2012

Recipe of the Week #23- Snickerdoodle Cookie Bars

          This week's recipe is my new favorite dessert- it is easy to make and SO STINKIN' GOOD!! These Snickerdoodle Cookie Bars taste just like the cookies, but they're way less work. Delicious.

Snickerdoodle Cookie Bars
2 1/3 cups all-purpose flour
1 1/4 tsp baking powder
1/2 tsp salt
3/4 cup butter, softened
1 1/4 cups sugar
1/2 cup brown sugar
3 eggs
1 tsp vanilla

Cinnamon Mixer:
1 Tbsp sugar
1 Tbsp cinnamon

Icing:
1 cup powdered sugar
2 Tbsp milk
1/4 tsp vanilla

Preheat the oven to 350 degrees. Spray the bottom of a 9"x13" baking pan with cooking spray. In a small bowl, combine flour, baking powder, and salt and set aside. In a mixing bowl, blend together softened butter and both sugars until blended. Add one egg at a time, then add the vanilla. Add the flour mixture and mix well. Spoon half of the batter into the pan and spread evenly.
Make the cinnamon mixture by combining 1 Tbsp sugar and 1 Tbsp cinnamon. Sprinkle evenly on top of the batter. Using the remaining batter, place teaspoon sized dollops on the top of the cinnamon mixture covering the pan. You will be able to see some of the cinnamon mixture peeking through. Bake for 25 min. a 350 degrees.
Remove from oven and let cool for 1 hour. Combine the ingredients for the icing and drizzle it over the bars.

     I found this recipe somewhere out in Blogland, but I don't remember exactly where- whoever came up with this is a culinary genius!
     Thanks for stopping by and God bless.

Blessed is the man who trusts in the Lord and whose hope is the Lord.
Jeremiah 17:7
This post is linked to
Tip Junkie handmade projects

Monday, June 25, 2012

Cute Little Notebooks

     I was looking at my Pinterest boards for a project to post for today and I came across this tutorial for these cute little notebooks.
     So, I pulled out some library cards that I had in my stash and started making them. I've had these brightly colored library cards for awhile, but never used them because they're so- well, bright. This is the perfect project for them!
     For the inside papers, I cut up graph paper, handwriting paper, ledger paper, and even some awesome old yellow graph paper that, yes, I found at the thrift store:)
     It's hard to see in this photo, but this is vintage handwriting paper.

     Here's one with ledger paper. The notebooks are small, but they're cute and I'm sure they have their purpose- it all depends on who's using them.
     I thought that they might be good for my son to try to sell at my mom's yard sale this coming weekend. I figure he can sit at his own table and sell these for fifty cents a piece. If I came across a kiddo selling something like this, I would surely buy at least one.

     I mean, who could resist this little guy?

     Thanks for stopping by and God bless.

And we know that all things work together for good to those who
are called according to His purpose.
Romans 9:28


Friday, June 22, 2012

Cabochon Flower Bracelet

     Recently, I made a purchase from Very Jane of a bag full of these beautiful cabochon flowers that came from Mindy Mae's Market. I've seen lots of pretty jewelry pieces made from these flower on Etsy and I was anxious to play with some.
     I stayed with simple and made this.

      I started by getting a bracelet with round blanks which are nice and flat for placing the flowers. Then I attached them with E-6000 glue. I also picked up a blank ring with flat base to make a matching flower ring.
Note: I did let these sit for 24 hours to let the glue dry completely.
      I chose a neutral color for the ring. 

I love all the different colors on this! It just looks happy, doesn't it?

Thanks for stopping by and God bless.

This is the day the Lord has made; we will rejoice and be glad in it.
Psalm 118:24


This post is linked to Happy Hour Projects and At the Picket Fence.
 five days five ways | feature friday free for all

Thursday, June 21, 2012

Thrifty Thursday #22

     This was a better week in yard sales. My hubby and I headed out to an estate sale in our neighborhood. We didn't find anything there, but scored at a yard sale that we stopped at.
     This was my jewel for the day- I got all 3 pieces for $1! They're not from the same set, but the gravy boat actually matches a platter that I bought a few months ago at a thrift store. Besides, I find charm in having mismatched pieces.

      I got this set of three embroidery hoops for $1. These will be featured in some upcoming crafts. Be watching. . .:)
     The center frame was only a quarter. I plan to paint it a bright color and do something fun with the center. The two black frames were a curbside find from when I was out on a bike ride earlier this week. Score!

     The final purchase of the day was made by my hubby. He got this hardly-used dehydrator for $2. It didn't come with a user guide, but he found directions on Google and has already dehydrated oregeno, okra, garden salsa peppers and jalapenos- all grown in his garden. He was like a kid with a new toy! It's finds like these that keep him coming with me to yard sales. I love that he enjoys coming with me.

     Thanks for stopping by and God bless.

Wherever your treasure is, there the desires of your heart will also be.
Matthew 6:21
     This post is linked to Apron Thrift Girl.