Friday, July 29, 2016

Flashback Friday: DIY projects with a Beach Theme

It's the last Friday of the month, which means it's Flashback Friday where we look back
at past projects all featuring the same theme.
In the heat of the summer, I thought we'd look at beach themed projects.
 
 
For this project, I added sand and shells to make a beach shadowbox .
 
 
Here is a simple beach-y centerpiece I made.
 
 
I used clear Christmas ornaments to bring a little beach to Christmas.
Go here to see more about it.
 
 
So when you're hanging out at the beach this summer,
 bring home a bit of sand and make your own projects.
 
Thanks for stopping by and God bless.
 
Do not sorrow, for the joy of the Lord is your strength.
Nehemiah 8:10


Thursday, July 28, 2016

Thrifty Thursday #226

Two Saturdays ago, I headed out all excited hoping to have a morning full of yard sale-ing.
I cruised my neighboring area and didn't find any sales.
There were only two yard sales advertised in the paper; only one was any good.
Isn't that funny that when you have time on a Saturday to go to garage sales,
 there aren't any to be found?
One of the two I went to was at a storage unit- it was actually in a large building
 on the same land as the storage units.


I spotted this scale, but it was marked $15 and I didn't want to spend that much.
The gal running the sale said she was up for making deals.
I asked if she'd take ten dollars for the scale. She said sure.


Then I found this slide carousel tray.
It was marked five dollars, but she took two for it.

 
While I was wandering the aisles of stuff, I spotted this metal thing.
I sent my hubby a text asking if he'd turn it into a light for me.
It took him awhile to answer, so I ended up having to go back for it.
This four dollar piece of some kind of metal will make a rather unique light fixture!
I was tickled with my purchases.
That's it for this week.
Thanks for stopping by and God bless.
He who follows righteousness and mercy
finds life, righteousness, and honor.
Proverbs 21:21

Wednesday, July 27, 2016

Layout of the Week #136

 Hello my friends!
It feels like a good day to scrapbook, doesn't it?
Well, that's fantastic because scrapbooking is just what we're about to do. . .


I'm going to show you how to create this layout in just a few easy steps.
Yours will look similar, but not exact as you'll be using your own supplies.


To make it, you'll need:
one piece of 12"x 12" cardstock 
one piece of 11 1/2"x 11 1/2" pattern paper in a subtle print 
one piece of pattern paper measuring 2 1/2" x 12"
two strips of pattern paper or decorative tape measuring 1/4"x 12"
letter stickers for the title
three horizontal photos
10-14 embellishments of varying sizes
adhesive
 

To begin, place the 11 1/2"x 11 1/2" piece of pattern paper on the center of the cardstock.


Trim your three photos to 5"x 3 1/2".
Adhere them in a column about 1" from the left edge of the pattern paper.
Leave a bit of space in between them. 

These are my parents- aren't they cute?


Now place your strip of pattern paper measuring 2 1/2" x 12" a little more than an inch 
from the right edge of the pattern paper.


On either side of that strip, add your 1/4" strips of pattern paper or decorative tape.


Using your letter stickers, place your title vertically on the strip of pattern paper.
I used larger letters since I had a short title.


My letter stickers were plain black, so I added three tiny flowers to the 0, A, and S. 

Now we'll add the rest of the embellishments in embellishment clusters on each photo. 
Use 3-4 embellishments in each cluster.
Here's how I did mine.


 At the bottom right corner of the top photo, I layered two flowers and a small tag that says, 
Savor the moment. I added a sparkly heart in the center of the top flower.


On the bottom left corner of the middle photo, I placed a medium size flower and overlapped the edge of it with a pre-printed ticket. Then I put a glittery heart in the center and added a silver bird.


On the bottom photo, I used a cloud punch and overlapped it with another pre-printed ticket.
Then I added another sparkly heart.

Embellishment clusters are pretty easy. The main thing is that you want to overlap 
each item to make them all look unified.


That's it!
Did you notice that I didn't add any journaling? That's because all I was going to say was that my parents celebrated their 30th anniversary. I figure the title covered that.:)
It is very rare for me to not have journaling on a layout- it just doesn't feel right to me.
If you'd like to add journaling, place it in the lower left corner of the layout 
slightly overlapping the photo.

I sure appreciate you scrapping with me! See you every other Wednesday for a new layout tutorial.

Thanks for stopping by and God bless.

Oh give thanks to the Lord, 
for He is good! 
For His mercy endures forever.
Psalm 118:29

Tuesday, July 26, 2016

Recipe of the Week #231 -Easy Burrito Casserole

Easy Burrito Casserole
1 lb ground beef
1 small onion, chopped
1 pack taco seasoning
1 can refried beans
1 can cream of mushroom soup
1/2 cup sour cream
1 pack large flour tortillas
2 1/2 cups shredded Mexican cheese

Preheat oven to 350 degrees. Cook beef and onion. Drain grease. Add taco seasoning and refried beans and heat through.
In a bowl, mix the sour cream and soup. Put half the soup mixture on the bottom of a greased baking dish. Place three tortillas on top- you may need to cut and overlap them to make them fit. Place half the beef mixture on top of the tortillas. Top with 1 cup the cheese. Repeat the layers and top with the remaining cheese. Bake for 20 minutes.

This was such a simple and yummy dinner. I served it with Mexican rice and chips and salsa. I sent a plate of it over to my neighbor's house and he called to let me know how much he loved it. My family scarfed up the rest.

Thanks for stopping by and God bless.

You are my God, and I will praise You
Psalm 18:28

This post is linked to Between Naps on the Porch, Sugar Bee Crafts, Lil' Luna,
and The Dedicated House.

Monday, July 25, 2016

How to Get Great Coffee Table Style

Think about your living room arrangement.
What takes center stage? The coffee table, right?
Although they're usually a catch all for remotes, magazines, and soda cans,
in just a few steps, you could use your coffee table to add a pop of personality to your living room.
First off, don't limit yourself to the traditional stale choices for coffee tables.
You could use a couple of old crates, a stack of vintage suitcases,
or even a short stack of pallets.


I have an old trunk for my coffee table, but I love this farmhouse coffee table from Chairish.

source
A good base for any coffee table décor is a tray.
You could use an old silver tray, a round basket, a wooden tray, or even a large vintage platter.

source
Then you need to start gathering things to put on the tray. A small stack of books always looks cute.
 I tend to lean towards vintage books, but you could use modern books as well.

source
You could add a few different elements such as a small clock,
a vase or pitcher with or without flowers, and candles.
It good to vary the heights of what you're using to add visual interest.

source
I love how this coffee table has a tray full of candles of different heights.

source
If you're looking at all these pictures thinking, sure, they're pretty, but what do I do with my remotes?, here's an idea for you. Place a pretty tray on the coffee table for them.
 
source
I totally love this last idea.
How about if you place a cool bowl and fill it with mementos.
Then when you have guests over, the mementos can be looked through and stories can be shared.
 
What do you think?
Are you ready to take a small step to make a big refresh in your living room?

Thanks for stopping by and God bless.

This is the day the Lord has made;
we will rejoice and be glad in it.
Psalm 118:24


Friday, July 22, 2016

Tiny Crochet Basket DIY

I've been practicing and practicing my crochet skills.
I'm slowly, but surely improving.
I have yet to actually be able to read a pattern, but I can follow along to video tutorials.


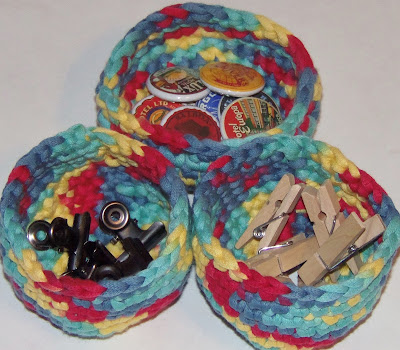
I just finished making these crochet baskets.


They're little and cute.


I think they'll look darling holding supplies on my craft desk.

You can go here to see the tutorial on how to make them.

I hope you all have a wonderful weekend.
Thanks for stopping by and God bless.

Let your speech always be with grace,
seasoned with salt,
that you may know how you ought to answer each one.
Col. 4:6

This post is linked to Life with Lorelai, That DIY PartyThe Crafty Blog Stalker, and Lil' Luna.

Thursday, July 21, 2016

Thrifty Thursday #225

Last Saturday, the Junk Hippy show was in town.
I had a great time looking around.
There was booth after booth of cute stuff, junk, and antiques.

I didn't pick up much, but I saw lots of good stuff.
Here's what I brought home.


I got a bag full of vintage Bingo cards for $10.
There were eighty-three cards in the bag!!!
Woo-hoo!


I also got this cool metal plate for $1.
I figure I'll attach it to a piece of furniture or a repurposed piece.
It measures 3 1/2"x 4".


My last purchase was these two cool old keys for a dollar each.
Not sure yet how I'll use them, but I thought they were cool.

That's all I got, but there was so much to see. I had a great time shopping.
Have you ever been to a Junk Hippy Show?

Thanks for stopping by and God bless.


Continue earnestly in prayer,
being vigilant in it with thanksgiving
Col. 4:2

 This post is linked to Blue Willow House, The Crafted Sparrow, Too Much Time,
and Embracing Change.

Wednesday, July 20, 2016

Lovelies That I Love

It is hot as the dickens here in southern Texas,
so let's look at some beach themed lovelies today. . .
 

Isn't this whale tail bracelet so unique?
Seeing a real whale is on my bucket list:)
 
 
I totally love this driftwood sign that can be customized with your latitude and longitude.
 
 
How cute is this beach cover up?
I mean really!
 
 
These beach letter photos just make me happy.
You could order the letters of your last name or you could choose a word like happiness.
 
 
I am so drawn to these round beach towels.
This one is especially beautiful with it's yellow center and fringe all around.
 
Seeing all of this just makes me want to grab a picnic and head for the beach!
Anybody with me?
 
Thanks for stopping by and God bless.
 
 
The Lord is my strength and song,
and He has become my salvation.
Psalm 118:14


Tuesday, July 19, 2016

Recipe of the Week #230- Slow Cooker Fig Butter


Slow Cooker Fig Butter
2 lbs whole figs (about 20)
1/2 cup brown sugar
1 cup sugar
1/3 cup molasses
2 tsp cinnamon
3 tsp vanilla extract
1 tsp nutmeg
1 tsp pumpkin spice

Cut stems off figs and slice in half. Place figs in slow cooker. Add other ingredients to slow cooker. Cover and cook on high for 3-4 hours until figs are falling apart. Stir occasionally. Place the mixture in a blender or food processor to break up the large pieces. Transfer to jars. Allow to cool at room temperature. These can be stored in the freezer for up to three months.

I don't often get my hands on some figs, but when I do, I usually use them to make strawberry fig jelly. My neighbor recently gave me some figs and a batch of her fig preserves, so I thought I'd find a new recipe. Enter this one. It smelled like Christmas while it was cooking! My hubby loves it! It tastes great on biscuits, toast, and crackers.

Thanks for stopping by and God bless.

Let the word of Christ dwell in you richly in all wisdom,
teaching and admonishing one another in psalms and hymns and spiritual songs,
singing with grace in your hearts to the Lord.
Col. 3:16
This post is linked to Tuesdays With A Twist, Crafts a la ModeTatertotsand Jello,
and Skip to My Lou.

Monday, July 18, 2016

Mini Album Monday #77- Travel Album

Last month I showed you a mini album that I made using half of a file folder.
Today I'd like to show it to you stuffed full of photos and memories.

Warning: this post is very photo heavy!


The pattern paper that I used on the cover had the word travel printed on it.
I added the word journal that I had printed off from a label maker.

I used this album to document a summer's worth of travel memories.


At the very beginning of the book, I added a pamphlet.
That's the beauty of having an album that is bound with office rings: you just have to punch holes in whatever you want to add.

I actually added quite a bit to this album as I was putting in the photos.

 
It's always nice to pre-make an album before I need it
 so that all I need to do is add photos and journaling.


For the next page, I added a park map and put photos on it.


I like to get pressed pennies when we take trips.
This book includes several. The first one is in the lower right corner of the pamphlet.


Here is another park map.
It worked out adding the extra pages because it gave me lots more room for photos.


I always keep tickets when we go places.
Here I stapled a ticket to a pamphlet.

 
The page on the right was originally the second page in the book.
But I added so many extra pages that it is now the seventh page.


I like adding pamphlets to my albums. That way they're right next to our photos from that place. 


I used this photo as a pocket and placed tickets behind it.


The tiny green card contains a pressed penny on the front. . . 


and another on the back.
The next page is a piece of ledger paper. I used it to add stories about our trips.


The next page is a paint chip. I used a photo as a pocket here, too.


The next two pages are just pieces of plain cardstock with a few embellishments added.


You can see how many photos I was able to include in this album.


Here's a second piece of ledger paper.


When we're on trips, I always try to keep a notebook handy so that I can jot down funny or memorable things that happen on our trip.


I use random items like tickets as page tabs
which I like to have when I make an album with different size pages.


I love going back and reading the journaling.
It's surprising show much of that stuff I would forget if I hadn't written it down


The final page is half a manila envelope which gave me room to add extras.
I put more pamphlets in here.


On the inside of the back cover, I added an envelope so that I could include a photo CD of pictures from this summer.


The back cover matches the front.

That's it, folks.
Have you ever done a summer album to document your activities?

Thanks for stopping by and God bless.

And let the peace of God rule in your hearts,
to which also you were called in one body; and be thankful.
Col. 3:15

 This post is linked to Between Naps on the PorchThe Dedicated House,
I Gotta Create, I Heart Naptime, and Plucky's Second Thought.