Friday, February 28, 2014

Chalkboard Ring

I've got an unusual piece of jewelry to show you today...
a chalkboard ring!


 Cute and unique, huh?


I started with a round frame pendant (after clipping off the necklace hoop).
I placed a piece of masking tape over the top. Using a pair of small scissors, I cut the center of the tape out leaving only the edge covered.
Then I gave it a quick coat of chalkboard spray paint.
After it dried, I used E-6000 glue to attach it to a ring blank.

I prepared the chalkboard by rubbing the side of a piece of chalk against the surface,
then wiping it off.

Now I have a customizable ring.

I can personalize it with my initial,

 write a word on it,


or draw a picture and have a holiday ring.

Wouldn't this make a cute gift- especially for a teacher?!?

Thanks for stopping by and God bless.

The Lord is my light and my salvation; whom shall I fear?
Psalm 27:1

 This post is linked to I Heart Naptime, My Repurposed Life, Be Different Act Normal, and Too Much Time On My Hands.

Thursday, February 27, 2014

Thrifty Thursday #106

Last weekend, I walked into an estate sale, looked around, and I felt giddy! 
I thought, "This is what estates sales are supposed to be like!"
 There was stuff everywhere- mostly old stuff. I couldn't wait to start digging! 
The place used to house a photography business. Wait til you see what I found!


I saw this sitting on the floor as I was coming up the walkway.
Isn't it so cool?
It's two sided. . .


Here's the other side.
This cost me $2. I now have it sitting in the arrangement on my mantle.
Too cool.


I got four of these film. . . things. They were a dollar each.
There were boxes of these things sitting around. I so wanted to get them all, but I resisted (actually, my hubby was with me and he couldn't figure out why I wanted them).
Won't they make the cutest frames?


I'm not for sure what they are, but they have two inserts that slide out.


I got these two old stamps for a dollar for both.

Someday I hope to find one of those old stamp holders. . .


I never pass up an old tater masher- especially when it's only a dollar.
When you see these at antique stores, they're at least six or seven dollars apiece.


I loved this old platter. Look at the patina on this guy.
He was two dollars.
I got him for my friend who is gathering plates for a plate display.


This lovely silver tray was only three dollars.
I love the detail along the edges.

Didn't I get some good stuff?!? Believe it or not, this isn't all my loot. Come back next Thursday to see the rest of the goodies that I picked up at this sale.

Good luck to all of you with your weekend treasure hunting!

Thanks for stopping by and God bless.

According to Your mercy remember me, for Your goodness' sake, O Lord.
Psalm 25:7

 This post is linked to Cheerios and Lattes, Junkin' Joe, and Made In A Day.

Wednesday, February 26, 2014

More Lovelies That I Love

I love, love, love tickets.
Whenever I attend a function where I have to have one to enter or when I buy a raffle ticket, I always keep the ticket- even if it's just a stub. I'm not kidding. I don't know what my facination is with them.
Today I'm going to show you some awesome ticket themed products I've found.


Check out this cute paper by Maggie Holmes. . . covered in tickets!
Love it!


How awesome is this ticket themed Washi tape?
So awesome!


How about a ticket punch so you can make your own? Here's one by EK Success.


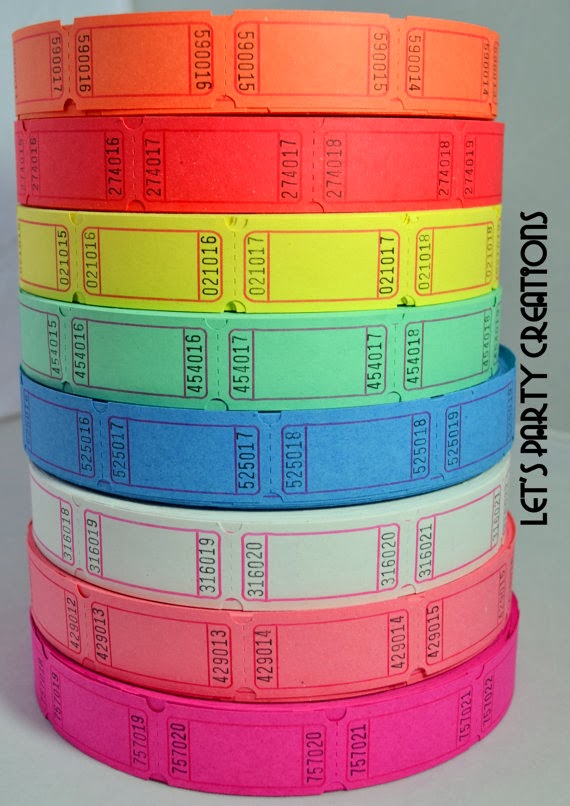
Or, if you want the real deal, here's a roll of vintage carnival tickets that I found on Etsy. Swoon!
I was so taken with these, I nearly ordered them on the spot!


This style of ticket is great because you can personalize them with stamps
or use them as  journaling tags.
There are a variety of colors to choose from at this Etsy store.
I've been known to use these as tags on gifts.

What do you think? Have I won you over?

Thanks for stopping by and God bless.

But You, O Lord, are a shield for me.
Psalm 3:3

 This post is linked to My Girlish Whims and Ivy and Elephants.

Tuesday, February 25, 2014

Recipe of the Week#107- Applesauce Cookies

Applesauce Cookies
2 sticks butter, softened
1 cup sugar
1 cup brown sugar
2 cups applesauce
2 eggs
1 tsp baking soda
5 tsp nutmeg
5 Tbsp cinnamon
4 cups flour

Mix butter and sugars. Add eggs and applesauce and stir. Slowly add dry ingredients. Mix until incorporated.
Drop by teaspoonfuls onto cookie sheet. Bake at 350 for 7-8 minutes. These should be soft and somewhat moist on the tops when done.

Note: it may seem like a lot of nutmeg and cinnamon, but if you slight these amounts, the cookies are too bland.

These cookies have more of a bread-like texture, and they are delicious! This is an old family recipe. My younger son swears he could live on these:)

Thanks for stopping by and God bless.

Remember, O Lord, 
Your tender mercies and Your lovingkindnesses, 
for they are from of old.
Psalm 25:6

This post is linked to Embracing Change,  Tatertots and Jello, and Craft-O-Maniac.

Monday, February 24, 2014

Mini Album Monday #24- Aunt Themed Album

This past Christmas, I made two mini albums as gifts and they were both aunt themed: one was for my sister and one was for a friend. Luckily, I had two pieces of "aunt" pattern paper because aunt themed scrapbooking supplies are hard to come by. I used family and love themed embellishments.

Here are photos of one of the albums:


I used an old book as the cover.
The sticker on the cover said, "Joy"; I added the rest of the title with stamps and Staz On ink. 


All the pages are different.


Both books have a green and pink color scheme.


I've made albums like this before- I just love the randomness of them.
I incorporate things like vintage Bingo cards,


sheet music (turned into a pocket page here),


and small paper bags.


Here's the aunt paper which is only printed on one side,


so I backed it with this butterfly paper.
Don't you love that large card?


The page on the right is a manila envelope that I trimmed to fit in the album.
I love pocket pages.


The page on the right is an old book page with a paint chip adhered along the edge.


Notice the stickers throughout- they mention love, laughter, fun times. . .
all good words for an aunt:)


The page on the right is a large journaling card.


The page on the right is ledger paper with a strip of the aunt pattern paper along the edge.


The final page in the album is an envelope which opens up. . .


and has two small pockets on the inside left.
It also opens on both edges to store mementos.


I ended the book with a fitting quote,
"We didn't realize we were making memories. We just knew we were having fun."

My sister was delighted when I gave her this album.
I filled it with precious pictures of her with my boys taken over the years.
My friend was equally excited with hers- and it was empty- just waiting for her to add her memories.

Thanks for stopping by and God bless.


Lead me in Your truth and teach me,
for You are the God of my salvation;
on You I wait all the day.
Psalm 25:5


This post is linked to Between Naps on the Porch, Funky Junk, Today's Creative Blog, and The Dedicated House.

Friday, February 21, 2014

Chairs, Chairs, Everywhere There's Chairs. . .

Among other things, I have a fondness for chairs. More specifically: cute, old chairs.
Over the years, I've brought home several- much to my hubby's dismay.
He always says we don't have room for another chair. Somehow, I find space:)

Like for this cute blue one that sits in the corner of our living room.
It was already painted the right shade of blue.
Even better- it only cost me five dollars at a thrift store.

(FYI: the shutter on the wall came from a yard sale
and the afghan in the basket came from a thrift store.)


Just around the corner from the blue chair is this darling old blue desk.
Would you believe that it was that color when I bought it?
It's like it was designed for my living room.
I got this fella for five dollars at a yard sale.


My hubby was with me when I spotted this corner chair at an estate sale. I thought it was so unique.
I have it sitting next to the piano.
This one cost ten dollars.

(The top afghan in the chair came from a thrift store.)


Wanna guess where I got this cute little green stool?
At the roadside. Can you believe that somebody was getting rid of this?
It was already distressed, so I was willing to overlook the fact that it's not sturdy enough to sit on.
But it sure looks cute sitting along the wall in my kitchen.:)

(By the way, the crate and two drawers on the left came from an antique store,
the large flower from a yard sale, and the tin pot from a thrift store.)

I also have delightfully mismatched chairs around my kitchen table (three of the four came from yard sales), I use an old jury chair as a desk chair (bought at an estate sale), and have a really old school chair (from the thrift store) as decor in our guest bathroom. Who says you can't decorate with secondhand stuff?!?
But if you're wondering, not everything in my house is pre-owned:)

So, stop on by for a visit- I've got plenty of seating!

Thanks for stopping by and God bless.

Show me Your ways, O Lord; Teach me Your paths.
Psalm 25:4


Thursday, February 20, 2014

Thrifty Thursday #105

Last Saturday, I was cruising up and down some streets that I don't usually frequent, trying to find a yard sale that was advertised in the paper. I never did find that sale; however, I happened across a church that was having a garage sale. I was happy to have found it because I got some good stuff!


I fell in love with this old bowl. It was sitting in a stack with the bowl in the photo below.
They both have that patina that comes with age.
They weren't priced, so I wasn't too sure what to expect.


 Can you believe the gal only charged me fifty cents per bowl? These were old enough to be in antique shops and they certainly would have cost a lot more there!
I love them so much- and yes, I will actually use them as serving bowls.
Since there are only males in my house, nobody else seems to enjoy my old dishes, but it makes me happy to use them:)


I got this picture for $3. Its 18" wide x 24"tall
and is from the Kelly Rae Roberts Collection by Demdaco.
These cost $59.99 brand new.
Quite a deal.
It actually matches my bedroom decor. I even had a space for it!


Sitting next to the old bowls were some old plates.
Isn't this one a beauty?
I bought two like this- one for myself and one for a friend.


I also got this one which matches one of the bowls.
I paid a dollar for all three plates.


I got this beautiful lacy table runner for $1.
I'm helping to decorate for an upcoming wedding shower and we're using lots of white lace, so I've been picking up pieces as I find them.


I got this doily and the next for fifty cents each.


These will also be used to decorate at the shower.

Well, I think you'll agree that I was lucky to have stumbled across this sale!
 I only spent $7 and look at my loot:)
I hope you have luck with your treasure hunting this weekend.

Thanks for stopping by and God bless.

Surely goodness and mercy shall follow me all the days of my life;
 and I will dwell in the house of the Lord forever.
Psalm 23:6


Wednesday, February 19, 2014

Layout of the Week #81

Every other Wednesday, I feature a step-by-step tutorial on making a scrapbook layout.
Each time it's a different layout, and I intend for you to be able to use products you have on hand to complete the layout quickly and easily.
Usually I have a theme for my Layout of the Week, but this week it's just. . . a quick and easy layout.

Here's the layout we'll be making this week.
Notice that it's full, but is actually very simple.
It features six photos, two strips of pattern paper, a journaling card, and a few embellishments.
Looks do-able, huh?


To create it, you'll need:
one piece of 12"x 12" pattern paper
two strips of pattern paper measuring 1/2"x 12" and 1"x 12"
letter stickers for the title
journaling card (an index card will do)
embellishments to match your theme (I used stickers)
5-6 photos
paper trimmer
adhesive


First, we'll need the two strips of pattern paper. Adhere the 1/2" strip to the top edge of the background paper and the 1" strip to the bottom edge.


Now start placing your photos like this.
The top photo is six inches wide. I made sure the photos that I placed beneath it were cropped to be only six inches wide also.
You may use fewer photos- for example, I have two in the lower right corner. That could be easily replaced with one vertical photo.


Add a larger photo to the bottom left side.
If you like, you can add a small one at the top right as well.


Now you'll want to place your embellishments.
I placed two at the top of the page along the photos.
I placed one on the bottom left photo and one overlapping the two photos on the bottom right.


Place your title in the upper left corner.


To finish it off, you need to add your journaling card just above the bottom left photo.
Now, wasn't that easy?

Let me know what you think.
If you liked this, come back every other Wednesday to complete another layout.

Thanks for stopping by and God bless.

Blessed are those who keep my ways.
Prov. 8:32

 This post is linked to I Heart Naptime, Be Different Act Normal, and Embracing Change.