Friday, June 28, 2013

It's In The Bag. . .

     I am sooooooooo excited about today's project! It's something that I've wanted to do for awhile, and it was so easy. I don't know why I put it off for so long!

 
How cute is this purse?
I don't mean to toot my own horn, but beep, beep!

 
Before you start thinking that I must be some kind of mega-seamstress, let me tell you how I made it.
I bought a pre-made handbag and some rosette trim from Hobby Lobby.
Then I used some material that I had at home to sew a ruffle.
I have never sewn a ruffle before. I followed the tutorial here.
 
 
The tutorial said to cut your material as wide as you want the ruffle to be and twice as long as you need the ruffle to be. I cut my material to 3" x 28".
After I sewed it into a ruffle, I used hot glue to attach it to the purse. The purse is made of jute and has a plastic lining, so I figured the hot glue wouldn't hurt it. It didn't.
Then I attached the trim by placing hot glue behind each rosette.
Note: I only attached trim to one side as I thought the side that I carried against my body would rub and the trim would start to look worn.
 
 
Ta-da! That's it! Now I have my summer purse!
The best part- it didn't even cost $8. I used my 40% off coupon on the handbag and the rosette trim was 30% off (and I have some of that left over!).
That, my friends, is what I call a good deal!
 
Thanks for stopping by and God bless.
 
Oh, give thanks to the Lord, for He is good!
For His mercy endures forever!
1 Chron. 16:34


Thursday, June 27, 2013

Thrifty Thursday #74

     This Thrifty Thursday is short and sweet. . . only a few items, as I only stopped at one store.

 
I got this beautiful old bowl for $1. I've got a small collection of these now.
My hubby says they are too small to be cereal bowls, though.

 
This small wire basket was only a quarter.
I have one like it on my coffee table that has croquet balls in it. This one will have a similar fate.

 
I couldn't pass up this brand new pair of Wrangler shorts. They are my son's size and his favorite color- camouflage! I got them for $5. You can't find denim shorts that cheap at Walmart!


I also stopped by one yard sale in my neighborhood. I found these four round frames for fifty cents- for all of them!
I think they'd look cute with cork board in the center. . .
 
I hope you all find something good while yard sale-ing this weekend! Thanks for stopping by and God bless.

 
Let the heavens rejoice, and let the earth be glad;
and let them say among the nations, "The Lord reigns."
1 Chron. 16:31

This post is linked to Junkin' Joes, Apron Thrift Girl, Too Much Time On My Hands, My Girlish Whims, and Shabby Creek Cottage .

Wednesday, June 26, 2013

Check This Out!

     In lieu of Layout of the Week this week, I'm going to show you something on my wish list. . .

 
Isn't this t-shirt awesome?!?
Someday, I shall own one. :)
 
You can find it here along with lots of other fantastic gear for the junker in you. This is not an affiliate link; it's just too cool not to share.
 
Thanks for stopping by and God bless.


Seek the Lord and His strength; seek His face evermore!
1 Chron. 16:11

Tuesday, June 25, 2013

Recipe of the Week #73- Microwave Potato Chips


Microwave Potato Chips
3-4 baking potatoes
olive oil
salt and pepper to taste

Wash potatoes, then slice them into 1/8" rounds. Put rounds into large bowl and toss with a little olive oil, salt, and pepper. Coat a microwave safe plate (I used the plate in my microwave) with olive oil. Lay the rounds on the plate so they don't overlap. Cook on high for 2-3 minutes. Flip and cook another 2-3 minutes until the potatoes turn golden. Chips will crisp up as they cool.

These were DELICIOUS!! I couldn't keep up with how fast my kids were eating them! It was amazing how they tasted like potato chips- only better! They are definitely healthier than a bag of potato chips. We will be making these pretty often around here!

Thanks for stopping by and God bless.

God be merciful to us and bless us,
and cause His face to shine upon us.
Psalm 67:1

This post is linked to The Dedicated House, Cheerios and Lattes, and Between Naps on the Porch.

Monday, June 24, 2013

Mini Album Monday #6- Family Album

     The album I'm showing you today is a family themed book. It would be a quick and easy one to replicate. You could use a pre-made album and have one layout for every family member.
     I feel journaling is super important to include when you're scrapbooking, and this book has journaling that can't get any simpler. For each person, I answered the same seven prompts: Is, Has, Can, Watches, Reads, Wishes, Needs (I got this journaling idea several years ago from Stacy Julian).

 
Here's the cover. It has two pieces. The first is chipboard cut into the shape of a bracket and covered with graph paper. The title is attached so that it hangs over the edge.

 
The second part of the cover is a piece of corrugated cardboard with a flower at the bottom corner.
 
I made custom buttons for this album by covering chipboard with papers that coordinate with the book. Then I used a punch to cut out circles and punched holes in the centers making them look like buttons.

 
The intro page says "The Sextons est. 1996" (the year we got married).

 
Then each layout has journaling and one photo.
 
Here's an example of how I answered the journaling prompts for my hubby:
Is almost 36 
Has blue eyes, a great smile, and a 1970 Ford Bronco
Can clean a gun, fix a car, and lull a baby to sleep
Watches the Military Channel, the History Channel, and war movies
Reads gun magazines, Clive Cussler novels, and the weather report
Wishes he had more time to fish
Needs coffee, sweets, and his family's love

 
Each page is different. The page on the left is a piece of double sided pattern paper. The page on the right is a paint chip (from Home Depot) with lace stapled to the bottom.

 
I covered the back of the paint chip with sheet music. The page on the right is another piece of pattern paper cut into the shape of a circle- actually it's more like two-thirds of a circle.

 
The page on the right is actually a portion of a 12"x12" piece of pattern paper with a decorative border. I just cut the paper into fourths.
For embellishments, I cut a heart from sheet music and overlapped it with a matching chipboard button. 

 
For the second to last layout, I used a picture of our dogs, then filled out the journaling about them.

 
The page on the right is just a piece of pattern paper cut wide enough so I could fold it over for a pocket. I stapled it at the bottom then slid a photo into the pocket.
 
This is such an easy idea, I think it's about time for me to make an updated one!
This album would also be cute to make as a gift for grandparents and include extended family members in it.
 
Thanks for stopping by and God bless.
 
I will remember the works of the Lord;
surely I will remember Your wonders of old.
Psalm 77:11
 

Friday, June 21, 2013

Plate + Glass= Plate Stand

     I really wanted to show you my distressed black chairs today, but I'm still working on them. They aren't quite looking the way I want them to yet. . . just about, though.
     Instead I'm featuring a quick and easy tutorial that requires only a decorative glass and a pretty plate- oh, and some E6000 glue.

 
I made this pretty plate stand and it took only moments.
These are so fun to make because you can pair together a plate with anything to give it height- a small vase, a candlestick, or a pretty glass.

 
This is how it looks from the side.

 
I used one of these plates. I love the little turquoise flowers.

 
And I chose this pretty brown glass. I thought it coordinated nicely with the brown in the pattern on the plate.
I got both the plate and glass at the thrift store. You can see that post here.
This project didn't even cost me two dollars.
 
If you want to make one, all you need to do is glue your two pieces together using E6000 adhesive. Then allow 24 hours to dry.
 
You can use this as a cake or dessert stand or you could use it to hold your bracelets. I think it would make a darling display for a craft show or would be a nice hostess or housewarming gift.
 Cute, huh?
 
Imagine if you used a plate or vase that once belonged to your grandma.
What a treasure that would be!
 
I hope you all have a wonderful weekend! Thanks for stopping by and God bless.
 
Pleasant words are like a honeycomb,
sweetness to the soul and health to the bones.
Proverbs 16:24
 

Thursday, June 20, 2013

Thrifty Thursday #73

     My, oh my, do I have a big haul to show you this week! It was a good day to stop into the thrift store!

 
I found this contraption and fell in love- it's a necklace hanger mounted to a china plate.
I've been wanting to make one of these, but I don't know how to drill through glass. This fella was only fifty cents!

 
I love quirky notepads.
They make cute pages for mini albums or great cards for journaling on scrapbook pages. Even though this pad was half gone, what was left was in good shape. It was worth the quarter:)

 
This plant hanger was only a quarter, too. I got it for my brother who loves plants. He has enough that he could open a nursery! He just keeps buying them and buying them. It takes him two hours to water them all. I told him that sounds more like work than a hobby!

 
Look at this darling pattern. How cute is it?
All patterns were only a quarter, so I picked up several. . .

 
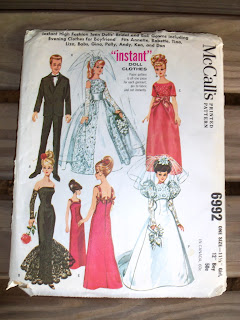
like this one for doll dresses. Too cute!

 
 I thought this one for choir gowns was pretty unique.  

 
I've told you before that I never pass up embroidery hoops - especially at a quarter apiece. You just never know when one will come in handy, so I try to keep some on hand.
There's a darling project I've been wanting to make with them. Hopefully I'll be able to get to it within the next couple of weeks. Stay tuned:)

 
I found this large beautiful China platter for a dollar.
I got it for my friend who's wanting some cute platters.

 
This set of metal plates was only fifty cents. I'm not for sure what I'm going to do with them, but I couldn't pass them up. I think they might make cute key rings.

 
There was a box of free stuff out in front of the thrift store. I got this double album set.
 
That's quite a load for a stop at one thrift store- and it didn't even cost me four dollars! I hope you have such bountiful luck with your secondhand shopping this week.
 
Thanks for stopping by and God bless.  
 
Blessed are those who put their trust in Him.
Psalm 2:12
 
 This post is linked to Apron Thrift Girl.

Wednesday, June 19, 2013

Layout of the Week #58- Using Your Child's Artwork in a Layout

     For the Layout of the Week, I'm going to feature a piece of my son's artwork. I know it's hard to save all of the drawings that my kids make, but there are some pieces that are just too cute to throw away.
     The piece I'm using is a list my son made several years ago titled, "Bugs I Like" and there's a list of ten bugs that apparently were ok with him at the time. What's funny is not all of them are bugs- he included frogs, worms, and lizards on the list. The pink rectangle is a Post-It note he added that says, "Bugs rock!" But I'd have to say that the best part is the dark spot at the bottom of the page- it's a real squashed bug with a note that says, "He was a good bug." :)

 
Here's the layout we're going to create. Yours will look similar, but not exactly like this because you'll be using supplies that you have on hand.

 
To make it, you'll need:
one piece of pattern paper measuring 6" x 12"
one piece of pattern paper measuring 7 1/2" x 10 1/2"
one piece of cardstock measuring 12" x 12"
decorative tape
letter stickers for the title
journaling card (I'm using a mailing label)
ruler
adhesive
one vertical 4"x6" photo
child's artwork or note
optional: coordinating embellishments- I used word stickers and a ticket

 
Place the pattern paper measuring 6" x 12" at the top of the cardstock.
Ink the edges if you'd like.

 
Using the decorative tape, make a square 1 1/2" from each side.
To do this, I just placed my ruler along the inside edge of the cardstock and placed my tape along its' edge. (Rulers are typically 1 1/2" wide.)

 
Then I trimmed off the decorative tape where the edges met.
If you don't have decorative tape, you can use strips of cardstock or masking tape.

 
You should end up with a square like this. It doesn't have to be perfect because we'll be covering most of it up. 

 
Now take your pattern paper measuring 7 1/2" x 10 1/2" and adhere it to the center of the cardstock.

 
Place your artwork on the right side and your photo on the left side.
My artwork measures 7 1/4" x 6 1/4 ". It's hard to see because my son used lighter color pencils on it.

 
Add your journaling square below the photo. I placed my letter stickers right on his page under his words, "Bugs I. . ."
If you'd prefer, you can place yours overlapping the bottom of the artwork.
optional: I placed half a ticket on the upper left corner of the photo. I also used three word stickers on the upper left corner and bottom right corner of the cardstock.
And we're done!!

     This layout would also work for a child's drawing, handwritten Christmas list, or even a workbook page from school.

   Have more than one piece of your child's artwork that you want to feature? Go here to see how to make an album to store them.

     Thanks for stopping by and God bless.

I am the living bread which came down from heaven. If anyone eats of this bread, he will live forever; and the bread that I shall give is My flesh, which I shall give for the life of the world.
John 6:51


This post is linked to Ivy and Elephants, Too Much Time on My Hands, and Today's Creative Blog.

Tuesday, June 18, 2013

Recipe of the Week #72- Crock Pot Beef Stroganoff


Crock Pot Beef Stroganoff
1 lb beef cut into 1/2 inch cubes (round steak)
1 can French Onion soup
1 can Cream of Chicken soup
1 can Cream of Mushroom soup
2 Tbsp sour cream

Put all ingredients into Crock Pot. Cook on high for 1 hour, then lower to low heat and cook 4-5 hours.
Serve over egg noodles.

I love Beef Stroganoff and this recipe didn't disappoint!

This is another easy and delicious recipe for your slow cooker. During the summer, I've planned to use my Crock Pot once a week. It makes dinner so easy.

Thanks for stopping by and God bless.

A merry heart does good, like medicine, 
but a broken spirit dries the bones.
Proverbs 17:22

This post is linked to Shabby Creek Cottage and Embracing Change.

Monday, June 17, 2013

Mini Album Monday #5- An Album Featuring Your Child's Notes/Artwork

     My boys are pretty delightful. They have always been very busy and very silly little boys. I've kept a notebook since they were little in which I've written down the funny things they've said and done. Sometimes I go back and read these stories. . and I laugh til I cry. No joke.
     In addition to writing down these anecdotes, I also saved some of the things they've written. I made this simple book to store them.
     I totally recommend that you get a notebook and write down your children's funny stories. You always think you'll remember, but if you do this, you'll be surprised at how much you would have forgotten if it wasn't written down.

 
For this album, I just used a regular file folder. I cut off the folded edge so that the two sides of the folder became my album cover. I covered it with strips of dictionary paper and used a couple pieces of pattern paper that have letters on them. Since this is focusing on the boys' writings, I decided to use a letter theme throughout the album.
I named this album "Words of Wisdom." For the title, I used scrabble letters and an old negative strip.
To bind it, I just punched holes and used two office rings. This way I can easily add to it.
 
 
This is what it looks like when you first open it. I used several layers of pattern paper on the left side. I wrote a quote by Dr. Seuss that says, "Be who you are and say what you feel because those who mind don't matter and those who matter don't mind."
The next two photos are close up photos of these pages.
 
 
If you decide to make a book like this, you can keep this page simple by using only one piece of pattern paper or by leaving it blank.

 
This is the introduction page. It says, "You boys delight me in so many ways. . . The things you do, the things you say, and your darling little notes and writings. This album is a collection of some of these writings."

 
I tried to keep this as simple as possible to keep the focus on the boys' work.
For each entry, I added description.
This is my brother's business card that Ethan used to make his own business card by crossing out my brother's name and adding his own. 

 
I just punched holes in the papers and added them in chronological order.

 
This is a funny picture Sam had drawn and hung in the hallway.

 
I added a couple of envelopes for the smaller papers.
  
 
I added a few photos here and there. This is my menu board with notes that the boys added.
 
You'll notice that the album pages aren't all the same size. I like the randomness of it.

 
This is a quiz that Ethan wrote for my mom to answer. . . he was testing her knowledge of Spartans.

 
This is a cute thank you note with a drawing.
 
There are lots more pages in this album, but I think you get the picture. It's packed with cuteness.

 
I printed off a large photo to cover the last page of the book.
This is actually the only photo of the boys in the album. 

 
 I covered the back of the file folder with strips of dictionary paper.
 
See how simple it is? Once you make the cover, you just have to add your child's notes or drawings. If you're not a scrapbooker, but you'd like to do this, you could even use a preprinted file folder. 
 
This would also be a great way to store your child's artwork or the school papers that you want to keep.
 
Thanks for stopping by and God bless.
 
I am the bread of life.
John 6:48