Wednesday, September 30, 2015

Layout of the Week #119

Feel like scrapping?
Then you're in the right place. 
I have a layout idea that you can complete very quickly.
Today's layout has several pieces of pattern paper, but don't be discouraged.
The steps are rather quick and certainly easy.


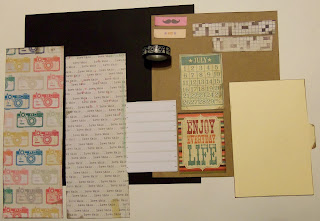
Here's the layout we'll be creating.


To make it, you'll need:
one piece of 12"x 12" cardstock
one piece of 8 1/2"x 11" cardstock
one piece of cardstock for the photo mat measuring 5"x 7 1/2" (I used a large index card divider)
one piece of pattern paper measuring 4 1/4"x 11 3/4"
one piece of pattern paper measuring 4 1/4"x 11"
two strips of pattern paper measuring 1"x 5 1/2" and 1"x 4"
3"x 4" card with pre-printed title or letter stickers for the title
small labels for journaling
embellishments in your theme
adhesive
paper trimmer


To start, place your 8 1/2" x 11" piece of cardstock on the right side of the 12"x 12" cardstock.


Place the pattern paper measuring 4 1/4" x 11 3/4" along the left side of the background cardstock
overlapping the smaller piece of cardstock.


Now adhere the piece of pattern paper measuring 4 1/4"x 11" slightly overlapping the first piece.


Adhere the piece of pattern paper measuring 1"x 5 1/2" along the upper left corner 
of the second piece of pattern paper. 
Place the piece measuring 1"x 4" in the lower right corner about 1" from the bottom
 of the background cardstock.


Now place your cardstock measuring 5"x 7 1/2" about 1 1/2" from the right edge 
of the background paper. This will be your photo mat.
I adhered mine with a strip of decorative tape so that my mat would flip open to give me more room for photos. If you don't need the room, you can adhere the mat right to the background. 

I added one of my embellishments, a mini Bingo card, to the upper right hand corner of the layout.
 

Add your title to the left side of your mat just under the small strip of pattern paper.
I used a pre-printed title. You could use letter stickers if you prefer.


Now add your photos to the mat.
I used two vertical photos.
You could also use one horizontal photo if you'd rather.
Because my mat flips open, I added more photos behind the mat.
 

Add your journaling to your labels and stagger them under the photo mat.
Add an embellishment to the edges of each photo.

That's it! Minimal effort for a cute, layered layout.
I hope you like it:)

Please stop by every other Wednesday for a new step-by-step layout tutorial.
If you have any scrapbooking friends, let them know, too.

Thanks for stopping by and God bless.

Good and upright is the Lord
Psalm 25:8

Tuesday, September 29, 2015

Recipe of the Week #189- Zucchini Pizza Bites

Zucchini Pizza Bites
1 zucchini
olive oil spray
salt and pepper
3/4 cup pizza sauce
1/2 cup shredded mozzarella cheese
12 slices of pepperoni

Cut zucchini into 1/4" pieces. Spray zucchini with olive oil spray and season with salt and pepper. Broil for 2 minutes on each side. Top with pizza sauce, pepperoni, and cheese. Broil for another 1-2 minutes. Don't burn the cheese.

If you'd rather, you can cut the zucchini in half lengthwise and follow the same directions. We tried it both ways and they were both yummy. My hubby went on and on about these. This will be a repeated recipe at our house!


Thanks for stopping by and God bless.

And whoever exalts himself will be humbled, 
and he who humbles himself will be exalted.
Matthew 23:12

Monday, September 28, 2015

Magnetic Monogram Message Board

Magnetic Monogram Message Board- well, that's a mouthful!
It's also an eyeful. . . 


I got this metal letter at Walmart. (Hobby Lobby has them, too.)
Then I added some cute magnets.


And Voila!
A darling message board!

I'm thinking this is a cute and simple gift idea!

Thanks for stopping by and God bless.

Jesus said to him, "You shall love the Lord your God with all your heart, 
with all your soul, and with all your mind."
Matthew 22:37

This post is linked to Natasha In Oz, Tip Junkie, and Plucky's Second Thought.

Friday, September 25, 2015

Don't Leaf These Projects Behind. . .

I can't believe September is almost over!
We're now officially in fall, so let's take a look at some leaf-y projects.
They're all so simple to make. . .

This project just needs leaves, raffia, and mason jars.
So simple!

I was really excited about this leaf mobile.
So unique, don't you think?
You can go here to see more about it.

This grateful banner was made with shipping tags and dollar store leaves.
Go here to see how.


Wanna know what makes vintage books cooler?
Leaves, of course!
Come here and see.


Garlands are so stinkin' easy to make.
And if you buy your supplies at the dollar store, they're so cheap, too.
Here is another leaf garland.

Makes you want to run out to the dollar store and find some leaves, doesn't it?
Or you could use real ones.
Unfortunately, I live in a part of Texas where it's still summer,
so I'm stuck with artificial leaves for now:)

I hope this leaves you wanting to craft!

Thanks so much for stopping by and God bless.

O my God, I trust in You
Psalm 25:2

Thursday, September 24, 2015

Thrifty Thursday #185

Last weekend my hubby and I were planning to get up early Saturday morning
and head 20 minutes down the road to a nearby town that was having a city-wide yard sale.
We intended to spend the morning shopping.
But Friday night, our dog broke off a toenail.
I don't know how she did it- she's a very silly and active Labrador Retriever.
It was gross and we didn't want it to get infected.
So we took her to the vet early Saturday morning.
After she got a clean bill of health, we felt better about leaving her and proceeding with our plans.

Take a look at what we found. . .


You know I looooovvvveee old globes.
I saw this beauty sitting on the back of a car along with a few other items.
I asked the young man how much he wanted for it and he said twenty dollars.
When I didn't respond to that, he asked what I wanted to pay.
I told him five dollars.
He agreed.
It's just so pretty and old- I love it!


I also love typewriters.
I know this one isn't vintage, but it still works.
I was intrigued by the color. 
The gentleman was asking $8. I offered $6 and he took it.
I'm going to use this thing for real- for journaling in my scrapbooks and maybe for typing 
on gift tags. Who knows what else?!?


This beauty was only a quarter.
 I love how old it looks.
It's going to hang on a wall, so the crack only adds to the charm.


You're probably looking at these old pans wondering why I would buy them.
Well, I got them because they're so small. I've never seen cookie sheets this size (9 1/2"x 7").
I think I may try to turn them into recipe holders. . .

I got a few more things. . . come back next week to see the rest.

Thanks for stopping by and God bless.

Show me Your ways, O Lord; 
teach me Your paths.
Psalm 25:4

This post is linked to My Girlish Whims, The Crafted Sparrow, and Life With Lorelai.  

Wednesday, September 23, 2015

Lovelies That I Love

I love every other Wednesday when I get to scour Etsy looking for stuff to share with you.
There's always so much awesomeness to see.
Today's items seem to be pretty girly.
Enjoy!


I totally love the look of the flower on this necklace- the center is so unique!

I love hair sticks- I'm actually wearing one now.
But this one looks like a feather! Love it!
This is a wrap bracelet. Isn't it just so pretty?
This Pride and Prejudice Scarf is so unique.

I've always liked these little cabbage roses-they're even cuter with the colorful drop jewels.
Who wouldn't wear these earrings?
I think they'd look great with the scarf and the wrap bracelet!

Aren't these just so lovely?

I'm not affiliated with any of these companies, I just like their stuff.

Thanks for stopping by and God bless.

To you, O Lord, I lift up my soul.
Psalm 25:1

Tuesday, September 22, 2015

Recipe of the Week #188- The Best Peanut Butter Cookies

The Best Peanut Butter Cookies
1 cup brown sugar
1 cup sugar
1/2 cup shortening
1/2 cup butter, softened
1 cup peanut butter
1/2 tsp salt
2 eggs
2 tsp vanilla
2 tsp baking soda
2 1/4 cups flour

Preheat oven to 350 degrees. Cream sugars, shortening, butter, and peanut butter. Add eggs and vanilla. Mix well. In a separate bowl, mix the dry ingredients. Add to the cream mixture and stir. Roll dough into tablespoon size balls. Roll balls in sugar. Place on cookie sheet, but do not mash with a fork. Bake 11-13 minutes.

I love peanut butter cookies. I craved them when I was pregnant with my second son. I wish I would've had this recipe back then! These are so tasty and soft. Yum!

Thanks for stopping by and God bless.

He is a shield to all who trust in Him.
Psalm 18:30


This post is linked to Natasha In OzToo Much Time, and Plucky's Second Thought.

Monday, September 21, 2015

Mini Album Monday #62- A Little Bit About Me Album

Often I stay behind the lens of my camera
which means I don't show up much in photos or on my scrapbook pages.
But I do know it's important to include myself in some way so I made this A Little Bit About Me book.

I'm not necessarily comfortable being the focus of something, but I think about how I'd love to have something like this featuring my mom or grandma, so I figure someday my boys will appreciate having this.


The front and back covers are an old file divider
(that I got from somebody who was cleaning out their office).


 The book opens downward.
It has eight pieces of white cardstock measuring 8 1/2" x 5 1/2" for the pages.
I used both sides of each page.
Then I punched holes in the pages and bound it with two ribbons.


 Each page has a journaling prompt followed by my answer.
This page says, "My favorite scripture."


 Although each layout is different, you can see that I kept the page design simple.

This page says, "Five random facts about me."


On some pages, I added a photo if it enhanced my journaling.
This prompt says, "A story that always makes me laugh."
Because my story included my boys, I used a photo of them at the time the event happened.


 Each page is white cardstock with a little bit of pattern paper added.
I used regular printer paper and graph paper to journal on.
This page says, "Five words to describe me."


I kept my embellishments simple, by using tiny flowers and decorative punches (like this butterfly).

This page says, "3 defining moments of my life."


The background of this paper is ledger paper on which I wrote my journaling.

The prompt here is, "Favorite childhood memory."


I layered this embellishment I started with a small scalloped circle, added a ticket, and topped it with a tiny stemmed flower. I adhered the flower with two pieces of decorative tape.

This prompt is "My hidden talent."


The last full layout includes two fill in the blank journaling questionnaires
 about "my childhood" and "before I was a mom."


The last page is "My lifelong dream revealed." 

You may have noticed that I only included four photos even though this album is eight double pages.
Because of the type of album it is, I think it still works. 

After going through this album, I'm thinking I need print off these questions for my mom to answer, 
then come up with a simple album to put hers in. . .


I used to teach scrapbooking classes and this was one of the classes I taught..
I'd come up with a mini album and make kits.
Then everybody left with a completed mini album (minus photos).
I forgot how much I enjoyed doing that until I got out today's album.:)


Thanks so much  for stopping by and God bless.


 The Lord has done great things for us and we are filled with joy.
Psalm 126:3

This post is linked to Tip JunkieBetween Naps on the Porch, 
Tatertots and Jello, and Skip to My Lou.

Friday, September 18, 2015

Vintage Book Page Candles

Whenever I'm out secondhand shopping, I'm always drawn to old books.
Needless to say, I have quite a few of them.
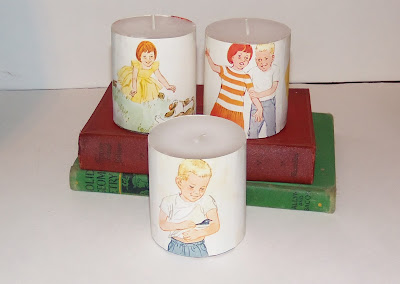
I used a few pages from two different vintage textbooks for today's project.


I wrapped candles with them.


All I did was cut the pages to the same height as the candles.
Then I used Mod Podge to attach them.


Here are the backsides of the above candles.
I covered the entire outside of each candle with images.


Here are the backsides of the first set.

Yes, you can still light them. 
I did it and the candle just burns down behind the paper.


I think these would make darling party decor or sweet gifts for a teacher.

Thanks so much for stopping by and God bless.

As for God, His way is perfect; the word of the Lord is proven
Psalm 18:30

Thursday, September 17, 2015

Thrifty Thursday #184

I had hoped to spend last Saturday morning cruising the neighborhood going to yard sales.
Instead I spent it cleaning my house and taking my boys to go mow a friend's yard.
I did get to squeeze one garage sale in on our way.


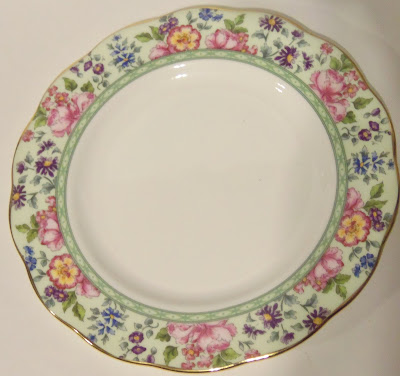
I got this beautiful salad plate and


this plate for $1 each.
They're not vintage, but they're so pretty, I couldn't pass them up.


I loved this container that looks like a locker.
It was only $1 and I'm sure I can find some use for it!

Maybe I'll get to go to some more sales this weekend. . .
there is a city wide yard sale in a small nearby town.
Good luck to you if you get to check some out!

Thanks for stopping by and God bless.

The earth is the Lord's and all its fullness, 
the world and those who dwell therein.
Psalm 24:1

Wednesday, September 16, 2015

Layout of the Week #118

Today hasn't the best day and I unfortunately didn't get a chance to make a layout to share with you.
Instead I'm going to share one from my archives.
This one features making a layout using game pieces.
That sounds like fun, huh?
 
Here's the layout.
You can go here to see how to make it.
Thanks so much or stopping by and God bless.
May He grant you according to your heart's desire,
and fulfill all your purpose.
Psalm 20:4

Tuesday, September 15, 2015

Recipe of the Week #187- Pizza Mozzarella Bites

Pizza Mozzarella Bites
1 pkg mozzarella bites (found in the frozen food section)
1 cup pizza sauce
1 1/2 cups shredded cheese
various pizza toppings (pepperoni, hamburger, Canadian bacon, onions, bell peppers, etc.)

Preheat oven to 350 degrees. Bake the mozzarella bites for 6-7 minutes. Pull them out of the oven and flip over so that the flat sides are up. Place a dollop of pizza sauce on each one. Add desired pizza toppings and cheese. Place back in the oven for another 7 minutes. Remove and serve.

My boys just love these mozzarella bites. One night I didn't feel that I could just serve cheese and bread for dinner, so I decided to turn them into little stuffed pizzas. The boys loved them! I think they would be fun to serve at a party.

Thanks for stopping by and God bless.

I have called upon You, for You will hear me, O God
Psalm 17:6

This post is linked to My Girlish Whims, It's Overflowing, and Between Naps on the Porch.