Showing posts with label party decor. Show all posts

Monday, April 11, 2016

Burlap Banner

I love making banners.
Sometimes I make them with pretty paper,
but my favorite ones have been made from burlap.


I made this one for my friend's baby shower.
The shower had a moustache theme and the color was turquoise.


I started by deciding what size triangle I wanted the letter panels to be.
I cut a triangle out of cardstock and used it as a pattern.
Using a Sharpie marker, I traced around the template for a total of six burlap triangles.


Then I cut out along the inside of my lines (that way the lines wouldn't be visible).
I used foam stamps and black paint for my letters.
On two triangles, I used a heart stamp.
To keep it with the moustache theme, I added moustache stickers to the hearts.
(I liked that they were stickers- that way my friend can peel them off
and use the banner in the nursery if she decides to.)


Then I glued the burlap triangles to a long piece of twine leaving just a little space in between them.
My final step was to add pieces of turquoise ribbon in those spaces.

Easy and cute.
You could make a personalized banner like this for any celebration.

Thanks for stopping by and God bless.

Be still and know that I am God
Psalm 46:10

 This post is linked to USS CraftyGingersnap Crafts, I Gotta Create, and Wow Me Wednesday.  

Friday, September 18, 2015

Vintage Book Page Candles

Whenever I'm out secondhand shopping, I'm always drawn to old books.
Needless to say, I have quite a few of them.
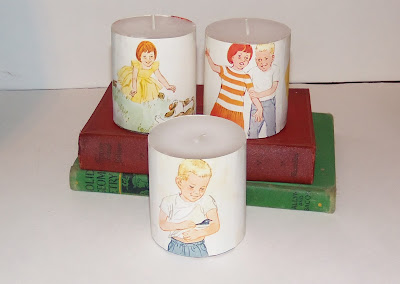
I used a few pages from two different vintage textbooks for today's project.


I wrapped candles with them.


All I did was cut the pages to the same height as the candles.
Then I used Mod Podge to attach them.


Here are the backsides of the above candles.
I covered the entire outside of each candle with images.


Here are the backsides of the first set.

Yes, you can still light them. 
I did it and the candle just burns down behind the paper.


I think these would make darling party decor or sweet gifts for a teacher.

Thanks so much for stopping by and God bless.

As for God, His way is perfect; the word of the Lord is proven
Psalm 18:30

Monday, August 17, 2015

Alphabet Vase DIY

School is set to start in one week.
In some places, it has already begun.
Here's a little something that would be a great teacher gift or even cute classroom decor.


It's an alphabet vase.

I got everything I to make it at a dollar store.
1 large vase
1 medium vase
ribbon
2 packages of alphabet/letter magnets


I started with two vases- one should be able to slide into the other
 with just a little bit of space around it.
Then I dropped the magnets one at a time into that little space.


By dropping them individually, I was able to make sure they didn't double up on each other.
This photo shows that the interior vase isn't as tall as the outer one which is ok
 because that part will get covered up in the next step.


Then I added a bit of tulle. Ribbon would have worked also.


The final step was adding flowers.
I used silk flowers, but real would look beautiful, too.

Here's to the last week of summer!
Thanks for stopping by and God bless.

The lamp of the body is the eye.
 If therefore your eye is good,
 your whole body will be full of light.
Matthew 6:22

This post is linked to Natasha In Oz, Plucky's Second Thought, Lil' Luna, and It's Overflowing.

Friday, June 5, 2015

Vintage Book Vase Covers

Who loves old books?
I know I'm not the only one.
I have several shelves full of vintage beauties,
but that doesn't stop me from buying more when I find them at a good price.
Some are in great shape, others not so much.
Some I'd never cut up, while some are just begging for it (Contrary to my hubby's belief)!

Today I grabbed a few and yes, I cut them up.


How cute are they as vase covers?
Wouldn't they make great centerpieces?


They're actually just two book covers tied together.

Here's how to make them:


Carefully remove the pages from two books without cutting through the covers.
Make small cuts with an Exacto knife or sharp scissors.
I kept flipping mine over making sure that I was only going through one layer.


Once you remove the pages, you'll want to make marks for the holes.
 I marked every 1.5 inches.

Then to make the holes, you'll want to use either a drill or a Crop-a-dile
(which is like a paper punch on steroids).

I used my Crop-a-dile and it went through the covers without any problems.


After the holes are punched, use twine to tie the books together.


Then stand the covers up in a square shape and insert a vase of flowers.

You can set it so that the two different covers show. . .


or so the binding of one book shows.
They're cute from any angle.


I even made one out of vintage school books.


For this one, I used a longer piece of twine at the top holes and tied a bow on the outside.

Wouldn't this one be cute at a teachers' banquet or even a baby shower?

What do you think? Are you itching to run out to a thrift store and get some old books?
I hope so:)

Thanks so much for stopping by and God bless.
I hope you all have a lovely weekend.

If any of you lacks wisdom, let him ask of God, 
who gives to all liberally and without reproach,
 and it will be given to him.
James 1:5

Monday, April 27, 2015

Personalized Burlap Banner DIY

I recently got the opportunity to make a burlap banner for a baby shower.


The baby's name is Hedessah.
Obviously we couldn't find a pre-made banner for her:)


I used this photo as inspiration to make my banner.


I started by making a triangle template.
I took a square 6"x 6" piece cardstock and made a fold  right in the center at one end.
Then I cut from that mark to the opposite two corners creating a triangle.
Once I had this, I used it to draw triangles with a Sharpie marker on a large piece of burlap.
I cut just inside the lines.


I made a total of 10 triangles- one for each letter of the name and two for hearts.
Then I used foam stamps and acrylic paint to paint the letters and hearts.


Once the paint dried, I used my glue gun to attach the burlap triangles to a long strand of twine.
I left a little bit of space in between each triangle.
 I added 3-4 fabric strips in between each triangle.


It turned out better than I thought it would.
As a matter of fact, I am thinking of making another one for a graduation party that
I'm helping to prepare for!

If you like this look, but would rather skip the step of cutting out your own pennants,
you can actually buy pre-cut burlap triangles at Hobby Lobby.
 Then all you have to do is stamp the letters and glue the pieces to twine.

Thanks for stopping by and God bless.

Now may the Lord of peace Himself give you peace always in every way. 
The Lord be with you all.
1 Thes. 3:16

This post is linked to Plucky's Second Thought, Tip Junkie, and Between Naps on the Porch.

Friday, November 28, 2014

Centerpieces to be Thankful for. . .

This past weekend, I got to help decorate for the Thanksgiving lunch banquet at my church.
Two other ladies and I decided to go with a vintage autumn theme.


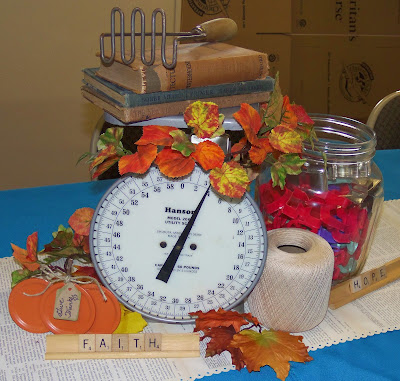
We brought in some vintage stuff from our homes and paired it up as centerpieces.


We incorporated projects that the Children's Church classes had made
(like the painted jars and pumpkins made from Mason jar lids).


We added artificial fall leaves here and there.


We used vintage book page table runners.
Come back on Monday to see more about those!


Who would've thought that scales look so cute as centerpieces?!?


The silver base here is a vintage film roll canister.


Old books work great to give height to different pieces.


Here's another film canister.
I brought my easy autumn mason jars (on the right).


Here are the doily topped pumpkins that I showed you here.


This is a chicken feeder filled with all sorts of vintage goodies!
One of the gals brought this from right off her dining room table at home!


I love how the oranges brought a little pop of color and added to the autumn look!

You can go here and see how I used jute, a leaf, and a book without a cover
 to create the book on top of this pile.


This jar is filled with lots of treasures including a cross stitch piece that one of the ladies' grandma started but never finished. I love how she displayed it in this jar!

See how we used the old crochet thread to sit out as décor?


Scrabble tiles always add to any type of décor if you ask me:)
Thanks so much for stopping by and God bless.
For the Lord is good; His mercy is everlasting,
 and His truth endures to all generations.
Psalm 100:5


Monday, July 28, 2014

Chalkboard Banner DIY

I sure do love a cute banner.
I think they're one of the easiest things to make.
I've made several different ones out of sheet music, paint chips, and shipping tags,
and today I'm showing a chalkboard one.
  
Here it is.

 
I started with two pieces of chalkboard paper
 (I got this in the specialty paper section at Hobby Lobby).

 
Then I used a large index card and made a fold on one of the short sides right in the middle.
This gave me a guide to make my triangle.
I just lined up a ruler with that spot and each of the opposite corners.
Then I cut along those lines.
This created a nice triangle to use for my template.

 
I was able to get four triangles off of each 12"x12" piece of chalkboard paper.

 
Once I cut them all out, I got a long piece of lace and used my sewing machine to sew the triangles onto the lace.
 
 
I love the look of the lace with the black pennants.

 
If you don't want to sew, you could hot glue or staple the paper to the lace.
 
 
This is a very versatile banner as it can be personalized for any get together!
 
Thanks for stopping by and God bless.
 
God is my strength and power, and He makes my way perfect.
2 Samuel 22:33