Monday, May 9, 2016

Mini Album Monday #74- Vintage School Album

With the school year rushing to an end,
I thought it would be fun to take a look at a vintage school themed mini album.

I used a new, but retro looking Crayola crayon box for the cover.
To give it extra stability, I added a wooden ruler to the binding.
The title block consits of a piece of notebook paper,
topped with a library card,
 topped with a piece of cork paper, 
topped with a mini file folder. 

Once I fill this album with photos and memories, I'll add the name to the front of the mini file folder.


This is what it looks like when you open it up.
I used two office rings to bind this album.
That gives me the opportunity to switch around pages or add more pages if needed.


Here's the backside of the crayon box.  
I added a strip of pattern paper along with 
this awesome book "sign out box" (not sure what it's really called).

When my boys were learning to read in elementary school, they came home with small paper books that had these on the first page. After they were done with them, I cut them out to use for projects.

I also turned vintage Dick and Jane images into buttons and added one here.
To do that, I just adhered the image to a piece of chipboard, then used a circle punch to make the button.  I finished them off by adding two small "buttonholes."


In keeping with the school theme, I used a lot of office/school items throughout this album.
This page is a file folder that I trimmed down to size.
On the background, I added a piece of handwriting paper that I had crumpled and inked.
The "My Name Is" sticker is only adhered in the bottom outer corner 
so that a photo can be added behind it.


On the back of the file folder, I just added a strip of paper from an old dictionary.
Notice the clip at the top: it was a plain black office clip 
that I covered with a small piece of vintage book text.


I love how this page turned out.
It's actually an old flashcard attached to a page out of a children's picture dictionary.
I taped the two together, then covered up the tape with a strip of old map.


Here's the backside.
I used a bit of pattern paper to cover where the pages joined.


This next page is actually extra long with a flap folded at the right edge.
I added two stacked floweres that I punched from an old map. 
A brass brad holds the two together.


The page opens to allow room for more photos
and shows a strip from another children's dictionary.


I left the backside of it blank.


This page is actually two office envelopes fastened together to make a page.
I placed a bit of adhesive on the back of the smaller envelope and overlapped it on the large.
Then I added the strip of pattern paper to reinforce the page itself.
This flower is punched from a piece of old ledger paper and attached with a brass brad.
I remember using those old brads when I was in elementary school.


Here's the back of that page. 
I added an image from an old reading textbook which is cute, 
but it also adds stability to the page itself.


The next page is very simple.
It's just part of an old handwriting page with numbers stamped along the outer edge.


I used part of a page from a children's encyclopedia here.
I added a bit of ribbon to the bottom.


Here's the back.
I think these old images add a lot to the vintage feel of the album.


Here I used yet another file folder.
I covered it with a strip of paper from a Dick and Jane book.
In the lower left corner is a pair of star stickers.
I remember getting those in elementary school, too.


For this file folder, I left it the full length, then folded a bit of it to make it two pages.


I left the second page shorter that the first for a little variety.


I used a tiny paper sack for this page.
I got this sack from a gas station. You know how they keep the small ones that hold just one can?
Whenever I go into a gas station, I always ask if I can take one with me:)


This page incorporates some of the pattern papers that I've used on the previous pages.
Notice the silk flower: I used Staz On ink and stamped letters onto it.


The backside is pretty simple with just a strip of pattern paper across the top.


The last page/back cover is part of a manilla envelope cut to size.
I used a random letter stamp along the edge to try to keep it in the school theme.


I happened across this awesome vintage stamp in my collection.
I thought it was the perfect end to this album!

It's been awhile since I put this book together, 
but it was so much fun going through it again looking at all the details.
I think I'll use it to document some of my mom's memories- either from her school years 
or from when she was a teacher.

Thanks for stopping by and God bless.


Therefore, my beloved brethren, 
be steadfast, immovable, 
always abounding in the work of the Lord, 
knowing that your labor is not in vain in the Lord.
1 Cor. 15:58

Friday, May 6, 2016

Everything's Coming Up Roses With These Bracelets

Recently I wandered through Michaels and ended up in the jewelry section.
I couldn't leave empty handed, so I bought some of my favorite turquoise flower beads.

 
I started by mixing them with some ivory rose beads for this bracelet.
But when I finished, I thought a bracelet with all turquoise roses would be pretty.

So I made one of those.

I also glued a couple of the beads to earring backs for a cute pair of earrings.


There's just something about those flower beads!
Thanks for stopping by and God bless.
But thanks be to God,
who gives us the victory
through our Lord Jesus Christ.
1 Cor. 15:56
This post is linked to That DIY Party, Crafty Blog Stalker, and I Heart Naptime.


Thursday, May 5, 2016

Thrifty Thursday #214

As I ran errands earlier this week, I was able to squeeze in a quick jaunt
to my two favorite thrift stores.
I didn't find much, but here's what I picked up.


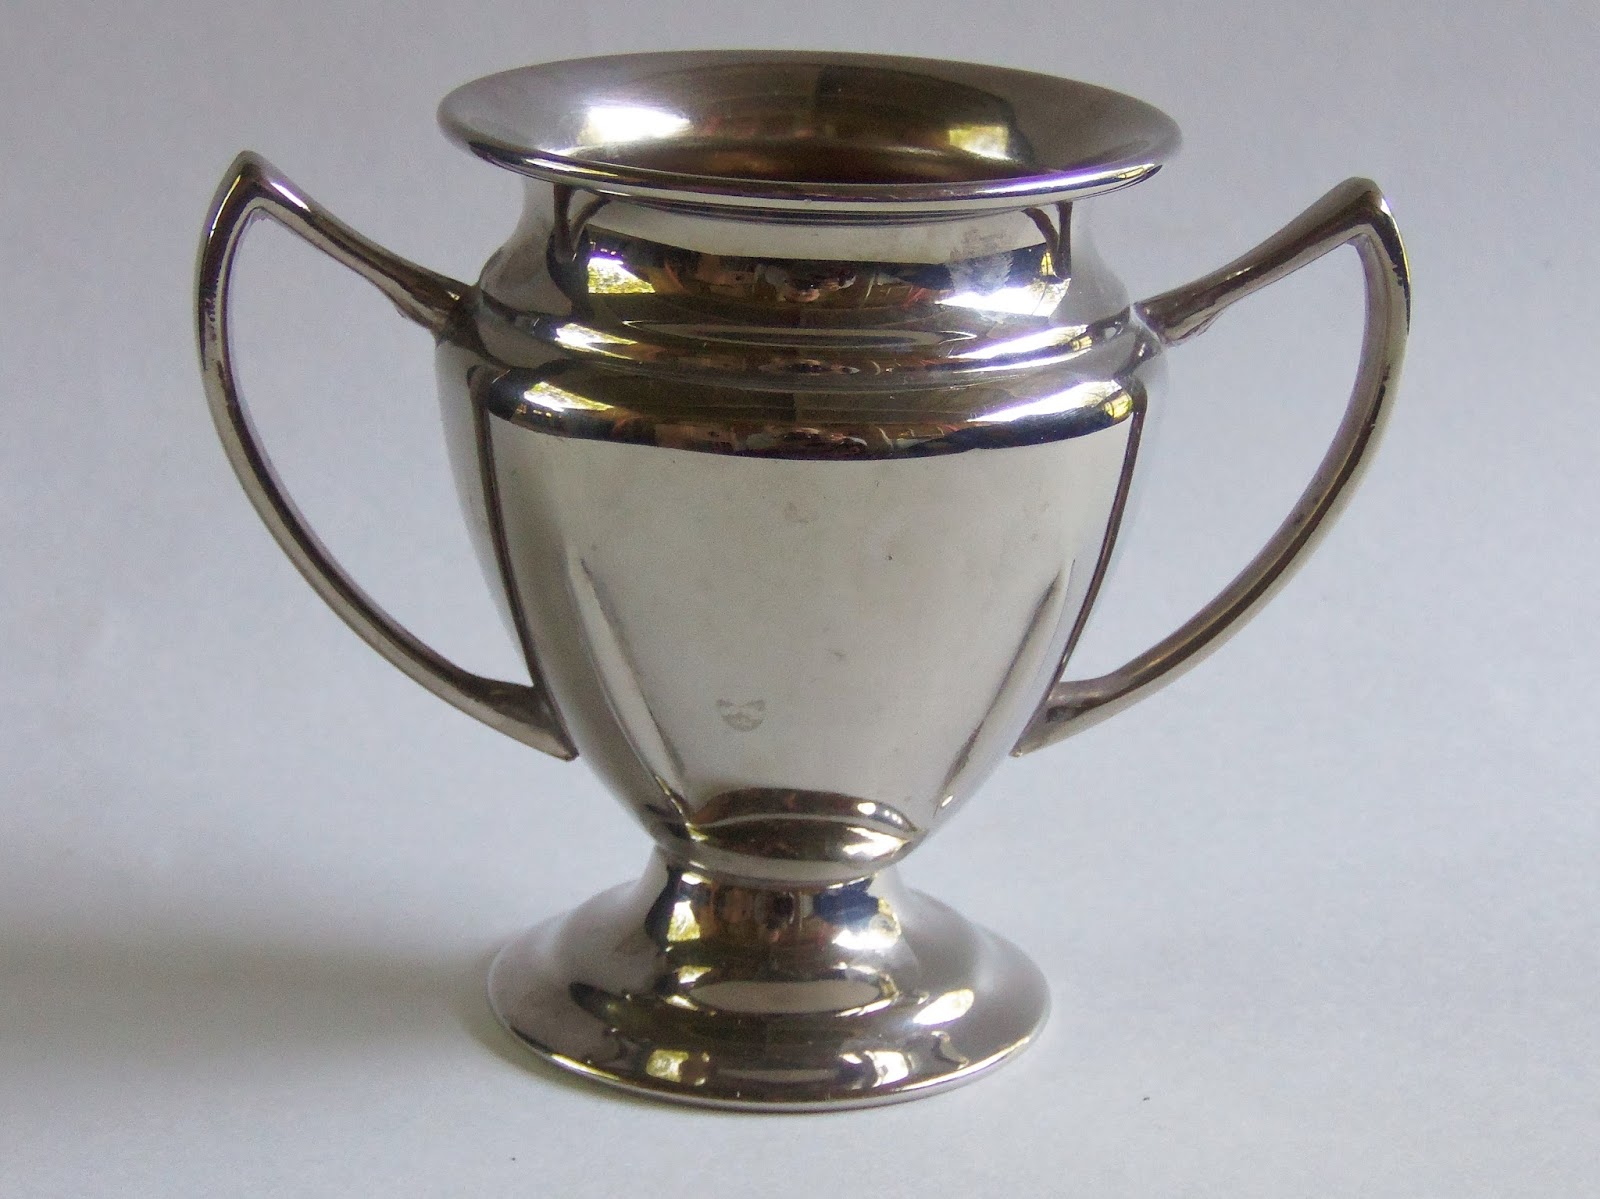
I love this silver creamer. It kind of looks like a small trophy, huh?
It's four inches high.
I paid $2 for it.
I'm thinking it would look cute with a little succulent in it.


I also found this awesome old math book.
I paid fifty cents for it.


I loved the insignia on the cover of this book.
It was a quarter.
I'm going to turn both of these books into Junk Journals.

Last but not least, I got this glass cloche.
It only cost $1.
I never pass these up when I find them for a good price.

That's all for this week.
Did you come across any good finds?
Thanks for stopping by and God bless.
Oh, give thanks to the Lord!
Call upon His name;
make known His deeds among the peoples!
Psalm 105:1
 This post is linked to Blue Willow HouseCraft-O-Maniac, Life With Lorelai, and Too Much Time

Wednesday, May 4, 2016

Layout of the Week #130

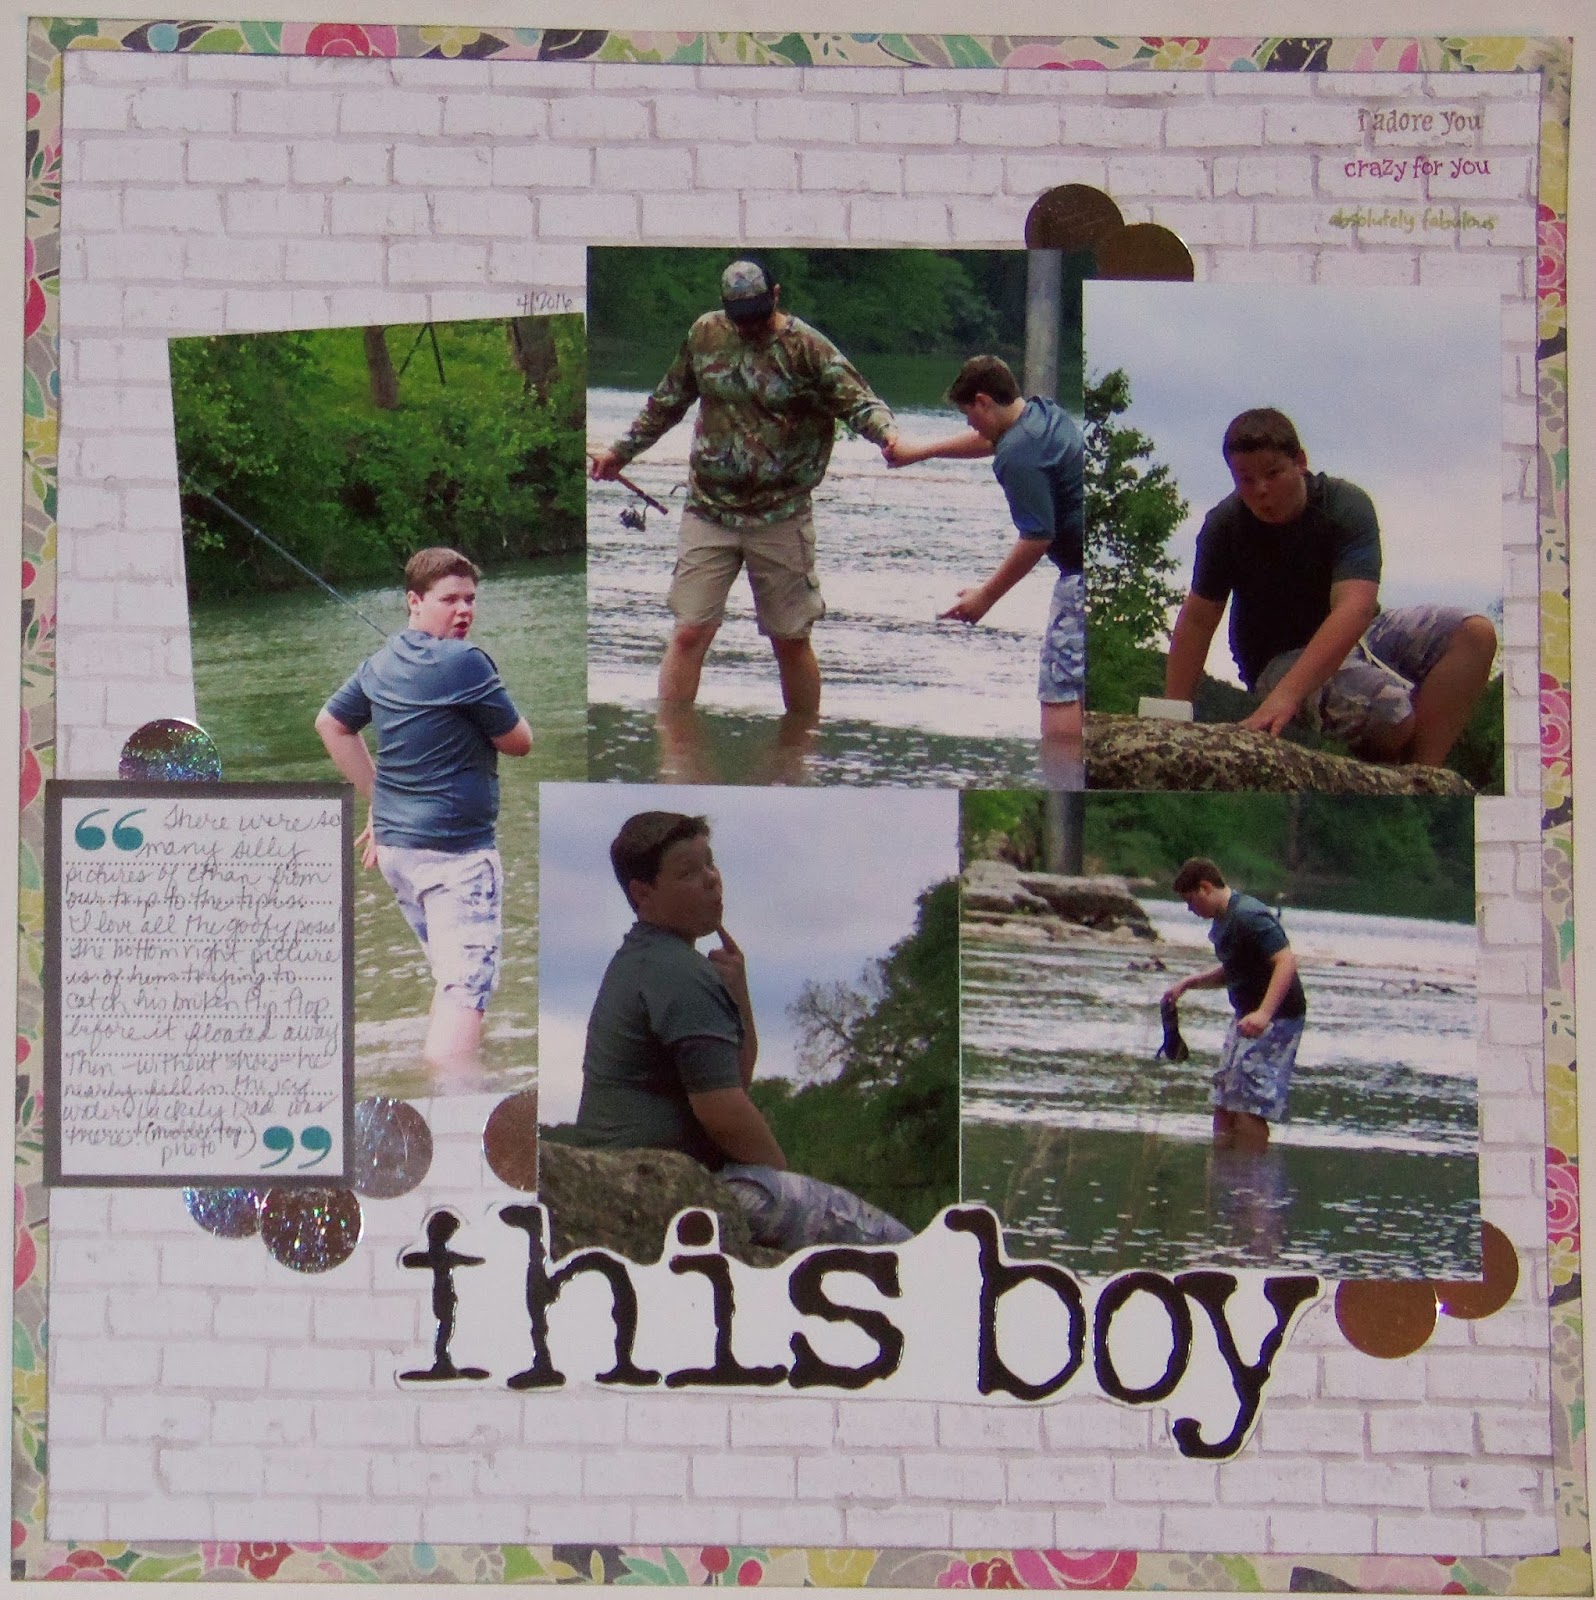
I wasn't sure of what to do for this week's Layout of the Week until I picked up my photos. 
Once I saw the shots I got of my son on our recent mini-vacation, 
I knew I had to put all these silly shots in one place.


Here's the layout we'll be creating.
Yours will look similar, but not exactly like this as you'll be using products you have on hand.
Just follow these simple steps, and you'll have a layout done in no time.


To make it, you'll need:
one piece of pattern paper measuring 12"x 12"
one piece of pattern paper or cardstock measuring 11 1/2"x 11 1/2"
letter stickers for the title
five photos
letter stickers for the title
journaling card (mine is 2 1/4" x 3")
embellishments in your theme (I'm using a stamp with colored inks and large silver sequins)
paper trimmer
adhesive


To start, adhere the 11 1/2"x 11 1/2" piece of pattern paper onto the center of the 12"x 12" piece.


Trim some of the excess off of your photos.
Adhere the first three in a triangle as shown.


Place one photo next to the bottom one.
Then place your tallest photo at an angle to the left of the other photos.
I tucked mine under my other pictures; 
you can decide if you'd rather have your tall photo overlap the others.


Add your journaling card on the bottom left corner of the angled photo.


Using your letter stickers, place your title along the bottom edge of the bottom photos.

I used large letter stickers and adhered them to a piece of white cardstock, 
then cut out around the letters. I felt like it helped the title to stand out.


To finish it off, place one of your embellishments in the upper right corner of the layout.
 I used my word stamp and stamped three phrases using three different colored inks. 

Now add your embellishments here and there around the photos.
I used the large silver sequins.


That's it!
Wasn't that fun?

Did you notice that I used a floral pattern on the background of a layout about my son?
It added just the right pop of color and didn't take away from the masculinity of the layout.
I think it's because I paired it with a brick pattern.

I hope you enjoyed this as much as I did.
Come back every other Wednesday for a new Layout of the Week.

Thanks for stopping by and God bless.

And now abide faith, hope, love, these three; 
but the greatest of these is love.
1 Cor. 3:13

Tuesday, May 3, 2016

Recipe of the Week #219- Cauliflower Soup


Cauliflower Soup
1 medium head of cauliflower, broken into bite-sized pieces
2-3 carrots, diced
1-2 ribs of celery, diced
4 1/2 cups chicken stock
8 fresh crimini or white button mushrooms, diced
1 medium onion, diced
1/4 cup butter
2 Tbsp flour
1/2 cup heavy cream
1/4 cup fresh parsley
salt and pepper to taste

In a pot, bring cauliflower, celery, and carrots to a boil in the stock. In a small pan, saute mushrooms and onion in butter until translucent. Add flour and stir constantly for 1-2 minutes. Add one cup of the warm stock to the flour mixture and stir until thick. Pour this into the broth and veggies and stir to combine. Stir in cream, parsley, and pepper to taste. Heat through.

Before you shake your head and pass up this recipe, think again. It is so delicious! My hubby and I loved it and our boys enjoyed it, too. I can't wait to make it again.

I found this recipe here.

Thanks for stopping by and God bless.

Love never fails.
1 Cor. 13:8

This post is linked to Tuesdays With a TwistMy Girlish Whims, A Morning Cup of Joe,
and Between Naps on the Porch.

Monday, May 2, 2016

Nurses' Week Gift DIY's

Nurses' Week is May 6-12.


Last year, I showed you how you could make this simple medical coat cover for a candy bar.
This year, I have several more gift ideas.
To make them, you just need to get an old medical book and use the pages.
I found my medical encyclopedia at the thrift store.


You can cut out an image from a medical book and use spray adhesive to place the image on a vase.


Looks cute, huh?


You can cover a clipboard.

I used a small one (5 3/4"x 9") and covered it with pages from my medical book.
You can go here to see how to cover a clipboard.


I love the back.


You can cut out images and adhere them to small jars, then fill the jars with candy or other goodies.
Once again, I used spray adhesive to attach the images to the jars.
In one, I placed a succulent.
In the others, I put chocolate animal crackers and Chex Mix.


You can turn part of a page into a necklace.
You can go here to see a tutorial on how to make one like this.


You can also use the pages to make gift card holders.


Just trim the page to 4" wide by 5 1/2" long.
Make sure the image you want is near the bottom of the area that you're cutting.


Fold up the bottom inch and place two staples at the edges to hold the card.
Then fold down the top two inches over the card.
Easy peasy.

Or you can simply give a vintage medical book.
This one is called Simply Nursing and has some awesome graphics in it.

As a nurse, I can tell you that any of these gifts would make a nurse's day.

Thanks for stopping by and God bless.
Love does not envy
1 Cor. 13:4