Friday, January 31, 2014

Heart Garland DIY

It's January 31st and you know what that means. . . Valentine's Day is right around the corner!
 
That means it's time to incorporate a little extra love around your house.
How about with some glitter hearts---strung on some garland?
 
 
See the heart garland strewn along the top of my piano?

 
Talk about bling!

 
If you'd like to make some glitter heart garland, you'll need:
two pieces of glitter paper (got mine at Hobby Lobby in the speciality paper section for half off)
heart punch (mine makes hearts about 2 1/2" across)
sewing machine
 
If you like the glitter hearts, but don't want to use a sewing machine, you could punch holes in the center and string them on some Baker's twine. Voila!

 
Punch out a slew of hearts.
I punched out 32.
 
If you have different styles of heart punches, try them.
I bet this would be cute with different types of hearts.

 
Sew across the heart (either from top to bottom or from side to side).
Continue sewing about 3-5 times before each new heart.
 
Make sure that you press the pedal to make the needle move in between the hearts. The first time I did this, I just pulled extra thread in between each heart. That didn't work.:)
 
 
Keep going until you've sewn all the hearts.
 
 
Here's a little tip: use the scraps and a smaller punch to make punched embellishments for other projects. I did tell you I'm frugal, didn't I?

 
See how festive it makes our piano look?
 
Bring on the Valentines!
 
If you like this style of garland, you can go here to see how I've made it with circles cut
from old book pages.
 
Thanks for stopping by and God bless.
 
Uphold my steps in Your paths, that my footsteps may not slip.
Psalm 17:5
 

Thursday, January 30, 2014

Thrifty Thursday #102

This week's trip to the thrift store didn't yield as many treasures as the last time I went
(see here and here),
but I'm pleased with what I found.

 
I got this small Pyrex mixing bowl for $5.
A good friend has me scouting for old mixing bowls.
I love when a friend asks me to keep an eye out for something while I'm thrifting. . . gives me an excuse to hit the thrift stores- and to spend somebody else's money:)

 
Do you know how excited I was when I spotted this tin covered trunk?
So stinkin' excited! Especially when I found out that it was ONLY THREE DOLLARS!!!
It's going to get painted and become my coffee table. We haven't had one for the last several months- I sold our old one and have been trying to find a replacement ever since.
Enter this soon to be trunk coffee table:)

 
Right after I saw the trunk, I found this awesome silver platter. It was $2. Normally I would probably have passed it up, but I justified this purchase thinking that it would look great on my new coffee table especially since my coffee table isn't going to cost much.
 
Happy Treasure Hunting! Thanks for stopping by and God bless.
 
My son, do not forget my law,
but let your heart keep my commands.
Pro. 3:1
 

Wednesday, January 29, 2014

More Lovelies That I Love


I've started a new series where I feature cute paper crafting products.
So, every other Wednesday, alternating with the Layout of the Week, I'll show you cute stuff that you can buy online. 
I try to choose items that coordinate so they could easily be used in a project.
This week, I've chosen "love" themed items.


How much do you love this love themed paper from Elle's Studio?
I think it's fantastic.
  
 
I think it could be paired with this paper from DIY Boutique.
There are so many relationships you can feature with these papers: husband and wife, family, kids, grandparents, pets. . .
 
 
These label stickers from DIY Boutique could be used on so many different projects!
It would be nice to have these on hand to pull out when you need just one more thing on a project.


I am a HUGE fan of tickets of any kind- I am also a HUGE fan of anything by Jenni Bowlin Studio.
Here are some tickets by Jenni Bowlin. I am swooning.:)
  
 
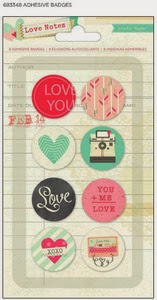
I am a sucker for cute embellishments . . . and these certainly fall into that category.
They're adhesive badges by Crate Paper.
  
Any and all of these products would work beautifully with whatever
Valentine project that you may have planned.
 
I am not affiliated with any of these companies- I just like to share pretty stuff that I find.
 
If you enjoyed this virtual shopping trip, stop by every other Wednesday to see what else I've found.
 
Thanks so much for stopping by and God bless.
 
Judge not, that you be not judged.
Mat. 7:1
 
 This post is linked to 52 Mantles, Too Much Time On My Hands, and  Ivy and Elephants.

Tuesday, January 28, 2014

Recipe of the Week #103- No-Bake Almond Bark Cookies


No-Bake Almond Bark Cookies
2 lbs almond bark candy coating
3 cups Rice Krispies
1 cup peanut butter
2 cups mini marshmallows
 
Melt almond bark. Stir in peanut butter. Add cereal and marshmallows and mix well.
Drop onto waxed paper and allow to set.
 
Note: I usually melt the whole brick of almond bark in the microwave first for one minute, then another minute. If it still needs to melt, I will only do thirty seconds at a time to avoid burning it.
 
These are an old family favorite from when I was young. These cookies are so good! This is an easy recipe to whip up when you need to take some goodies on the run.
 
I'd love to hear what you think of these. Feel free to leave a comment.
 
Thanks for stopping by and God bless.

The Lord is near to all who call upon Him,
to all who call upon Him in truth.
Psalm 145:18
This post is linked to Cheerios and Lattes, The Dedicated House, My Girlish Whims, and Skip to My Lou.

Monday, January 27, 2014

Mini Album Monday #22- "People I Love" Album

With Valentine's Day coming, I thought I'd show you a simple mini album that you can make out of a small tin, like an Altoids tin, and a few pieces of pattern paper and cardstock.
My album is entitled, "People I Love."
You could make a slight adjustment and call it "People Who Love You", and give it to your hubby or have your kiddos give it to their grandparents.
 
 
I started with a plain tin that measures 3"x 4 1/4".
I trimmed a piece of pattern paper to 2 3/4" x 3 3/4", rounded the corners, and glued it to the lid.
Then I glued two clear letters X and O to the lower right corner.
I tied a pink ribbon around the tin. This ribbon easily slides off and on so the lid can
be opened to reveal. . .
 
 
a tiny scrapbook.
It's made from four pieces of kraft cardstock trimmed to 2 3/4"x 3 3/4".
I rounded the corners so they'd fit in the tin better.
On both sides of each piece of cardstock, I adhered a bit of pattern paper. I alternated from covering the bottom of one piece to covering the top of the next piece.
 
If you use a different size tin, simply adjust the measurements for the pages to fit your tin.
I would suggest to cut about 1/4" smaller both vertically and horizontally.

 
Then I printed off black and white photos in a wallet size. I rounded the corners and adhered them to each side of the cardstock.
On the pages that have pattern paper at the bottom, I placed the photo closer to the top and on the pages with the pattern paper at the top, I placed the photos closer to the bottom of the cardstock allowing more pattern paper to show.
 
I had room for six photos: I did an individual one of my hubby and two sons.
Then on the rest of the pages, I used pics that included all three of them.

 
I used alphabet stamps and Staz On ink to stamp names on each photo.

 
I went through with small embellishments- brads, mini flowers, word tags- and ribbon to add a little character to each page.

 
I finished it off by punching holes in the upper left corner and binding with a bit of ball chain.
My journaling says, "Oh, how I love these three men. . . more than words can say. I thank God for them everyday. I am so blessed."
 
Wouldn't this make a nice Valentine's Day gift?
 
Thanks so much for stopping by and God bless.
 
Do not be wise in your own eyes;
fear the Lord and depart from evil.
Pro. 3:7
This post is linked to Tatertots and Jello, Craft-O-Maniac, Tip Junkie, and
 

Friday, January 24, 2014

Using Vinegar in Your House Cleaning

I don't think anybody would say that they like the smell of vinegar, but they sure couldn't argue about how well it cleans!
 
I recently incorporated it into my cleaning regimen.
Take a look:

 
Place 1 cup vinegar in a glass bowl or cup and heat for 4-5 minutes.
Beware: when you open the door, the smell is strong!
 
 
Use paper towels and wipe down the interior.
As the vinegar heats up, everything softens up and will just wipe right off.
No elbow grease needed!

 
The first time I did this, I added some water to the warm vinegar and
used the mixture to wipe down the interior of the fridge.
My oh my, it made the inside of my fridge look as clean and white as the inside of this microwave!
 
The next time I did it (my microwave was not nearly as dirty thanks to this technique),
I mixed the one cup of warm vinegar with one cup of blue Dawn dish soap
to make an awesome tub, sink, and shower cleaner.
It cleans like you would not believe!
Don't take my word for it, though. Try it; you won't be disappointed!
 
Happy Cleaning to you. Thanks for stopping by and God bless.
 
 I will praise You, O Lord, with my whole heart;
I will tell of all Your marvelous works.
Psalm 9:1
 

Thursday, January 23, 2014

Thrifty Thursday #101

Last week I told you about the awesome day I had at the thrift store.
I got so much that I had to split the photos up into two posts!
Yowza, that's a good day of thrifting!!
 
 
Yep, that's right. I found this beautiful decorative birdcage for $5.
It's about 10" tall.
Won't it look lovely with a couple of candles in it?
It even has a chain attached to hang from the ceiling.
Love it!

 
I found this fella sitting right next to the other birdcage.
He's about 8" tall and was only $3.
I'm thinking that I'm going to pair this with a larger birdcage I already had and make a unique chandelier for my kitchen.
Stay posted. I'll surely share pics . . . if it works out:)

 
I got this brand new Paris themed make up bag for fifty cents.
I don't wear much make up or travel much, but I thought it would make a darling cash bag if I ever get a booth at a craft show.:)

 
I also found this brand new wristlet. I think the brand is Natural Life.
This has never been used before. Can you believe it was only fifty cents?!?
 
 
My final treasure was a small one. A vintage button card for a quarter.
There was a whole basket of these, but I have so many buttons already, that I limited myself to this one. I hope to use it in a collage.
 
That's it for this week, but boy, wasn't it a doozy of a score?
 
Thanks so much for stopping by and God bless.
 
And those who know Your name will put their trust in You;
for you, Lord, have not forsaken those who seek You.
Psalm 9:10
 
 This post is linked to Simple Nature Decor, Petticoat Junction, and Made in a Day.

Wednesday, January 22, 2014

Layout of the Week #79- Grouping Photos in a Cluster

About every month to month and a half, I upload photos to Walgreens so I can have hard copies for our family photo album and of course, for scrapbooking.
This process helps me be aware to take more photos.
Needless to say, I have quite a pile of photos that are waiting to be placed on a layout.
Sometimes I'd like to put a bunch on one page, but it's not always easy to figure out how to do that.
 
Today, I'm going to show you how I was able to place eight photos on one layout by grouping them in a cluster.
 
 
Here's the layout we'll be creating.
The most time consuming part will be cropping your photos and deciding how to position them.
After that, there's only a few quick steps to complete the layout.

 
Here's what you'll need to make it:
one piece of 12"x 12" cardstock
one thin strip of pattern paper or decorative tape
letter stickers for the title
pen for journaling
five embellishments
6-8 photos
adhesive
paper trimmer

 
Crop all the excess off your photos.
Arrange the first three like this. They should be close to the top right side of the paper.

 
Continue placing photos in an oval shape leaving space in the center for your main photo.
Since all the photos will end up different sizes, you should end up with a very uneven oval.
I love the randomness of it. If you prefer more structure, you can trim your photos so that the edges line up and it makes more of a rectangle.

 
Place the final photo in the center.

 
Place two embellishments at the top left and the bottom right of the cluster.
 
 
Using your letter stickers, place your title in the lower left corner of the paper.

 
Add handwritten journling on the background above the title.
Place your remaining embellishments around the photo cluster.
I placed one in the upper right corner and two in the middle along the right and
left edges of the cluster.
 
That's it- pretty simple, huh?
Doesn't it feel good to complete a layout?
If you enjoyed this, come back every other Wednesday for a new layout tutorial.
 
Thanks so much for stopping by and God bless.
 
In the Lord I put my trust.
Psalm 11:1
 

Tuesday, January 21, 2014

Recipe of the Week#102 - Sweet Molasses Meatballs


Sweet Heat Molasses Meatballs
1-2 lbs frozen pre-cooked meatballs
1 cup molasses
1/2 cup brown sugar
1/2 cup water
1 tsp garlic powder
1 tsp chili powder
pinch cayenne

In a large pot, bring the water, molasses, brown sugar, and seasonings to a simmer. Add the meatballs and coat evenly in sauce. Simmer until meatballs are heated through. Stir until sauce thickens.
Use sauce for dipping.

These are very tasty. Who doesn't like a quick and easy appetizer?!?My older son could make a meal of them!

I found this recipe here.

Thanks for stopping by and God bless.

The Lord upholds all who fall, and raises up all who are bowed down.
Psalm 145: 14

This post is linked to Craft-O-Maniac, Ivy and Elephants, and Between Naps on the Porch.

Monday, January 20, 2014

Easy to Make Quote Plaque DIY

While browsing through Pinterest, I often come across the cutest printables. It makes me wish I knew how to create them. Since I don't, I just use the ones that people share.

 
I'm going to show you how I took a printable and turned it into a plaque.

 
Here's what I used:
printable
piece of wood slightly larger than the printable
Mod Podge
foam brush for applying the Mod Podge
paper towel

 
Trim the excess paper off the printable making sure that it will fit on your piece of wood.
Carefully and quickly apply Mod Podge to the back of the printable. Make sure you thoroughly cover it, especially along the edges. If you miss a portion in the center, you'll get an air bubble on your finished product. If you don't get all the way along the edges, your printable will start to peel away from the board.
Before the Mod Podge starts to dry, place it centered on the board.
Use a dry paper towel to smooth across the top pressing all across the surface.
Wipe away any excess Mod Podge that seeps out around the edges.
Allow a few hours to dry, then it'll be ready to place on display.
You can either add a picture hanger to the back or place it on a plate display.
I found this printable here.
 
Here are a few other plaques I've made:
 
 
I got this quote here.
  
 
This printable came from here.
 
 
Wouldn't these make great gifts? If you make several at once, it doesn't even take much time.
 
Thanks for stopping by and God bless.
 
Do not be wise in your own eyes; fear the Lord and depart from evil.
Proverbs 3:7


Friday, January 17, 2014

Painted Candlestick Holder

This is a project that's been a longtime coming.
I have wanted to paint this candlestick holder since I bought it over a year ago. It's just been sitting on my kitchen counter looking longingly at me (or maybe I've been looking longingly at it).

 
So I finally sat down and painted it.
Pretty, huh? How about that color?
 
 
This is how it started out. It only cost me a dollar at a yard sale.
 
I started by giving it two coats of metal primer.


Then I painted it in eggshell (the tip is what it looked like before the glaze).
I gave it two coats,
 

 then I covered it with a glaze which I made by watering down brown paint.
 
 
I painted a small area, then wiped off the extra glaze with a paper towel.

 
I think it brings out the detail.

 
I'm super happy with how it turned out.
 
Thanks so much for stopping by and God bless.

Freely you have received, freely give.
Mat. 10:8


This post is linked to Funky Junk, My Repurposed Life, Be Different Act Normal, Too Much Time On My Hands, and I Heart Naptime.