Friday, August 29, 2014

Have You Heard of 30 Days of Lists?

For quite sometime, I've wanted to try this challenge by
30 Days of Lists.
Finally, I'm going to do it.
 
 
Here's what it's all about (from their blog):
 
Not everyone can make a mini scrapbook every week or an art journal page every night.
30 Days of Lists is our encouragement and challenge to you that you CAN journal just something every day- even something as small as a list.
Every day through the month of September 2014 we will be posting a list prompt – anything from weekend goals to celebrity crushes. At the end of the 30 days you’ll have a collection of entries creating a small snapshot of your life right now.
Only 5-10 minutes per day are really needed. While you’re waiting for someone, or when you’re the passenger in the car. You can even download the list topics ahead of time to get a jump start!
That’s all.
Just write.

Sounds do-able, doesnt' it?
I'm super excited to finally try it.
What about you?
 
 You can go here to register.
 

I went to their blog and found some previous lists that they had posted.
I made a quick page to feature the list I chose: my to-do list.
Only took me 10 minutes and was lots of fun. Because it's so low key, I didn't feel any pressure to make it perfect or to spend too much time on it. Love it!

I'm not affiliated with this organization- I just like this idea :)
 
Come back on Monday and I'll show you the mini album that I'll be using for this project.
 
Thanks for stopping by and God bless.
  
Wait for the Lord, and He will save you.
Proverbs 20:22


Thursday, August 28, 2014

Thrifty Thursday #132

Mike, Mike, Mike. . . guess what day it is? (Imagine a talking camel)
It's Thrifty Thursday!
 
I got a few goodies on my quick run into the thrift store this week.
 
 
I found this small book My Holy Communion for $1.25. It's copyrighted in 1951.
It's a tiny storybook (it's only about 4" tall).
 My mom had been asking me to keep my eye out for one of these-
imagine my delight when I found it!

 
I never pass up doilies- especially for a dime!
Sometimes I tuck one of these in a mini album as a unique page
and sometimes I use one when wrapping a gift- these look darling glued onto kraft wrapping paper!

 
I couldn't pass up this 1944 Astronomy book for a dime.
It's going to become a junk journal.

 
I really love the charts in this book!

 
I got this package of Hallmark coasters with the cursive S- a set of 50 (minus a few) for a quarter.
They're part paper, part felt- something different. I think they're disposable.
Pretty cool. Our last name begins with S.
I also may figure out how to work these into a scrapbooking project. . .

 
Even though I got one of these last week, I went ahead and bought one more package of
player piano roll. They were marked down to fifty cents.
 
That's all for this week. Good luck to all of you with your secondhand shopping this weekend:)
 
Thanks for stopping by and God bless.
 
But the word of God grew and multiplied.
Acts 12:24
 
 This post is linked to Ivy and Elephants, Junkin' Joe, and My Girlish Whims.


Wednesday, August 27, 2014

Layout of the Week #93

This is my 93rd Layout of the Week- that's a lot of layouts!
Without this series, I probably wouldn't get any scrapbooking done.

It's a good challenge for me to keep up with my scrapbooking.
I challenge you to follow along every other week- each tutorial takes an hour or less.
That's only two layouts a month, but it doesn't take long before you'll have
a small stack of layouts done. . . such a good feeling:)
 
Today's Layout of the Week takes a bunch of photos, crops them, and fits them together like a puzzle.
 
 
Here's the layout we'll be creating.
I fit 14 photos on mine.
 
You could also do two even rows of 6 photos measuring 4 1/2"x 4"
or three rows of nine 3"x 3" photos.
 
 
To create this layout, you'll need:
one piece of 12"x 12" cardstock
3"x 12" pattern paper
letter stickers for title
white cardstock for journaling
8-14 photos
paper trimmer
adhesive
 
 
Adhere the 3"x 12" piece of pattern paper along the left edge of the cardstock.
 
I used part of a park map that I brought home from our trip to Sea World.
I always bring those home, but don't always find a use for them.
 
 
Start cropping your photos to make them fit.
I started along the top edge.
I suggest before cropping, you lay out the photos to get an idea of how much
of each one you will need to trim.
 
 
Continue adding photos.
 
 
For some of my photos, I overlapped others photos- for others, I butted them up edge to edge.
Use whatever method works best for you.
 
 
Keep adding photos until all the blank cardstock is covered.
 
 
Note: I had one extra small photo left, so I placed it overlapping the two photos
in the upper right corner.
 
 
Add your title overlapping the photos.
 

Print or write your journaling on white cardstock.
Cut it into strips and add it in a column overlapping the pattern paper and photos.
 
I had lots of stories to add- don't feel you have to have this much journaling.
 
That's it! This layout really lets the photos do the talking!
 
If you enjoyed this post, stop by every other Wednesday for a new tutorial to
complete a layout from beginning to end.
 
Thanks for stopping by and God bless.
 
The righteous man walks in his integrity;
his children are blessed after him.
Proverbs 20:7


Tuesday, August 26, 2014

Recipe of the Week #133- Italian Roast Beef


Italian Roast Beef
4 lb beef roast
12 oz bottle Balsamic Vinaigrette Dressing
1 envelope onion soup
Italian seasoning to taste
buns

Spray slow cooker with non-stick cooking spray. Place roast in slow cooker. In a mixing bowl, mix the dressing, soup mix, and Italian seasonings. Cook on low for 8-10 hours. Remove roast, shred, and place back in juices. Serve on buns.

This is another tasty meat for sandwiches. I make a meal in my Crock Pot at least once a week. I love recipes like this where I just have to make a couple of simple sides, then my meal is done!

Thanks for stopping by and God bless.

I have put my trust in the Lord God, that I may declare all Your works.
Psalm 73:28


Monday, August 25, 2014

MORE Low Cost Teacher Gift Ideas

Last week I showed you a few inexpensive gift ideas
for teachers as back to school gifts.
Here are a few more ideas.
Just follow the links to see more details.


All you need to make this is a little bit of scrapbook paper and a large wooden clothespin
 which you can find at Hobby Lobby.


Clipboard + scrapbook paper= display for class photo
 

Dictionary Definition Necklace

This gift is easily personalized depending on
which word you choose to feature on the charm.

I hope everyone's school year starts off with a bang!

Thanks for stopping by and God bless.

Be strong and of good courage, and do it;
do not fear or be dismayed,
for the Lord God... will be with you.
He will not leave you nor forsake you
1 Chron. 28:20


Friday, August 22, 2014

Low Cost Teacher Gift Ideas

Here are a few low cost ideas for back to school teacher gifts.
 
 
For this school themed can, I used a container that had contained peanuts.
I washed it out, then trimmed scrapbook paper to fit along the outside.
I chose two different patterns and adhered them with Mod Podge.
Then I placed a school sticker where the two papers overlap.
I also added red ric rac (attached with Glue Dots) to cover the seam of the papers.
To finish it off, I added a tag to the lid.
 
This would be cute filled with candy or erasers, paper clips, or other school supplies.

 
I used the same method to make this gift out of a Pringles can.
 
 
For the tag, I used stickers on white cardstock to spell out "My Teacher."
Then I matted that to some pattern paper and placed a sticker along the right edge.

 
I overlapped three different stickers to make the tag on the lid.
 
Easy-peasy, huh?
I thought this one would be cute filled with pencils.

 
My last low cost gift idea is this bin for paper storage.
I got the plastic container at a yard sale for a quarter. It originially held pamphlets for some company.
You should be able to find something like this at an office supply store.
 
 
I trimmed a large piece of paper to fit along the inside.
Then I covered the front panel with some coordinating pattern paper
and a tag that says "Due Papers."
 
Cute, cheap, and easy.
I hope you all enjoy this last weekend before school starts!
 
Thanks for stopping by and God bless.
 
Now therefore, our God, we thank You and praise Your glorious name.
1 Chron. 29:13


Thursday, August 21, 2014

Thrifty Thursday #131

My, how the time flies!
I can't believe that we'll be starting school on Monday.
Once school starts, Halloween is just around the corner, then Thanksgiving, then Christmas.
It seems to me that the older I get, the faster time goes. . .
 
Oh, well. My thought is to enjoy every minute- no matter how fast or slow:)
One thing I so enjoy doing is checking out thrift stores.
I have one particular one that I try to pop into once a week.
 
Here's what I found the last time I was in there. . .
 
 
this jar of marbles for $4.
The jar looks old, but isn't. I bought it for the marbles.
I have an old gumball machine in my living room that I'm trying to fill with marbles-
that's where these guys will go.
 
 
Here's a unique find- a roll of piano paper.
Cool, huh? I got it for a dollar.
If you can believe it, there were probably thirty of these at the store.
Somebody must have had quite a collection.

 
I got this small silver tray for fifty cents.
I liked the size and the price.

 
This pretty fabric was only fifty cents.
It's sheer and there's a whole bunch of it.

 
The last thing I bought was this French flower book for a dime.
I'm going to give it to a scrapbooking friend who loves flowers. I'm thinking between the beautiful graphics and French words, she may use it in some projects.
 
That's it for this week's haul.
Thanks for stopping by and God bless.
 
Cease listening to instruction, my son,
and you will stray from the words of knowledge.
Proverbs 19:27


Wednesday, August 20, 2014

More Lovelies That I Love

As I did some virtual shopping this week, I was drawn to a couple of camera related items.
So I decided to go with a camera theme and feature all kinds of cute camera stuff.
On the count of three, say cheese. . .                                      
                                                            and come look at what I found:)
(Too corny, I know.)


I just love this funky camera fabric.
I'm thinking it would make a darling pillow.

 
This World Map Camera Strap totally rocks!
I love anything with a map print.
 
 
I think this Fujifilm Instax Mini Camera is going to go on my Christmas wish list.
Every time I go to Michaels, I gaze longingly at it.
I love the small photos it prints.
 
 
I love, love, love this Mama-razzi pattern paper by Bo Bunny.
The whole line is awesome.
I actually have some of this paper that I haven't used yet,
 but I'm feeling like I need to get it out now . . .

 
How cute are these camera buttons?!?
They're made by A Flair For Buttons and this shop actually has 16 different styles of camera buttons!
These would be cute for scrapbooking or as tags on gifts.
 
What do you think? It's all overwhelmingly cute, huh?
 
I'm not affiliated with any of these companies, I just think they have cute stuff.
 
Thanks for stopping by and God bless.
 
That your faith should not be in the wisdom of men
but in the power of God.
1 Cor. 2:5
 
This post is linked to Ivy and Elephants, I Heart Naptime, and My Girlish Whims.

Tuesday, August 19, 2014

Recipe of the Week #132- Root Beer Float Cake

 
Root Beer Float Cake
1 pkg caramel or yellow cake mix
1 1/2 tsp vanilla
1 tsp finely shredded lemon peel
Root Beer
 
Grease 13"x 9" pan. Preheat oven to 350.
Prepare cake mix according to package instructions, substituting Root Beer for the liquid called for, and adding vanilla and lemon peel. Pour into the prepared pan. Bake according to package directions. Cool in pan for 10 minutes. Remove from pan and cool completely.
 
Root Beer Frosting
1/3 cup butter
3 cups powdered sugar
3 Tbsp Root Beer
1 tsp vanilla
 
Beat butter with 1 cup powdered sugar. Slowly add Root Beer and vanilla. Gradually stir in 2 more cups powdered sugar. If necessary, beat in a little more root beer or powdered sugar to make of spreadable consistency.
 
Cut cooled cake in half crosswise. Frost top of one cake, then top with remaining cake half. Frost top of cake.
 
Note: I substituted 1/2 tsp lemon extract for the lemon peel. Also, my icing was a little thin. I would recommend at least one additional cup of powdered sugar.
 
This cake truly tasted like a Root Beer Float! I made it for my son's birthday and it was a hit! (despite the thin icing). This is a repeat recipe.
 
Thanks so much for stopping by and God bless.

In You, O Lord, I put my trust
Psalm 71:1


Monday, August 18, 2014

Mini Album Monday #36- Yearly School Album

It's almost time for school to start (enter cheers and/or groans here).
In honor of this time of year, I have a fun album to share with you this week:
a yearly school album.
 
 
The beauty of this album is that it documents seven years of school photos in one small album.
Let me show you how I made it. It's very simple if you'd like to make one.
 
The cover is made of chipboard measuring 5 1/4"x 8 1/4".
I used two pieces of school themed pattern paper to cover the front and back covers.
Then I added a title "School Days" printed on white cardstock and matted with red cardstock.
The book was bound with a Zutter Bind-It-All.

 
The title page simply says, "Kindergarten through sixth grade".

 
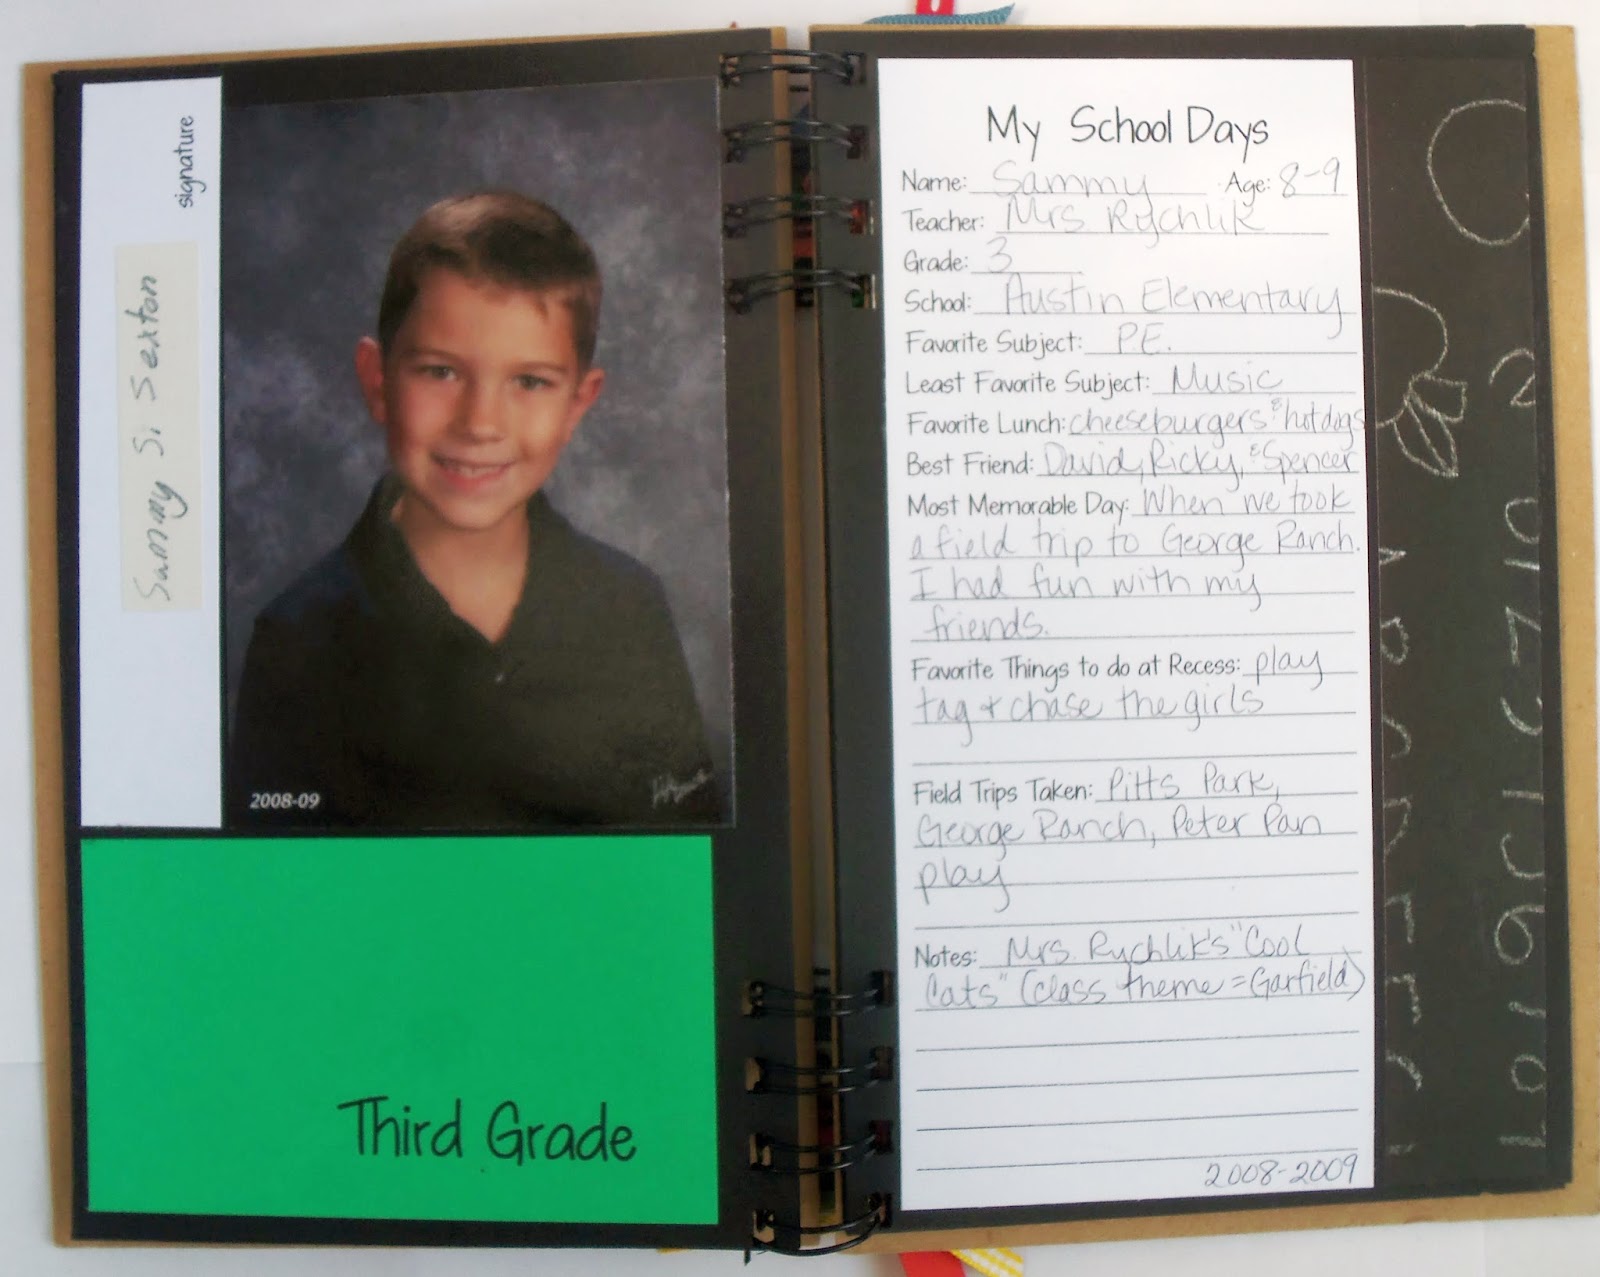
Each layout features that year's school photo,
a signature block to show how my son signed his name that year,
and a questionnaire.
 
 
This album has 8 pages and I used the fronts and backs of each page.
Each page is black cardstock trimmed to 5"x 8".
 
 
On the right side of the layout, is a vertical strip of pattern paper measuring 7 1/2" x 1 1/4".
Next to that is a questionnaire that got filled out every year.
The prompts include:
name
age
teacher
grade
school
favorite subject
least favorite subject
favorite lunch
best friend
most memorable day
favorite things to do at recess
field trips taken
notes

 
Each layout has a piece of colored cardstock measuring 2 1/2"x 4 1/4" in the lower left corner
with a grade level printed on it.
Above that, is a vertical strip of white cardstock measuring 5"x 1"
which provides room for a signature.
Next to that is space for a school photo.
 
 
Each photo measures 3 1/2" x 5".


Every layout is the same, but has a different colored block of cardstock
and a different type of school themed pattern strip on the right.

 
This is a great way to record a school year.

 
My son was looking at this album after I took photos of it and he said,
"Where's 7th and 8th grades?" which I took to mean he likes this album!

 
The back cover matches the front.
 
Seems do-able, doesn't it?
 
Thanks for stopping by and God bless.
 
Seek the Lord and His strength; seek His face evermore!
1 Chron. 16:11