Showing posts with label decor. Show all posts

Monday, July 25, 2016

How to Get Great Coffee Table Style

Think about your living room arrangement.
What takes center stage? The coffee table, right?
Although they're usually a catch all for remotes, magazines, and soda cans,
in just a few steps, you could use your coffee table to add a pop of personality to your living room.
First off, don't limit yourself to the traditional stale choices for coffee tables.
You could use a couple of old crates, a stack of vintage suitcases,
or even a short stack of pallets.


I have an old trunk for my coffee table, but I love this farmhouse coffee table from Chairish.

source
A good base for any coffee table décor is a tray.
You could use an old silver tray, a round basket, a wooden tray, or even a large vintage platter.

source
Then you need to start gathering things to put on the tray. A small stack of books always looks cute.
 I tend to lean towards vintage books, but you could use modern books as well.

source
You could add a few different elements such as a small clock,
a vase or pitcher with or without flowers, and candles.
It good to vary the heights of what you're using to add visual interest.

source
I love how this coffee table has a tray full of candles of different heights.

source
If you're looking at all these pictures thinking, sure, they're pretty, but what do I do with my remotes?, here's an idea for you. Place a pretty tray on the coffee table for them.
 
source
I totally love this last idea.
How about if you place a cool bowl and fill it with mementos.
Then when you have guests over, the mementos can be looked through and stories can be shared.
 
What do you think?
Are you ready to take a small step to make a big refresh in your living room?

Thanks for stopping by and God bless.

This is the day the Lord has made;
we will rejoice and be glad in it.
Psalm 118:24


Monday, July 11, 2016

How I Turned a Wooden Crate into an End Table

You know those wooden crates that you can get at Michaels and Wal-mart?
Well, I've had one sitting around just waiting for me to do something with it.
Guess what I did?


I turned it into an end table.


I started by painting it a light aqua.
Then I applied a grayish stain on top of the paint.
I let each step dry for 24 hours before moving on to the next step.


Then I tore pages out of an old book and cut them into strips. Using spray adhesive, I adhered the strips to the bottom slats of the crate. I chose some pages with images to give the project a cute twist.
My final step was to add castors to the bottom of the crate.


This was such an easy and enjoyable project.

Thanks for stopping by and God bless.

It is better to trust in the Lord 
than to put confidence in man.
Psalm 118:8

Friday, July 8, 2016

Alphabet Wall

Well, I've been talking about it forever, and I finally have it. . 


my alphabet wall!!!


I gathered all my letters- some I crafted, some I bought.
Then I talked my hubby into hanging them up for me.


Yes, my hubby always hangs things on our walls.
Years ago, when we were first married, I tried to surprise my hubby by hanging a large picture on our living room wall. He was pretty pleased until I showed him the wall behind the picture.
There was a large part of the wall that was missing.
My hubby decided then that he would be the all time picture hanger.
No problem with me!

Anyway, take a look at my wall. . . 


Definitely worth the wait!!!

Thanks for stopping by and God bless.

For who is God, except the Lord?
And who is a rock, except our God?
Psalm 18:31

Friday, June 17, 2016

Check Out My Gallery Wall!

I am so excited to show you my new wall décor in our living room.
It all started with buying a canvas featuring a recent family photo.
Then I drew out a plan for what to hang around it, and my hubby helped me to hang it.
(Is it strange that I drew it out first?)
   

I incorporated many thrifty finds like a wine crate, old bobbins, and a printer's tray.
What do you think?
Thanks for stopping by and God bless.
And be kind to one another, 
tenderhearted, forgiving one another, 
even as God in Christ forgave you.
Eph. 4:32

Monday, May 16, 2016

Some of My Favorite Reading Material

We are heading out for a three day mini-vacation, so I don't have a project to show you today.
I do, however, want to share with you what I'll be reading in the car.


I have a subscription to this magazine,
 and I am giddy when I open the mailbox and see it sitting there waiting for me.

I just saw that Walmart has it in their newsstand as well.
Or you can go here to get your own copy.

Thanks for stopping by and God bless.

I will praise You, O Lord, among the peoples
Psalm 108:3

Friday, April 15, 2016

Earth Day Decor from the Dollar Store

Earth Day is next Friday.
Normally, I don't usually pay much attention to it, but this year, 
I thought I'd take advantage of the opportunity to turn some trash into treasure.
You know how that's always a chore for me;)
 

 How cute are these?
Believe it or not, I got everything to make them at the Dollar Tree.


I picked out three cans that had a vintage-y look.
I opened the cans, emptied the contents, then washed them up really well.
(I used one of those can openers that doesn't leave rough edges.
If you don't have one of those yet, you need to get one. They are awesome!)
 

Then I chose flowers to match. 
I think this project would be cute with real flowers, too.
 

For this one, I used a succulent.


I'm tickled with how they turned out.
I think it was six dollars well spent!

I would love to make some of these with vintage cans or even foreign cans.
The next time I drive by an ethnic grocery store, I may have to stop in
and check out their canned goods.
I'm thinking these- along with some vintage scales and spice containers-
 would make a nice addition to a kitchen themed wedding shower.

Here are some fun facts about Earth Day:
* it always falls on April 22
* it arose from an interest in gathering national support for environmental issues
* the most common practice of celebration is to plant new trees

So if you're not up for planting a tree, maybe you want to make a cute floral arrangement.

 Thanks for stopping by and God bless.

Enter into His gates with thanksgiving 
and into His courts with praise.
Be thankful to Him 
and bless His name.
Psalm 100:4

Monday, March 28, 2016

This Light Fixture Is for the Birds!

For the longest time, we had an old light fixture above the breakfast bar in our kitchen.
Then we even went for awhile with no fixture (not sure what was going on there!).
Finally, my hubby decided to do a project that I'd had in mind for that spot.


He hung a birdcage as our light fixture.


I picked up this wooden birdcage for a dollar or two at a yard sale many years ago.
My hubby drilled a hole in the top if it, then added the light kit and attached it to the ceiling.
To finish it off, he added an Edison light bulb.

I'm loving how it turned out!!!

Thanks for stopping by and God bless.

For the Lord is the great God, 
and the great King above all gods.
Psalm 95:3

Friday, February 26, 2016

Flashback Friday: DIY Projects Using Corks

I've started Flashback Friday on the last Friday of each month,
where we'll take a look back at five projects featuring the same theme.

This month, we're looking at projects using corks.
I scored two bins of corks at an estate sale sometime ago.
Follow the links to read more about each project.

This large cork heart wreath is nearly two feet tall and now hangs in the peak of our living room wall.


 A yard-o-corks is a great display for your child's drawings or even for Christmas cards.


I used beads and corks on these key rings.


I love how this cork covered letter turned out.


Go here to see how to make this cork heart
which looks cute on a shelf or can be used as a trivet.

Last month's Flashback Friday was chalkboard projects. Go here to see.

I hope you all have a lovely weekend!

Thanks for stopping by and God bless.

Wait for the Lord, and He will save you.
Proverbs 20:22


Wednesday, February 17, 2016

Check This Out!

I checked my mail this morning and guess what I found in the mailbox?!?


My favorite magazine!
Isn't it so inviting?

I love thumbing through the pages and looking at all the beautiful photos.
It always makes me want to stop what I'm doing and hit the thrift stores.

If you've never read this magazine, I suggest you go get yourself an issue.
I'm not affiliated with it, but I highly recommend it:)
Here's where you can find single issues
and here's where you can subscribe.

Thanks for stopping by and God bless.

Oh, give thanks to the Lord!
Call upon His name;
Make known His deeds among the peoples!
2 Chron. 16:8

Monday, February 15, 2016

A Pop of Love

I've had a jar full of old bottle caps sitting on my mantle for sometime.
I've known what I wanted to do with them, I just haven't taken the time.
Fast forward to this morning. The boys didn't have school due to the holiday
 which meant I also had a little time to myself.
So I broke out my old bottle caps and made this. . . 


I placed the bottle caps in a heart shape inside a shadowbox.


Then I used rub-ons to add the word love to the glass.
I kinda love how it turned out!

Do you have a crafty to-do list full of ideas?
How often are you able to get to it?

Thanks for stopping by and God bless.

Remember His marvelous works which He has done
1 Chron. 16:12

Monday, January 18, 2016

Trash to Treasure: Attic Turbine Turned Light Fixture

Last year, my neighbor had an old attic turbine sitting outside her garage.
I asked if I could have it because I thought it would make 
the most awesome light fixture.


And holy cow! It sure did!


After sitting at my neighbor's for sometime, it sat at my house waiting to be hung.
Then one day, my hubby made it work.
And I totally love it!


It allows light to come through, although not enough to be a main light fixture in a room.
But it's perfect for a front entry, and it casts a cool shadow on the walls.
If you're wondering what is on the right side of the hallway, it's an old door with clipboards displaying photos. You can go here to see it.

Thanks for stopping by and God bless.

Sing out the honor of His name; 
make His praise glorious.
Psalm 66:2

Friday, October 16, 2015

Cigar Box Chalkboard Sign

I love the look of old cigar boxes.
I'd like to get a large enough collection that I could use them to organize my craft supplies.
Then they'd be cute and useful.

I do have a couple of my own.


I chose one that had a pretty plain top and painted it with some chalkboard paint.
I left the sides and inside cover with their original images.

It works as a sign.


I think it would also be darling holding small items in a craft booth.


It would work to wrap gifts, too.


Cute, huh?

Thanks for stopping by and God bless.

In You, O Lord, I put my trust
Psalm 31:1

Monday, September 28, 2015

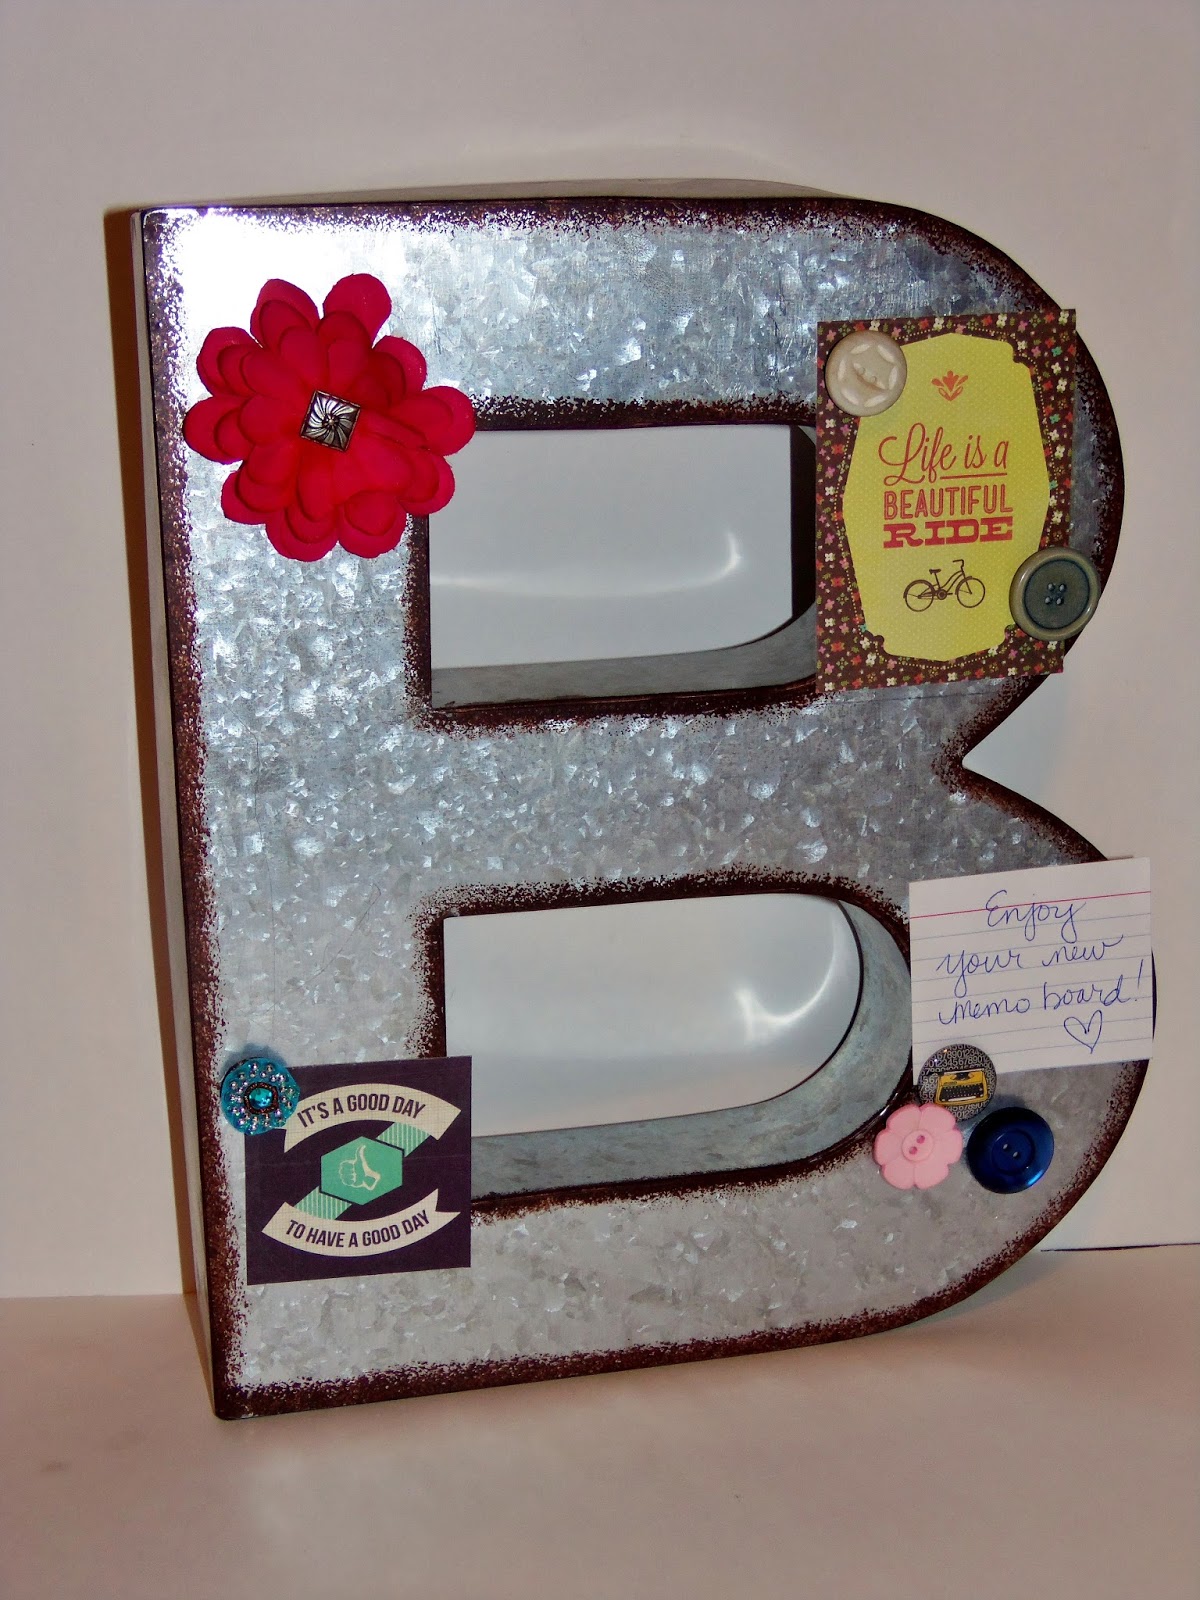
Magnetic Monogram Message Board

Magnetic Monogram Message Board- well, that's a mouthful!
It's also an eyeful. . . 


I got this metal letter at Walmart. (Hobby Lobby has them, too.)
Then I added some cute magnets.


And Voila!
A darling message board!

I'm thinking this is a cute and simple gift idea!

Thanks for stopping by and God bless.

Jesus said to him, "You shall love the Lord your God with all your heart, 
with all your soul, and with all your mind."
Matthew 22:37

This post is linked to Natasha In Oz, Tip Junkie, and Plucky's Second Thought.

Monday, September 14, 2015

How I Turned A Large Clipboard Into a Chalkboard Message Center

I just love clipboards--- and chalkboards.
I was straightening my craft area when I came across this large clipboard
that I had gotten at a thrift store.
And I thought to myself. . .
What's better than a chalkboard clipboard?
How about a giant chalkboard clipboard?!?
This one measures 18" square.


I started off by covering the clip with painter's tape so I wouldn't mess up the silver.


Then I applied two coats of chalkboard paint and waited 24 hours for it to dry.

Now I have a nice message center to keep all my stuff together- like the weekly menu, coupons, appointment reminders, and even love notes to my family.

Don't you just love chalkboard paint?
I'm going to take a look around to see what else I can paint. . .

Thanks for stopping by and God bless.

The Lord has done great things for us 
and we are filled with joy.
Psalm 126:3


This post is linked to The Dedicated House, Plucky's Second Thought
I Heart Naptime, Funky Junk, and Natasha In Oz.

Friday, September 4, 2015

Check Out This Little Red Wagon

A few months ago, a good friend and I took a trip to the awesome flea market in Canton, Texas.
I brought home many treasures including two wooden sides to an old red wagon.
I couldn't leave them behind even if they were in an extremely used loved state.


With a little help from my hubby, I turned them into coat racks.


I sanded them down to make sure there weren't any rough edges.
Then my hubby attached the drawer pulls and added a piece of wood along the back of the
top plank so they'll be sturdy enough to hold coats or towels.


I think the worn edges add to the charm.


I chose worn looking spigots for the first rack,


and distressed stars for the second one.
I don't know which one I like better!

What do you think?

Thanks so much for stopping by and God bless.

And let us not grow weary while doing good, 
for in due season we shall reap if we do not lose heart.
Gal. 6:9

Friday, August 7, 2015

Decorative Letter DIY

In this day and age it's easy to get overwhelmed with all that's on our to-do lists.
Taking a little time for ourselves is refreshing- so that we can get back to do what we need to do.:)
I find that I like to use my "me" time doing something crafty. 
I suggest that you try to take some time to be creative.
Here's a simple project to get you started.


Try your hand at making a decorative letter.


To make one, you need:
paper mache letter (mine is 8" tall)
large piece of pattern paper
paint
Mod Podge
2 paint brushes
sandpaper
fabric flower or ribbon


To start, paint the edges of the letter.


Once the paint dries, put your letter on the back of the pattern paper
 and trace around it leaving plenty of space. Then cut around those lines.
I lined mine up up at the top right corner to make it easier 
to get my paper on straight for the next step. 


 Cover the front of the letter with Mod Podge.


Lay the paper on top of the letter. 
I lined my paper up at the top left corner to make sure it was straight.
Press along the entire letter paying close attention to the edges to make sure all the paper adheres.


This is what it looks like from behind.
I feel working with a little extra paper around the edges allows me to cover the entire letter.
If I cut it exactly to size, I have to be sure to line it up exactly which is difficult to do on wet glue.


Carefully use your sandpaper along the edges to remove the excess paper.


Finally, add a flower or ribbon to your letter.


Here's a side view to show how painting the edges gives it a more finished look.

One of these would be a great gift for a teacher (with school themed paper),
for a baby shower or even for a house warming gift.

I hope you have an awesome- and creative- weekend!
Thanks for stopping by and God bless.

Charm is deceitful and beauty is passing, 
but a woman who fears the Lord, she shall be praised.
Proverbs 31:30