Showing posts with label jewelry. Show all posts

Monday, August 8, 2016

Repurposed Bracelets: Belts to Cuffs

I've had this project in mind for awhile.
I've been collecting leather belts to turn them into bracelet cuffs.

It's actually been on my to-do list for about three months.
Do you ever have something that you want to do, 
but you're just afraid to start it because you don't know if you can do it? 
That was this project for me.

Then I finally told myself, "Just cut the belt. What's the worst that can happen?"
 I'd just mess up a yard sale belt.

 Crazily enough, that first cut was super easy.:)


Once I got started, I couldn't stop.


I cut off between 6 1/2" and 7" for each cuff.


Then I punched two small holes on each end.
I used my Crop-A-Dile to make the holes, but there are special leather tools made for doing this too.


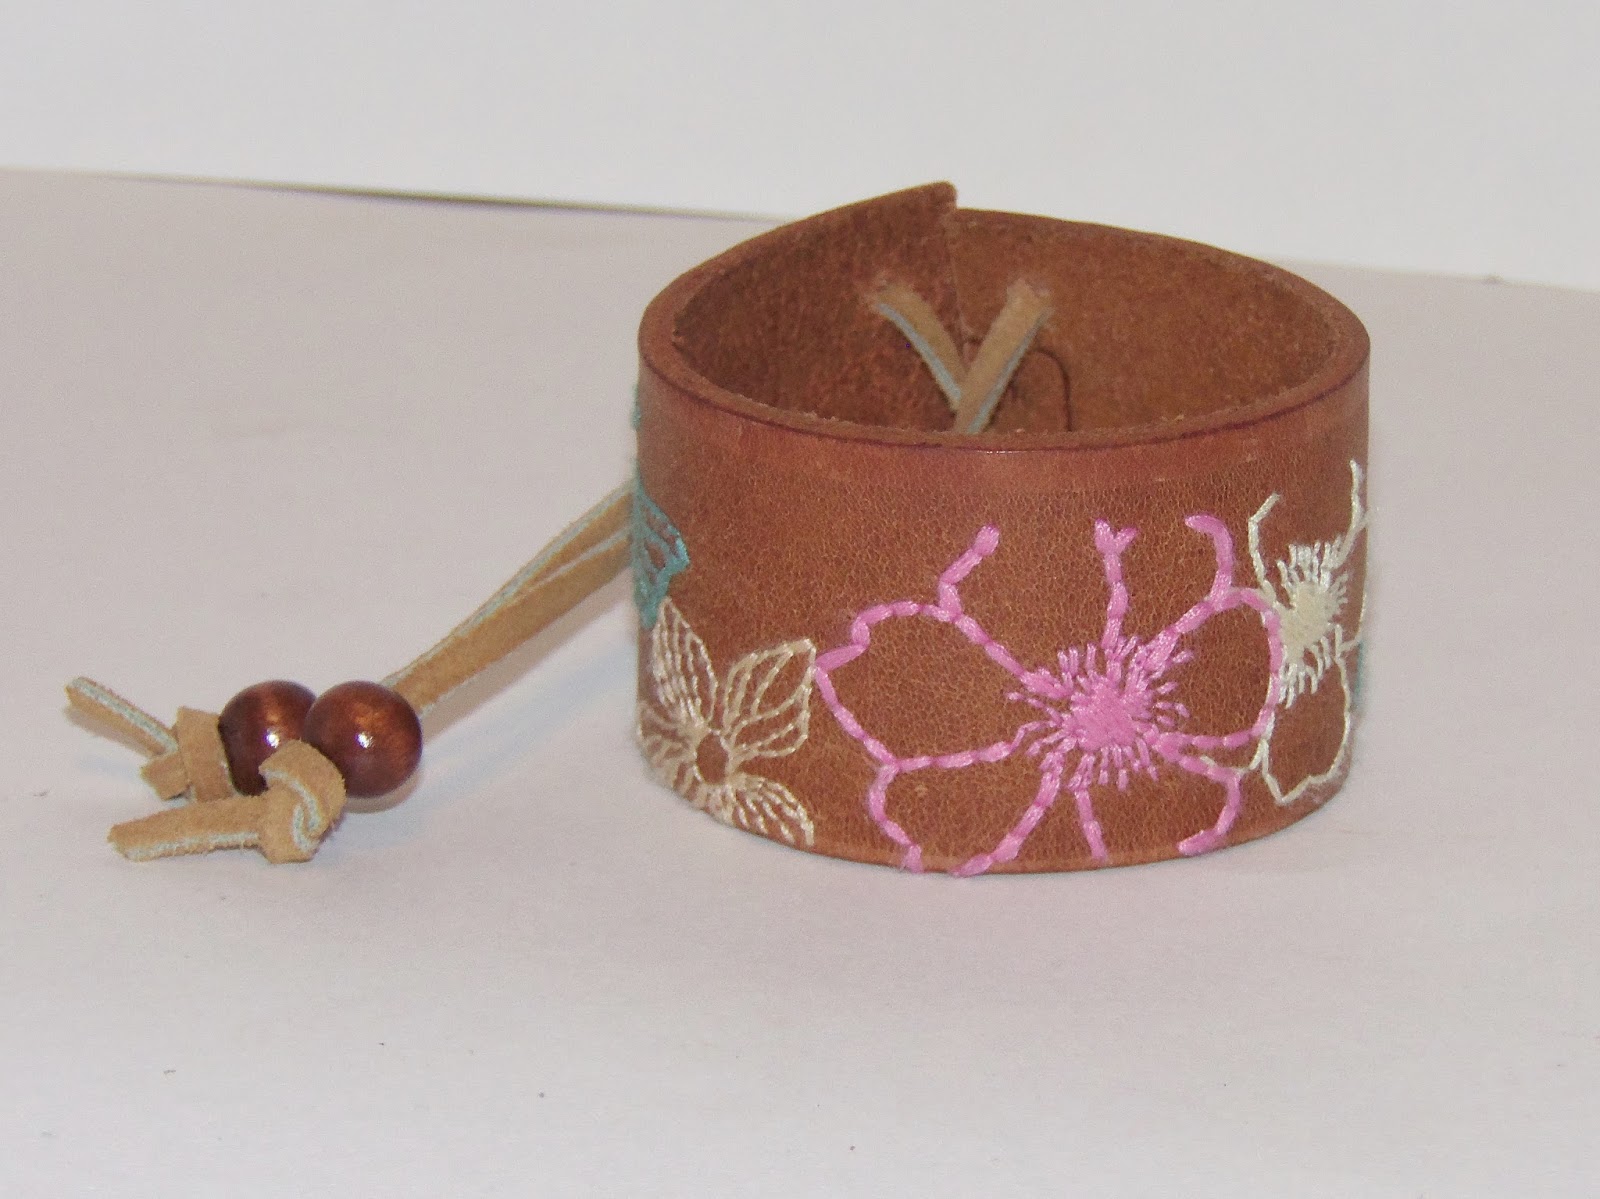
 Finally I threaded narrow leather string through the holes.
I added wooden beads at the end of each strap just above the knots.


On this cuff, I added a metal quote band.


For these, I used some fabric as ties.
 

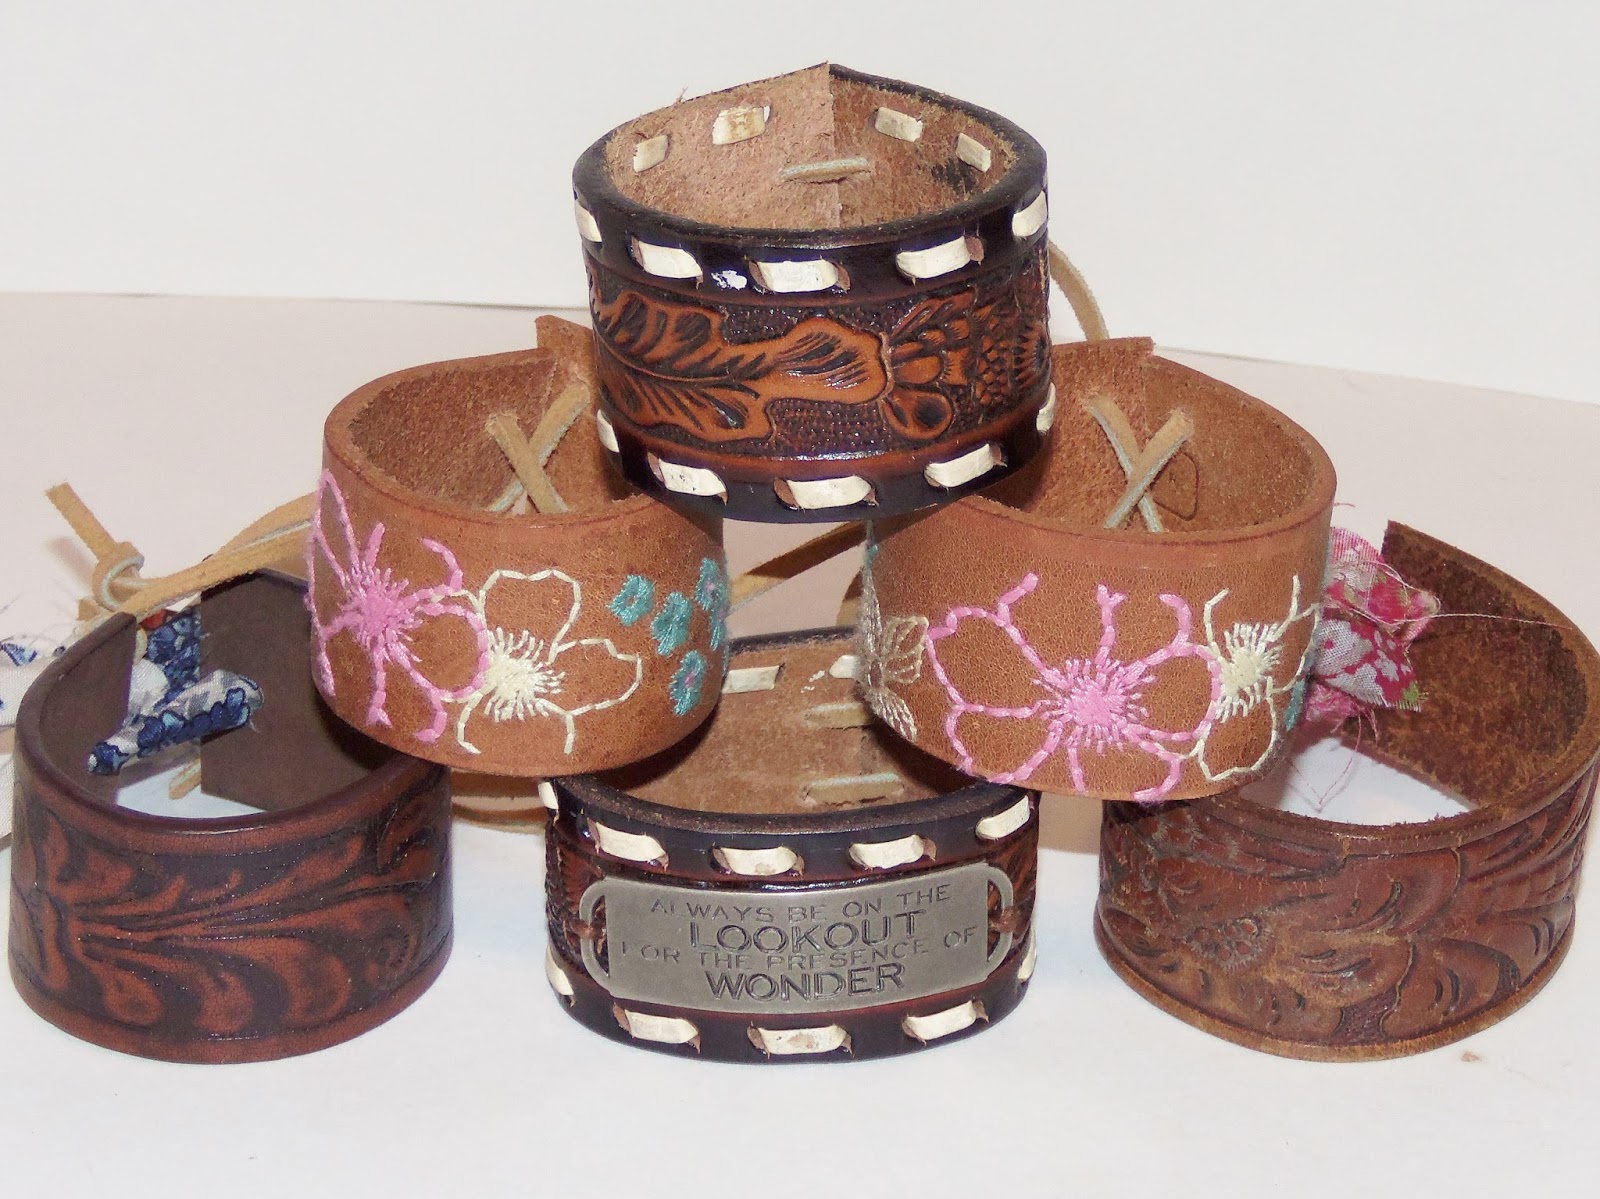
I got all these belts at yard sales and/or thrift stores.
I still have quite a bit of the belts left. I think I'm going to have to make some more. 
One belt even has the words rodeo queen engraved on it. Won't that make a cute bracelet?

If you are dealing with something in your life right now that you're not sure how to handle,
just take that first step. Stop dreading it. "Just cut the belt." 
You'll find that it wasn't worth the worry that you put into it.

Thanks for stopping by and God bless.

Rejoice always,
 pray without ceasing, 
in everything give thanks; 
for this is the will of God in Christ Jesus for you.
1 Thes. 5: 16-18

Friday, May 6, 2016

Everything's Coming Up Roses With These Bracelets

Recently I wandered through Michaels and ended up in the jewelry section.
I couldn't leave empty handed, so I bought some of my favorite turquoise flower beads.

 
I started by mixing them with some ivory rose beads for this bracelet.
But when I finished, I thought a bracelet with all turquoise roses would be pretty.

So I made one of those.

I also glued a couple of the beads to earring backs for a cute pair of earrings.


There's just something about those flower beads!
Thanks for stopping by and God bless.
But thanks be to God,
who gives us the victory
through our Lord Jesus Christ.
1 Cor. 15:56
This post is linked to That DIY Party, Crafty Blog Stalker, and I Heart Naptime.


Monday, May 2, 2016

Nurses' Week Gift DIY's

Nurses' Week is May 6-12.


Last year, I showed you how you could make this simple medical coat cover for a candy bar.
This year, I have several more gift ideas.
To make them, you just need to get an old medical book and use the pages.
I found my medical encyclopedia at the thrift store.


You can cut out an image from a medical book and use spray adhesive to place the image on a vase.


Looks cute, huh?


You can cover a clipboard.

I used a small one (5 3/4"x 9") and covered it with pages from my medical book.
You can go here to see how to cover a clipboard.


I love the back.


You can cut out images and adhere them to small jars, then fill the jars with candy or other goodies.
Once again, I used spray adhesive to attach the images to the jars.
In one, I placed a succulent.
In the others, I put chocolate animal crackers and Chex Mix.


You can turn part of a page into a necklace.
You can go here to see a tutorial on how to make one like this.


You can also use the pages to make gift card holders.


Just trim the page to 4" wide by 5 1/2" long.
Make sure the image you want is near the bottom of the area that you're cutting.


Fold up the bottom inch and place two staples at the edges to hold the card.
Then fold down the top two inches over the card.
Easy peasy.

Or you can simply give a vintage medical book.
This one is called Simply Nursing and has some awesome graphics in it.

As a nurse, I can tell you that any of these gifts would make a nurse's day.

Thanks for stopping by and God bless.
Love does not envy
1 Cor. 13:4

Friday, March 25, 2016

Flashback Friday: Unique Jewelry Pieces

I've dedicated the last Friday of the month to flash back to previous projects
all within the same theme: hence, Flashback Friday.
 This week, we're looking at some eclectic jewelry pieces.
Follow the links to read more about each project.

This recycled bracelet is made with an old locker plate.
Unique, huh?

These beaded necklaces each have a sewing bobbin and tiny buttons.
Go here to see them.


I used the leather from an old baseball to make this bracelet.


I just love vintage game pieces.
I incorporated Bingo pieces on this bracelet.


What do you think of these bracelets?
I used pieces of vintage wooden rulers to make them.

I hope you all have a fabulous weekend. We're going to see Miracles From Heaven tomorrow.
I've heard it's a great movie.
Thanks for stopping by and God bless.

Let us come before His presence with thanksgiving;
  let us shout joyfully to Him with psalms.
Psalm 95:2

This post is linked to Pretty Handy Girl, I Heart Naptime, My Salvaged Treasures,
That DIY Party, and Artsy Fartsy Mama.

Friday, January 29, 2016

Flashback Friday: Chalkboard Project DIYs

I thought it would be fun to take a peek back at past projects,
so the last Friday of every month will be Flashback Friday
where I'll feature five projects with the same theme.

This month is chalkboard projects.
Who doesn't love chalkboard paint?


I turned this thrift store tray into a chalkboard.
Go here to read more about it.


This is a chalkboard necklace.
Cute, huh?


I painted a chalkboard panel onto a vintage suitcase.
Check it out here.


This cheese dome was another thrifted find.
I thought a chalkboard base would give it a little character.


I love making buntings, so I was tickled to turn chalkboard paper into a banner.

Makes you want to break out some chalk, doesn't it?

I hope you have a fantastic weekend! Thanks for stopping by and God bless.

A new commandment that I give to you,
that you love one another;
as I have loved you, that you also love one another.
John 13:34

 This post is linked to Too Much Time, A Morning Cup of Joe, My Salvaged Treasures,
 Funky Junk, and I Heart Naptime.

Friday, January 22, 2016

Easy Necklace DIY

Today I've got an easy necklace DIY.


Here's the necklace we'll be making.


To make one, you'll need:
Tim Holtz Typed Tokens
small resin flowers
small circle blanks
ball chain
jump rings
E-6000 glue
two pairs of jewelry pliers


First, you need to glue a flower to the circle blank using E-6000 glue.
Allow to dry for 24 hours


Using two pairs of jewelry pliers, open a jump ring.
Don't pull it apart; instead twist it to open it.
This way it will close properly without leaving a gap.


Place a jump ring on the flower piece.


Close the jump ring.


Apply a jump ring to a Tim Holtz token as well.


Cut a length of ball chain to 20".
Place both the flower and the token onto the chain.
Attach a ball chain closure at the end.


Ta-da!


I made twenty of them to take to work and give to my co-workers as Christmas gifts.


I think they're pretty cute!

If you like this, but don't want to make one, you can get one here.

Thanks for stopping by and God bless.

Come and hear, all you who fear God, 
and I will declare what He has done for my soul.
Psalm 66:16

Friday, June 26, 2015

Colorful Bracelet DIY

 Have you ever tried to make a bracelet?
It's not too hard.
Here's how I made this one.


I just love all the colors.


I started with these two items from Hobby Lobby.
I also used some silver beads and elastic jewelry cord.
 On the back of the elastic cord package are directions on how to tie knots for jewelry.


It's a bit hard to see in this photo, but I started by tying the elastic to one edge of the jewelry plate.
(I use thin elastic, so I usually use two strands to make the bracelet stronger.)


Then I alternated colorful beads with silver beads.
I think the silver beads seem to dress it up.


I kept adding beads until the bracelet was long enough to go around my wrist.
Then I tied the elastic cord off on the other side of the jewelry plate.

This is my new favorite piece.
With all those colors, it goes with nearly everything!

Thanks for stopping by and God bless.

And this is His commandment: 
that we should believe on the name of His Son Jesus Christ
 and love one another, as He gave us commandment.
1 John 3:23

Friday, June 12, 2015

Wood Beads with a Pop of Color

The other day, my sister came over and needed me to repair a bracelet of hers,
 so while I had my supplies out, I whipped up a few new ones.


 I thought the colorful crosses would be just the right pop of color for these wooden beads.


I alternated silver beads with the wooden beads to dress them up a bit.


I think they look cute individually


or even doubled up.

Have a wonderful weekend!
Thanks for stopping by and God bless.

Humble yourselves in the sight of the Lord,
 and He will lift you up.
James 4:10

This post is linked to Life with Lorelai, My Repurposed Life, and I Heart Naptime.