Friday, June 14, 2013

"Create" A Bracelet

     I was shopping at a gift store with my friends, and I saw the most beautiful bracelet. It was a beaded bracelet with a silver word plate. It was $40 though, so I didn't get it.
     I am a frugal girl who sees something cute, then says, "I can make that." And that's just what I did with this bracelet.

 
I first found the vintage looking charms at Hobby Lobby. They are a part of the Timeline line of jewelry, and they were half off.
Then about a week later while walking around Michael's, I saw this silver plate with the word "Create." When I paid for it, it turns out that it was on clearance for $1.99!
I got home and pulled out a toggle clasp, some jump rings, and these dangly pearls (that I had bought at a thrift store).

 
These are the items that I used to make this:
"Create" connector by Bead Landing
vintage style charm bracelet by Timeline
four jump rings
one toggle clasp
one dangly pearl
 
 
I used a jump ring to connect one side of the charm bracelet to the Create connector. Then I measured it on my wrist to see how many charms would need to come off- keeping in mind that I needed to allow room for the toggle clasp, too. It turns out that I only needed six of the eleven charms.
I connected the end of the strand of charms to the other side of the Create connector and also added the dangly pearl to the jump ring.
Then I opened the ring in the center of the charms to add a toggle clasp.
It was one of the easiest bracelets I've made. And for right now, it's my new favorite!
This bracelet cost me less than six dollars for the supplies- and I even have several of the vintage charms left over. Not too shabby compared to the price of the $40 inspiration piece!
 
Thanks for stopping by and God bless.
 
Greater love has no one than this, than to lay down one's life for his friends.
John 15:13

This post is linked to Happy Go Lucky, Happy Hour Projects, Five Days Five Ways, My Repurposed Life, I Heart Naptime, and Tater Tots and Jello.

Thursday, June 13, 2013

Thrifty Thursday #72

     Last week, my hubby and kids decided to come with me running errands- to thrift stores and grocery shopping! Hard to believe, I know.  
     We stopped a t a thrift store I've only been to once before. It's close to where we live, but the first time I went, I wasn't impressed with the selection or the prices. I decided to give it another chance.
 
 
I found these two packs of metal bobbins. They were $1.50 per pack.

 
There was a whole rack of brand new beading items.
I got these two packs of eye pins for a quarter each.
 
I decided that I may not have given that thrift store a fair shake. I may have to add it to my weekly rounds. 
 
Then on Saturday morning, I gave my neighbor a ride to a doctor's appointment. While she was there, I took advantage of the time and went to a couple of yard sales in a neighborhood I've never been to. It was definitely worth it because I found. . .
 

this printer's tray!
Isn't it beautiful? I only paid $3 for it!!
Oh, how I love it.
 
 
I also found this metal magazine holder for a dollar. I love how has a locker look to it (someday I hope to find a real locker to bring home:).
 I think I'll hang this in my younger son's room for magazines.
 
Now that summer is here, I have switched my work day from Friday to Monday. . . guess what that means? I get to go to Friday yard sales! So looking forward to that!
 
Thanks for stopping by and God bless.

Blessed be the Lord God, the God of Israel, who only does wondrous things!
Psalm 72:18


Wednesday, June 12, 2013

Layout of the Week #57- Using Aluminun Foil in a Layout

     You probably read this title and thought, "What?! Aluminum foil?" That's right, Folks. It's not just for your leftovers anymore:)
     Since Father's Day is around the corner, I did a layout about my dad.

 
Here's the layout we'll be creating. Because you'll be using your own papers, yours won't be exactly like it, but it will have the same look.

 
To create it, you'll need:
one piece of 12"x12" pattern paper
one strip of pattern paper measuring 1" x 12"
one strip of pattern paper measuring 5 1/2"x 3/4"
one piece of paper for journaling- measuring 4 1/2"x 7 1/2" (I used a piece of ledger paper)
one piece of aluminum foil measuring 6 1/2"x 7 1/2"
one border strip (that we'll be cutting into two parts)
one 5"x7" photo
letter stickers for the title
paper trimmer
adhesive
 
 
First, adhere the 1"x 12" strip along the bottom edge of the pattern paper.

 
Then adhere you journaling paper along the strip at the bottom about  1/2" from the right edge.
Leave about 1" on the bottom of your paper blank which is where we'll be placing our title.
 
I printed my journaling out on the computer. I didn't write much, so there was some space at the top of the ledger paper. I'll cover it up later.
My journaling reads,
I remember Dad trying to teach me to drive stick in his little blue Toyota Corolla. I didn't do well.
I remember Dad and Mom surprising me with my own saxophone so I could be in band. I was thrilled.
I remember Dad reading the Sunday classified ads telling me that I should be a nurse. I was skeptical.
I remember Dad being so proud of me when I joined the Army. I loved making him proud.
I remember going on a helicopter ride with Dad above Sugar Land. I was nervous and excited.
I remember going with Dad and Mom to Six Flags in San Antonio before I left for the Army. We had a delightful time.
I am indeed blessed to call him dad

 
Now place your strip of pattern paper measuring 5 1/2" x 3/4" vertically along the journaling paper. Half it's length should extend up past the journaling paper. 

 
Now we'll be working with the aluminun foil. Tear the bottom edge off your aluminum foil on the shorter side. We don't want to shorten the side measuring 7 1/2" because that is going to line up with our journaling paper.
 Then adhere it overlapping your journaling paper. It should be about 1" from the top of the pattern paper (in this photo, mine isn't 1" from the top, but I fixed it as you'll see in the next photo.)

 
Trim your photo to 6 1/2" x 5 " and adhere it to the aluminum foil. There should be more foil showing at the bottom of the photo.
Adhere your title at the bottom of the journaling square. Depending on how much you wrote, you may need to overlap the strip at the bottom of  the page.

 
Now take your decorative border strip and cut off a piece that measures 6 1/2" and place it at the bottom of your photo.
Place the rest of it vertically along the top left corner of the paper. I cut mine into pieces, but you can leave it whole if you like.
And we're done! The aluminum foil worked just like a piece of pattern paper. It was pretty easy to use, huh? It would also look great cut into stars to use on the background of a page. Open your minds and I think you could come up with quite a few ways to use it on a layout.:)
 
Thanks for stopping by and God bless.
 
His name shall endure forever;
His name shall continue as long as the sun.
And men shall be blessed in Him;
All nations shall call Him blessed.
Psalm 72:17
 
 
This post is linked to Shabby Creek Cottage52 Mantles, and Embracing Change

Tuesday, June 11, 2013

Recipe of the Week # 71- Peanut Butter Rice Krispie Treats

Peanut Butter Rice Krispie Treats
1 cup sugar
1 cup light corn syrup
1 cup creamy peanut butter
6 cups Rice Krispies

Combine sugar and corn syrup in large saucepan and bring just to a boil over medium heat, stirring constantly. Remove from heat and stir in peanut butter. Stir in cereal. Press into greased 9"x 13" greased baking pan. Let cool, then cut into squares.

These are so stinkin' good, it isn't even funny. I eat so much of them, that I start to feel sick and vow that I won't eat anymore. Then guess what happens when my stomachache goes away? I'm nibbling on them again! My boys like to start eating them before they're even cool. Give them a try. . .I'm sure they'll be a big hit at your house, too!

Thanks for stopping by and God bless.

Make a joyful shout to God, all the earth!
Psalm 66:1


This post is linked to Ivy and Elephants, Too Much Time On My Hands, Be Different Act Normal, and My Girlish Whims.

Monday, June 10, 2013

Mini Album Monday #4- Father's Day Album

     Since Father's Day is coming up this weekend, I thought I'd feature a dad themed album for Mini Album Monday.
 
For this album, I used a file folder and folded it into thirds.
I chose brown papers and a set of father stickers by 7 Gypsies.

 
This album is a trifold. 
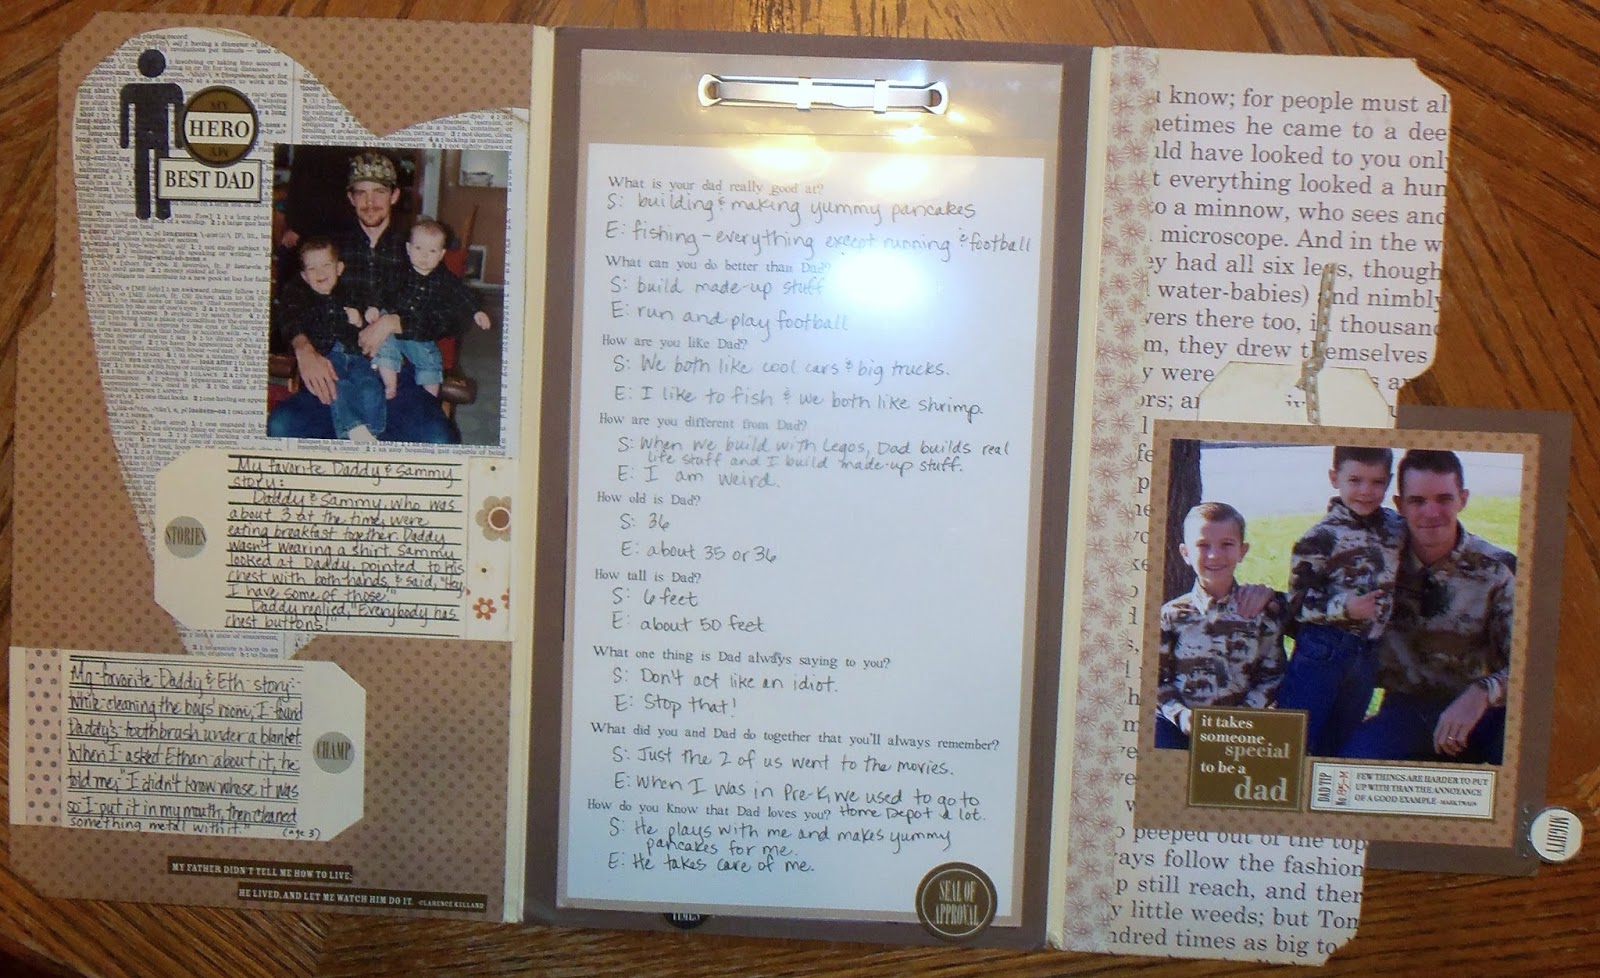
This is the first page (the backside of the cover). I cut a heart out of dictionary paper and adhered it over the pattern background. Then I used one of my favorite photos of my hubby and our boys. On the two tags, I wrote a funny story about a conversation between my hubby and each boy.

 
This is the flap on the right side. I covered each section with pattern paper. On this one, I placed two photos with a tag for pull-out journaling behind the larger photo.
Once you open this flap, you get to the center of the book. 

 
Here is the center section and the right side.
The right side has a photo with another pull-out tag for journaling.
The center has two pieces of cardstock with journaling and additional photos.

 
Here is a glimpse of the open trifold.
I printed off several questions for my boys to answer about their dad:
What is your dad really good at?
What can you do better than Dad?
How are you like Dad?
How are you different from Dad?
How old is Dad?
How tall is Dad?
What one thing is Dad always saying to you?
What did you and Dad do together that you'll always remember?
How do you know that Dad loves you?

 
The center piece lifts up to show more photos. 

 
Another flap lifts up for even more photos and a few questions that my hubby answered.
The first questions were about his childhood:
What did you want to be when you grew up?
How did you help out around the house?
What did you do in the summertime?
What were you most afraid of?
The next questions have to do with him being a dad:
What do you enjoy doing with your kids?
What's your favorite memory from when your kids were babies?
What have you learned from being a father?
What do you find yourself doing that your father used to do?

 
On the back, I used just one piece of pattern paper and added a "Dedicated to" sticker.
 
Thanks for stopping by and God bless.
 
And He said, "Therefore I have said to you that no one
can come to Me unless it has been granted to him by My Father."
John 6:65


Friday, June 7, 2013

Music Themed Party Decor

     Last weekend was the graduation banquet that I got to help to decorate. I've mentioned it several times now, so I'm just going to show you some pictures of how it all turned out.
     The graduate was in choir and loved it, so we went with a music theme. We used lots of vinyl records and sheet music (all purchased at thrift stores).

 
We decorated this display rack and put a table in front of it with a record and a silver paint pen. We thought it would be fun to have all the attendees sign well wishes for the graduate on it.
I bought a 12"x12" frame at Michael's and covered the inside of the back piece with sheet music. That way, after everybody signed the record, we could put it in the frame and you wouldn't see the back of the frame peeking out from around the record.

 
Here's a close up of the display. . . I put the "N" covered with his pictures in the center. (You can go here to see how I made it.)
I had a lot of photos, so I attached them to the chicken wire with clothespins.
I made a sheet music banner to hang across the top (go here to see how to do that).
I thought I could add a little of his school color by making a chain out of tickets. I alternated red and white tickets stapling them in circles to one another.

 
We used simple dollar store tablecloths in black and red.
For the table centerpieces, we placed a record plate stand (you can go here to see how to make one) with a hurricane candle holder and pillar candle on top of each raised record. Then we put two regular records on either side of that. To finish it off, we sprinkled sheet music curls.
 
 
To make the sheet music curls, all I did was cut sheet music into strips and wrapped them around a pencil to make them curl.

 
I made a record chandelier from an old wheel, some 45s, and some black ribbon.
I had seen one of these on Pinterest and fell in love. Mine isn't as elaborate as the one I saw, but I think it turned out pretty cute.

 
We used the last of the red and black decor to pep up the food area.
I made another sheet music banner, but added words to this one.

 
For the dinner, we had a nacho/burrito bar. I had made record bowls for the nacho toppings, but I forgot to take a picture of those. You can go here to see what I'm talking about.


     This was a very affordable decorating theme- and quite easy to do. It would work for an anniversary party or a birthday party.

     If you're getting ready to decorate for a party, you can go to this post for other themed ideas or this post for cupcake topper ideas.

     Thanks for stopping by and God bless.


Say to God, "How awesome are Your works!"
Psalm 66:3

This post is linked to Embracing Change, My Repurposed LifeBe Different Act NormalToo Much Time on My Hands, and Tatertots and Jello.

Thursday, June 6, 2013

Thrifty Thursday #71

Last week I started showing you the treasures that I picked up while out of town. Here's the continuation of what I bought while thrifting on my girls' trip. . .

 
I found this awesome old baby scale for $3.99 and it's in great shape!
It's going to sit on one of my living room shelves with some old books stacked on it.

 
Then I found this cute set of plates that weren't priced. They had a tag on the bottom that said they were a set of 10, but all I could find were these six. I only wanted one, but I took the whole set to the check out and offered $2. The sales girl balked at first, then rang me up for $2.
 
Since I prefer my dishes mismatched, I now have some extra cute plates that I can give when I share baked goods.

 
I fell in love with this plate. I got two of them for a dollar apiece- one to use in a project and one to add to my mismatched dinner set. Love those turquoise flowers!

 
I love the brown etching on the side of this glass. I'm not sure what kind of glass this is, but I picked up two at $.69 apiece to use on projects.

 
My final purchase was this darling blouse for $3. I fell in love with the colors!
 
I know that you're probably thinking how strange it is that my friends and I were stopping at thrift stores on our trip. I believe that I may have had something to do with it. . . :) They didn't mind- they had a good time and found lots of good stuff, too.
 
Good luck with your secondhand shopping this week. Thanks for stopping by and God bless.
 
Sing out the honor of His name; Make His praise glorious.
Psalm 66:2
 
Thsi post is linked to Cheerios and Lattes, Apron Thrift Girl, and Junkin' Joe