Friday, August 30, 2013

Bag of Pinto Beans. . . Or A Pillow?

I'm so glad you stopped by! I have a quirky and fun project to share with you today.


It's a pillow- made from a pinto bean bag!

I got the bag for ten cents at a yard sale last year. No joke.
It's been folded up on a shelf since I bought it. Then I recently tried making a pillow and was so pleased with the results that I started looking around to see what else I could turn into a pillow. And I remembered this beautiful burlap bag.
So I dug through my ribbon collection and found this delightful blue pom-pom trim
and knew it was meant to be.

Now, let me tell you that I'm by no means a seamstress. I remember tips my mom has taught me over the years and bits and pieces from Home Ec. Lucky for me it doesn't take too much to sew two rectangles together!

If you like this project, you may want to take a look at another pillow I made.
Thanks for stopping by and God bless.
For the Lord is good;
His mercy is everlasting, and
His truth endures to all generations.
Psalm 100:5

Thursday, August 29, 2013

Thrifty Thursday #82

     It's that time again. . . for me to show you how one gal's trash becomes my treasure! I don't know if I should be embarrassed to tell you how much I look forward to going to thrift stores. When I'm making a list for my errand running, and I get to write "Stop at thrift stores," I get excited! I know that there are times that I won't find anything good. I know that sometimes those stores don't smell the best. I know that what I'm looking through is stuff that somebody else decided they didn't want anymore. But that doesn't matter to me. . . maybe it's because I've always been a fan of the underdog or because I've always loved old things or because I love the challenge of taking something old and making it new again. . . I don't really know.
     Anyway, wanna see what I found?

 
I love this old pattern for girls' costumes.
Too cool for only a quarter.
 
 
I have been loving all the alphabet walls that I've seen on Pinterest. I've been slowly collecting letters, but wasn't too sure where I'd be able to hang them. Well, I figured it out this week (Yay!), and now I'm anxious to complete my collection. I got each of these for a dollar. They have a label on them from Pottery Barn.
I love the shiny sleekness of them.

 
This pearl bracelet was only $.75.
The beads are in good shape and they will make an awesome part of a "new" piece of jewelry.

 
Aren't these a fun childhood flashback?
I've noticed a trend in scrapbooking using these View master reels. I got these for a dime apiece and they will be featured on an upcoming Layout of the Week tutorial.

 
I've been on a Nicholas Sparks jazz lately, so I was excited to pick up this for fifty cents. I thought that I had already read it, but it turns out that I hadn't!
Is it just me, or does he make you cry at some point in every story he writes?
 
That's all my treasures for this week. Did you notice that I have plans for everything I bought? That's such a good feeling. I try not to buy something if I don't think I'm going to use it in the near future.
 
 If you enjoyed this post, stop back next Thursday for another rendition of thrift store purchases. :)
 
Thanks for stopping by and God bless.
 
 Hear my prayer, O Lord, and let my cry come to You.
Psalm 102:1
 
 This post is linked to Junkin' Joe, Be Different Act Normal, and 52 Mantles.

Wednesday, August 28, 2013

Layout of the Week #65- Making a Layout on a Clipboard

     I'm super excited about today's Layout of the Week. . . I thought it would be fun to put a layout directly onto a clipboard which would act as a photo display for class photos!

 
Here's the layout we'll be creating.
Because it's on a clipboard, you can change out the photo every year!

 
To make it, you'll need:
clipboard
five pieces of pattern paper (measurements below)
letter stickers for the title
paper trimmer
adhesive (I used a glue stick)
small piece of sandpaper

 
My clipboard is 12 1/4"  x 9" which should be standard- if not, you my need to slightly
 alter my measurements.
 
Trim your first piece of pattern paper to 8.5" x 9"
Adhere it to the clipboard making sure that you lift up the clip. Slide the paper up as far as it will go.
 
This project will work with the other version of a clipboard, too.

 
Trim a second piece of pattern paper to 3"x 9". Adhere it to the bottom of the clipboard.
It's ok that there's a space between the two papers- it will get covered.
 
The bottom corners of the board are rounded- don't worry that the paper sticks off;
we'll fix it in a few steps.

 
Trim your third piece of pattern paper to 11 1/2" x 2". Adhere it vertically to the far right side of the clipboard.
 
Then trim your fourth piece of pattern paper to 1" x 9" and adhere it above the bottom
piece of pattern paper. 

 
Trim your last piece of pattern paper to a 3/4" x 9" strip. Adhere it above the other strip.
 
Use a piece of sandpaper to sand along the edges paying special attention to the bottom corners. Don't sand upwards or you may peel the edges up. This will get rid of any edges that may be hanging over the side of the clipboard. It gives it a more finished look.

 
Using your letter stickers, place a title in the bottom right corner.
I went with a simple title: "School Days."
That way it will work year after year with each new photo.
 
Optional: place a sticker on the metal part of the clipboard.

 
Just place the class photo under the clip. No adhesive needed!


You can even use this design for an individual 8" x 10" school photo with some slight trimming.
 
How handy is this for those annual pictures?
It could be hung on the wall or placed on a nice plate stand.
 
I think this would make a great gift for a teacher and also for grandparents!
 
Thanks for stopping by and God bless.

To everything there is a season,
a time for every purpose under heaven
Ecc. 3:1
 

Tuesday, August 27, 2013

Recipe of the Week #82- Crock Pot BBQ Chicken

 
Crock Pot BBQ Chicken
4 boneless, skinless chicken breasts
18 oz bottle BBQ sauce
1/2 cup brown sugar
1/4 cup apple cider vinegar
1 Tbsp Worcestershire Sauce
 
Place chicken in Crock Pot. Combine the rest of the ingredients in a bowl, then pour over the chicken. Cook on high for 3-4 hours or low on 4-6 hours.
 
This was some very tasty chicken. My family really enjoyed it. I always love finding a tasty chicken recipe.
 
Next time I think I'll shred it and place it back in the sauce, then serve it on hamburger buns or slider buns. Makes my mouth water just thinking about it. . .
 
Thanks for stopping by and God bless.
 
O Lord of hosts, blessed is the man who trusts in You!
Psalm 84:12


Monday, August 26, 2013

Mini Album Monday #11- An Album Made Out of Page Protectors

     Not all mini albums have to be traditional albums with hard covers. If you've taken a look at any of the posts where I've shown you albums that I've made, you may have noticed that mine tend to be far from traditional.  I love a challenge of using something unusual to create a book.

 
Today's featured album was put together using only five pieces of double sided 4"x4" pattern paper and five 4"x4" page protectors.
Because the paper was double sided, I was able to use both sides.
The first page was my title page.
 
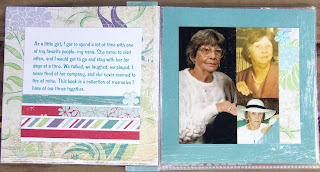
I named the album "Grand Memories" because it's an album about my Nana.

 
On the back of the title page, I adhered some journaling for my dedication page.
(I usually try to include some sort of description as to why I made an album.)
Once that page was done, I just slid it into the page protector.
The page on the right has pictures of my Nana. I cropped them, so I was able to fit three.
 
On each page with photos, I added one thin strip of pattern paper for a little color.

 
Each layout, I alternated the order of the photos and journaling.
On every page, I left a half inch border.
 
My journaling here is a long list of random memories I have of Nana.

 
All I used for embellishments is a small flower on each page.
 
The journaling here is labeled, "I remember. . ."

 
I used a larger photo on this page, so there was only room for one.
 
The journaling here is "More Stories."

 
 This is the back cover.
I used two strips of pattern paper to cover the edges of the page protectors, then I bound this album with two large brads.
 
Most packs of page protectors come in packs of ten, so you actually could make two albums from one pack. Not too shabby if you ask me!
 
Thanks for stopping by and God bless.
 
For you were bought at a price; therefore glorify God
in your body and in your spirit, which are God's.
1 Cor. 6:20
 

Friday, August 23, 2013

Teacher Gift Idea: Clothespin Photo Holder

Since school is about to start, I thought I'd make a quick teacher gift.

 
It's a large clothespin that can be used as a note holder or as a photo display.
This gift literally took me less than 20 minutes to make.
 
 
I covered the back of the clothespin with the same paper.
That way it looks pretty from either side- especially if it will be sitting on a teacher's desk!

 
If you want to make one, you'll need:
a large clothespin (you can find one here- I've also seen them at Hobby Lobby)
a strip of pattern paper
Mod Podge
foam brush
small piece of ribbon

 
Measure and cut your paper so it will cover the front of the clothespin.
Using the Mod Podge and foam brush, apply Mod Podge to the back of the pattern paper and press it to the clothespin surface.  Make sure you get glue along all the edges of the paper.
If you don't have Mod Podge, you could use a glue stick for this part. Just make sure you are very thorough when applying the glue.

Repeat on the back of the clothespin.
Give it a few minutes to dry, then sand along all the edges. Sand away from the edge of the paper, not towards it- otherwise the paper will start to peel up.
The sanding gets rid of any paper that's hanging over the edge
and also gets your edges good and tight.
To finish it off, tie a ribbon somewhere along the bottom part of the clothespin.

 
How's that for a quick gift?
 
I hand stamped a note, but you could easily print one off from your computer or buy a card.
You know what would really finish it off? A gift card. :)
 
I also have two ideas for teacher themed necklaces: a dictionary definition one here and a tiny chalkboard one here.
 
Thanks for stopping by and God bless.
 
Serve the Lord with gladness; come before His presence with singing.
Psalm 100:2
 

Thursday, August 22, 2013

Thrifty Thursday #81

     My sweet hubby has been really good lately about offering to take me yard sale-ing
and I'm loving it!
     We went out last Friday morning, but didn't have much luck.

 
As we were driving through a neighborhood looking for sales, I spotted this chair at the roadside.

 
Far be it from me to let something like this with so much potential go to the dump. I hopped out of the car and tossed it into the trunk. My hubby said he wasn't for sure if the people were throwing it away. I explained that nobody puts worn out stuff at the curb unless they're getting rid of it. :)
Anyway, I'm super excited to revamp it!
 
 
We actually only found one yard sale in our area.
I got this small dish for a quarter. I held it in my hand so you could get an idea of the size.
 
Since we only got two things on Friday, my hubby took me out again on Saturday. Isn't he fantastic? :)
  Once again, we only found one sale worth stopping at.

 
We found this thing for fifty cents.
I don't know what it is, but I know I can turn it into something!

 
I spotted this heavy duty onion holder for a dollar. I thought my hubby could use it to grow herbs in his garden. He liked the idea.
 
We didn't even spend two dollars, but it was worth going out.
I hope you all enjoy your secondhand shopping this week.
 
Thanks for stopping by and God bless.
 
Shout joyfully to the Lord, all the earth;
break forth in song, rejoice, and sing praises.
Psalm 98:4


Wednesday, August 21, 2013

Layout of the Week #64- Incorporating Packaging into Your Layout

     If you've read my blog for any length of time, I'm sure you've gathered that I am a trash-to-treasure kind of gal. From chairs to wood to paper, I'm quite a junker:)
     Today I'll show you how to incorporate trash packaging into a layout.


Here's the layout we'll be creating.
See the seed packets behind the photos?


To make it, you'll need:
one piece of 12"x12" cardstock
one piece of pattern paper measuring 5 1/2"x 8 1/2"
paper for journaling- I used ledger paper
stickers in the theme you'll be scrapbooking
product packaging-
I used seed packets. Lots of scrapbooking embellishments come in darling packages- you could use those, or a Cracker Jack box, or any other packaging that you find cute


Adhere the pattern paper measuring 5 1/2" x 8 1/2" to the bottom section of the cardstock.


Trim your packaging if needed. Adhere one or two pieces in the upper right corner.


Then adhere one or two more pieces in the upper left corner.
You basically want to have most of the top half of the cardstock covered.
My seed packets were pretty bright, so I sanded them to get a more subdued look.


Place a horizontal 4"x6" photo centered like this while allowing the packaging to peek out above it.
Optional: my seed packets are so busy that it was hard to see my photo, so I matted it on some darker paper. If you have the same problem, you'll want to do the same.


Now place two vertical photos at an angle on either side of the horizontal photo. They should overlap the packaging.


Now place a smaller photo in the center.


Place your title at the bottom slightly off center.
I used a pre-printed sticker for my title. It says "G is for grow" and was intended for a layout on growing up. I liked it for my garden layout, but it was a little girly, so I sanded over it.


Place your journaling card at the bottom of the left photo.
If you like, place a few stickers here and there- I placed one at the bottom of the journaling paper, at the top corner of the center photo, and in the upper left hand of the layout.

We're done- we literally turned pieces of trash into a beautiful background. What do you think?

Thanks for stopping by and God bless.

Oh, sing to the Lord a new song! For He has done marvelous things
Psalm 98:1


Tuesday, August 20, 2013

Recipe of the Week #81- Rolo Stuffed Cookies


Rolo Stuffed Cookies
1 pkg. Rolos
1 box Devil's Food cake mix
2 eggs
1/3 c. oil

Mix cake mix, oil, and eggs thoroughly. Take a small ball of dough and form a ball around the Rolo. Use just enough dough to cover the Rolo.
Place on greased cookie sheet and bake at 350 for 7-8 minutes. Yields about 3 dozen.

Sprinkle with powdered sugar, if desired. I rolled mine in sugar before baking.

These are simply delicious! Chocolate cookies with caramel centers. . . need I say more?

I found this recipe here.

Thanks for stopping by and God bless.

But You, O Lord, are a God full of compassion, and gracious,
longsuffering, and abundant in mercy and truth.
Psalm 86:15

This post is linked to Making the World CuterBe Different Act Normal, Cheerios and Lattes, and My Girlish Whims.

Monday, August 19, 2013

Vintage Pattern Bracelet

     I love bangle bracelets. I love vintage patterns. Today I combined the two . . .

 
and covered a wooden bangle bracelet with vintage pattern pieces.
 
I recently found the bracelet on one of my thrift store runs and got it for a bargain. I have quite a collection of vintage patterns as I pick them up every time I find them cheap.

 
If you'd like to recover a bracelet, you just need:
 a bangle bracelet (you can buy wooden bangles here)
Mod Podge
a foam brush 
 old pattern pieces
scissors or paper trimmer
 
Trim the paper into strips. They should be 1/4" wide- any wider than that, and they're too wide to lay flat. Lengthwise, they need to be long enough to cover the front and fold down around the inside of the bracelet. I suggest you cut one and measure it by wrapping it around your bracelet. (There's not one set measurement as it depends on how wide your bracelet is.)
You'll want to cut quite a few strips. Then you can start to adhere them by using your foam brush to paint Mod Podge all along the back of the strips. Carefully flatten each strip against the bracelet making sure you wrap both sides of the strip around the inside of the bracelet.
I went around my bracelet one time with vertical strips. Once those dried, I took some more strips and placed them diagonally here and there so there was a lot of the pattern markings visible.
Allow these to fully air dry. Once dry, paint a coat of Mod Podge along the outside and inside of your bracelet to seal it.
 
There you have it- a one-of-a-kind bracelet.
 
What do you think? Would you wear one of these?
 
Thanks for stopping by and God bless.
 
Apply your heart to instruction, and your ears to words of knowledge.
Proverbs 23:12


Friday, August 16, 2013

Simple Pillow Project

I have discovered a new hobby. . . sewing pillows!
I must say, the process goes so quickly, I wonder if I'm doing something wrong. . .


Here's my first creation.
I got this fabric out of the remnants section in the Hobby Lobby clearance rack.
The lace was some that I pulled out of my stash.
 
The reason I went with a short, long pillow is because that's how the fabric
was cut. I just worked with what I had. 
 
 
For now, I've propped it on the couch among my current store-bought pillows.
One by one, I plan to replace my worn out pillows with new pretty handmade pillows.
 
 
Who doesn't love toile?
 
Thanks for stopping by and God bless.
 
Owe no one anything except to love one another,
for he who loves another has fulfilled the law.
Romans 13:8


Thursday, August 15, 2013

Thrifty Thursday #80

     While out shopping for school supplies and groceries, I fit in a little bit of "Laura Fun." Shocker, "Laura Fun" involves stopping at thrift stores. Boy, am I glad I did because look what I found. . .
 
 
I got all these blocks for fifty cents! My favorites are the +, ?, and division sign!
I'll be on the hunt for something to do with these. . . I'm thinking of putting them in a glass jar. Wouldn't that be cute in a nursery?
 
 
These wooden letters were a quarter each.
I'm planning to make an alphabet wall like I've seen on Pinterest. I've got about six letters so far.

 
These old bookends were fifty cents. I'm going to re-cover them. Can't wait!

 
I never pass up a cheap embroidery hoop- this one was a quarter.

 
I love this wooden bangle. I am going to re-cover it- perhaps with map strips or old pattern pieces.
It has two rough areas on it that somebody had somehow refinished so I decided to bargain with the thrift store gal. She wanted a dollar for it, but I got it for fifty cents. Woo- hoo!
 
 
Best of luck to you as you go bargain hunting this weekend! Thanks for stopping by and God bless.
 
O Lord, how great are Your works!
Psalm92:5
 
 This post is linked to Ivy and Elephants, Junkin' Joe, and My Girlish Whims.