Most scrapbookers I know aren't just scrapbookers, but are also collectors of scrapbooking products. When I plan these tutorials, I hope to make the directions generic enough that you can use products you have on hand to create a layout.
If you don't have any rub-ons, feel free to replace them with stickers in this tutorial.
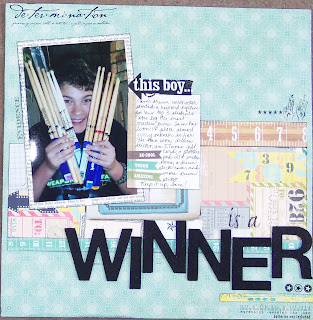
Here's the layout we'll be creating.
I used a subtle piece of pattern paper for the background giving me
plenty of workspace for the rub-ons.
To create this layout, you'll need:
one piece of 12"x 12" pattern paper or cardstock
two strips of pattern paper measuring 1/2" x 11 1/2" and 1" x 7 1/2"
one piece of pattern paper measuring 3 1/2"x 11 1/2"
one piece of pattern paper for the photo mat measuring 4 1/2" x 6 1/2"
journaling card- a note card will do
rub-ons
letter stickers for the title
adhesive
paper trimmer
Adhere the piece of pattern paper measuring 3 1/2"x 11 1/2" about five inches from the top of the background paper.
Now adhere both pattern paper strips above and below the the larger piece of pattern paper making sure the shorter one is at the top.
All three pieces should line up on the right side about 1/4" from the edge of the background.
Mat a vertical photo, then place it at an angle overlapping the top two pieces of pattern paper pieces.
Place your title along the bottom edge of the pattern paper pieces.
Place your journaling card straight up and down at the bottom right corner of your photo. My journaling card measures 3 1/4" x 2 1/4".
Now it's time to adhere the rub-ons. Apply one at the right edge just above the top strip.
Place one in the upper left corner and bottom right corner of the layout.
You'll see that I used a variety of rub-ons- a couple are words while the rest are images.
To finish off my layout, I added a rub-on just above my journaling card to act as part of my title which reads, "This boy. . . is a winner." I also placed a thin strip of pattern paper in the lower right corner just above a rub-on.
I hope you enjoyed this tutorial and will be able to use it. Please let me know if you have any questions or any suggestions for future Layouts of the Week.
Thanks for stopping by and God bless.
Thanks be to God for His indescribable gift!
Isaiah 27:15


1 comment:
Great layout! I found it while looking for inspiration for a scraplifting challenge, and used it to inspire a layout about my nephew. Thanks for the great tutorial!
Post a Comment