Thursday, July 19, 2012

Thrifty Thursday #26

     While visiting my favorite thrift stores yesterday, I bought five items and only spent $2.09! It is so nice to leave a store with a bag full of stuff that I paid for out of my change pouch!:)
I found a large bin full of patterns for only a dime each. I searched for the really old patterns. They only had two.
I love this one. I remember wearing a gown like this when I was an acolyte at church:)


Even with the damage, this one is a gem.

This ink pad is 6.5"x 5" and still is good. I tested it on my thumb before buying. Can't beat that price! I am always in need of black ink- for scrapbooking, not for every day use:)

I can't pass through the book section without a quick look. I got these two hardbacks for fifty cents each. Looking forward to reading them both.
(Usually I just show you books that I buy to cut up- just want to let you know that I buy some to read, too!)

Thanks for stopping by and God bless.

I can do all things through Christ who strenghtens me.
Phil. 4:13 
 
 
This post is linked to Apron Thrift Girl and
shabby creek cottage

Wednesday, July 18, 2012

Layout of the Week # 21- Creating a Hand-Painted Title on Your Layout

     Hi Guys! Time to dig out some craft paint and a brush for today's layout. We're going to create a hand-painted title- don't worry, it's a piece of cake.


You'll need:
one piece of cardstock
one piece of pattern paper
three strips of pattern paper
paint
paint brush
adhesive
trimmer
scissors

First, trim your pattern paper and place it on the right side of the card stock.

Now take your three strips and adhere them about 4" from the left side of the paper. One of my strips has a scalloped edge, so I trimmed along the scallop before adhering it. Then I placed a 1/2"x12" strip of plaid paper right next to it. Finally, I took my last strip, which has a quote printed on it, trimmed the ends off and adhered it right on top of the other two strips.
I suggest that you use three different prints for the strips although one of them could be the same print as the pattern paper on the right side of the layout. 
Place your photos to the right of the strips in two vertical columns. I only had three photos, so I used two vintage images.

Now for our title- first lightly write it in pencil. Then trace it with your paint brush. You only want a small amount of paint on your brush, but dip it often so it always has paint on it. This will not look perfect and that's okay:) It's supposed to look like your handwriting.

Once the paint is dry, use your scissors to trim around the letters.

Adhere the title below the photos.  
Finally, print your journaling, cut it into strips and adhere it in the upper left corner slightly overlapping your pattern paper strips. Ta-da! You are now done with a quick and easy layout.

Here is one more example of a hand-painted title. Instead of painting it on a separate piece of paper, I painted directly onto the card stock background.

Thanks for stopping by and God bless.


The LORD is good, a refuge in times of trouble.
He cares for those who trust in him." Nahum 1:7


Photobucket

Tuesday, July 17, 2012

Recipe of the Week #26- Beef and Noodle Chowder

Easy Beef and Noodle Chowder

1 (8 oz) bag wide egg noodles
1 lb hamburger meat
chili powder (or half of a pkg. taco seasoning)
onion, chopped
1 clove garlic, minced (I replaced this with garlic powder)
1 can corn, drained
1 can peas, drained
1 can Rotel
1 cup shredded cheese
salt and pepper    

Boil water for the noodles and cook the noodles according to the instructions on the bag.
Meanwhile, brown the beef and onion. Add pepper, garlic, and sprinkle in the taco seasoning  or chili powder to taste. I used about 1 tsp of chili powder. Once the beef is browned, add the corn, peas, and Rotel. Stir well and continue to heat over medium heat.
When the noodles are done, drain, and return to pot. Add the meat mixture stirring well.
Cover with cheese. Place lid on pot, leave pot on burner, but turn burner off. Allow to sit for 5 minutes to let cheese melt. Serve and enjoy.

This was a great recipe. (I love one pot casserole type recipes!) The Rotel added a bit heat which my hubby didn't notice, but the kids and I did. Next time I'll probably replace it with a cup of mild homemade salsa.

I found this recipe here.

Thanks for stopping by and God bless.

Do not be wise in your own eyes; fear the Lord and turn away from evil.
Proverbs 3:7


Monday, July 16, 2012

No-Sew Scarf Made from T-shirt

          That's right, my friends, today I made a scarf from a t-shirt without any sewing involved! And it only took 20 minutes! Here's the finished product (I wish I would've taken a before photo of the t-shirt. It was just an old raggedy thing that I still wore for exercising. It had seen better days- believe me!)
I made a rosette out of some of the extra material and glued it to an alligator clip. The clip fastens right onto the band holding the strips together. Since I didn't permanently attach the rosette, I'll be able to switch it out.


Here it is with the rosette hair bow that I made last month. Looks cute with this sundress, huh?

I really love to wear cute scarves- I'm going to have to make a few more of these in different colors!

Here's the tutorial I followed to make it- it's very easy to follow and has photos for every step.

Thanks for stopping by and God bless.

Do not be deceived: bad company corrupts good morals.
1 Cor. 15:33


Skip To My Lou

Today's Creative Blog
Tip Junkie handmade projects
Visit thecsiproject.com


52 Mantels

Friday, July 13, 2012

Another Happy Bracelet


     Earlier this week, I came across this bag of flower beads that I had picked up at Hobby Lobby. I bought them because I just love the bright flowers on them. I'm not the best bracelet maker- I never know quite what order to place the beads. But I enjoy making jewelry- and I really enjoy wearing jewelry!
This is what I came up with. I alternated the flower beads with the other colorful beads and placed silver spacers in between each. Very simple design, but I like how it turned out.

I bought both sets of beads at Hobby Lobby. I used only the coordinating colors of beads. 

While I had my beads out, I put this one together, too. I love turquoise and green together!

I think I could wear my two new bracelets together. How bright is that?

I really like the new bracelet with the cabochon bracelet that I made a few weeks ago. I love the bright flower bracelets together! That's happiness on my arm right there!:) 

Thanks for stopping by and God bless.


Create in me a pure heart, O God, and renew a steadfast spirit within me.
Psalm 51:10


toomuchtime


Thursday, July 12, 2012

Thrifty Thursday #25

               Hi Guys! Recently when my hubby and I were headed out of town, we saw a huge yard sale in the middle of nowhere. My sweet hubby asked if I'd like to turn around and check it out. Of course I said yes! Here's what we found. . .

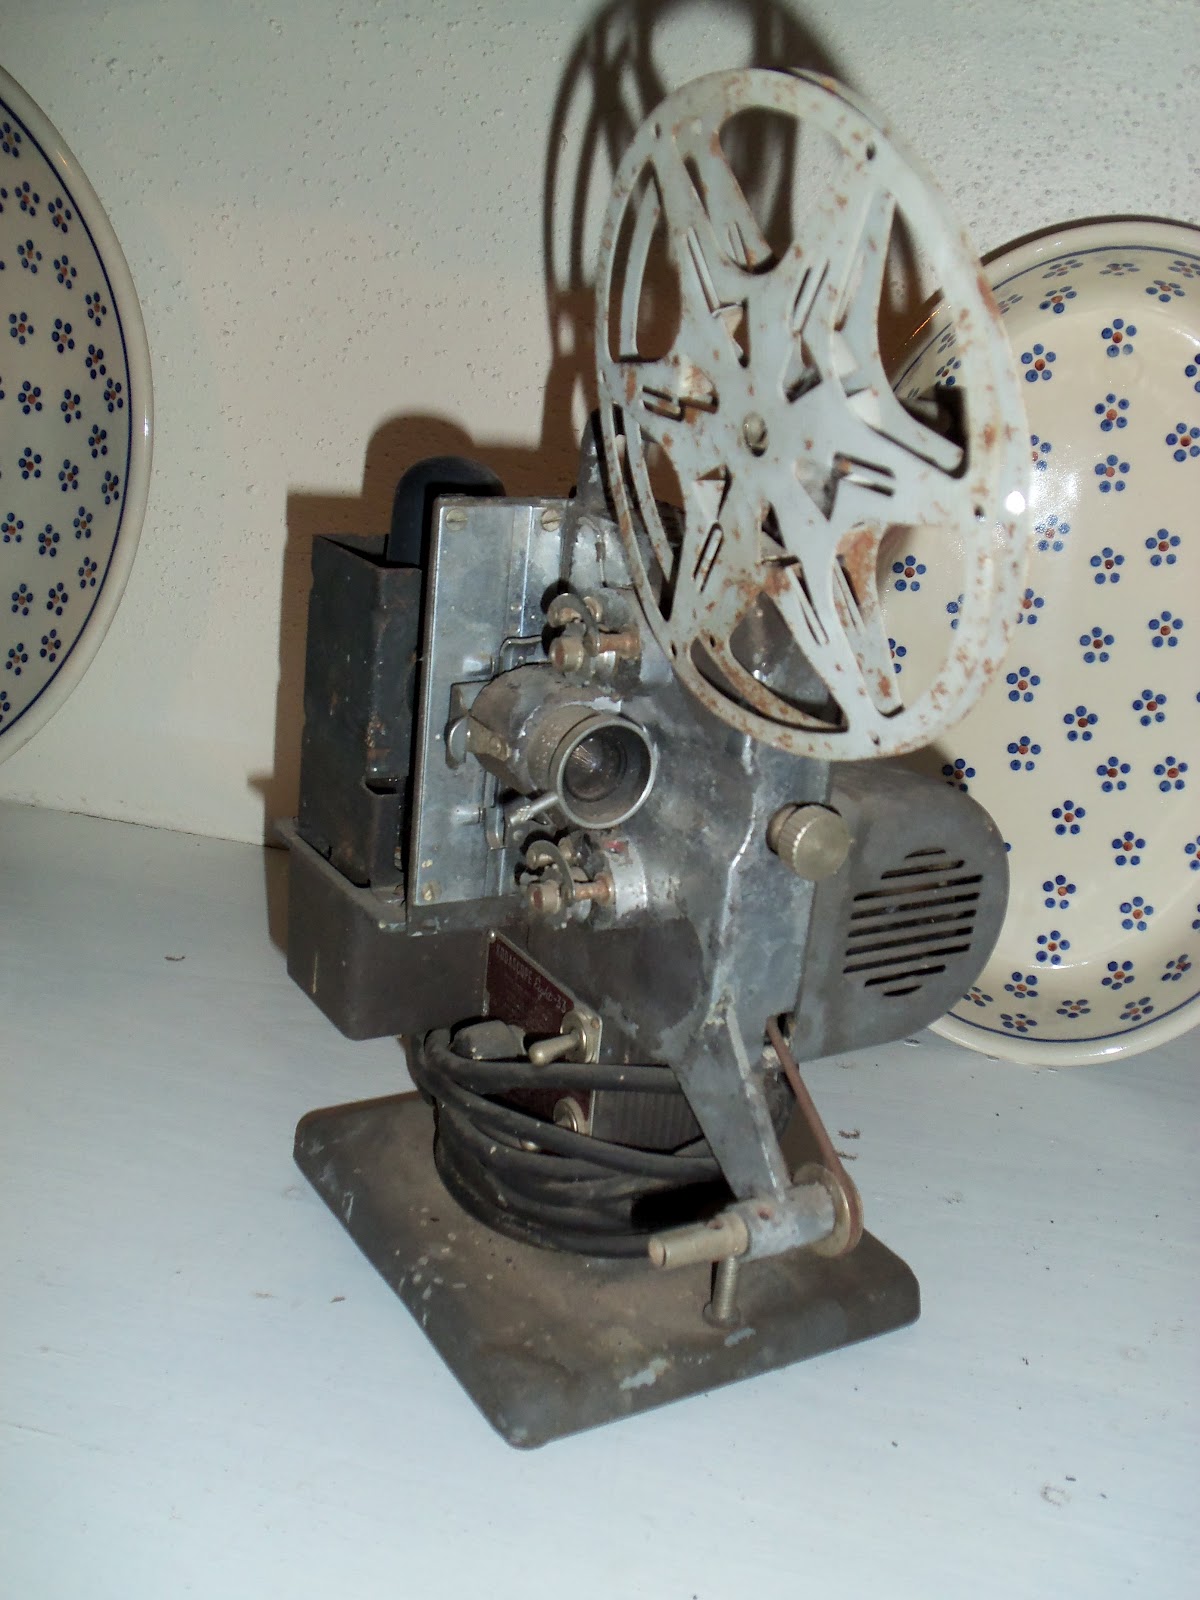
This old film projector was only $5. It's so old and beautiful. It's sitting on a shelf in my livingroom right now.
It's a Kodascope Eight-33. After we got home, I actually plugged it in to see if it would work- I have a couple of old films that I've purchased that we could watch.
The light was extremely bright and right away it smelled like it was burning. I turned it off and set it back on the shelf. Later my hubby told me I could've started a fire. Whoops.


These four old milk bottles were marked as $1 each. I asked if the lady would take fifty cents per bottle. She agreed, then only charged me a quarter a piece when I went to pay! Doesn't hurt to ask!

Then I paid $1 for this roll of white tulle- who could pass this up?:)

     Thanks for stopping by and God bless.


Come to me, all you who are weary and burdened, and I will give you rest.
Matthew 11:28


Photobucket

Wednesday, July 11, 2012

Layout of the Week #20- Scrapping with 8 or More Photos

     Hello! Get out a stack of photos you've been meaning to scrap, because I've got an easy layout for you! Many times I like to put as many photos as I can on a layout. Today I'm going to show you a layout that you can use for eight or more pictures.
Gather your supplies:
one piece of 12"x12" card stock
5-6 pieces of coordinating scrap papers
piece of Baker's Twine or some other fiber
letter stickers for the title
stapler
adhesive
paper trimmer


First you're going to want to lay out your photos and determine where you want them. Then trim them so that they'll fit. It's fine for them to overlap. 
Start with the two outer rows and adhere them. The photos are going to take up 2/3 of the card stock.

Now adhere the center row. Place the middle photo on last. Don't worry if your photos don't line up along the right side. It adds to the charm.


Then cut rectangles from your scraps. They should be 1" or less across and all different lengths. Mine are all different sizes.

On each one, you need to cut a notch from the bottom to make them look like little flags. No need to be perfect, just trim a triangle from the bottom.

Then fold a little edge on the tops, place them around the fiber, and staple. Repeat this with all the flags.

Adhere the flags about 2/3 down the right side of the layout. Print your journaling and adhere it above the flags. Place your title below the flags. Now you're done!
I added colorful letter stickers spelling out my son's name above the journaling- I thought it brought out the colors on the flags. Then I finished it off with a rub-on figure at the top.
My layout is about my son posing on his skateboard. These pictures make me laugh! He didn't realize skateboarding was so hard, so he just stood on the board looking cool for the camera!

On this layout, I was able to include 12 photos- I cut them to 2 1/4" x 3". Then I placed the journaling in strips around the photos along with the title. This is a quick and easy way to include lots of photos on one layout!

Thanks for stopping by and God bless.

Give all your worries and cares to God, for He cares about you
1 Peter 5:7


shabby creek cottage


52 Mantels