Showing posts with label cork. Show all posts

Friday, August 5, 2016

Not Your Usual Cork Boards

I've mentioned before that I have a big bin of corks that I bought at an estate sale.
I used up quite a few for today's project: shaped cork boards.


This is a Texas shaped one.
 

I started with a thin piece of wood cut into the shape of Texas.
Then I glued corks to it.


I'm a big fan of ampersands, so when I found a wooden one,
I thought it would work great for this project.


Here's a side view. I glued the corks end up.
I like the different looks of the corks- especially the ones with the dates printed on them.

I went through almost my whole cork supply.
Hopefully I'll come across some more soon in my secondhand shopping.

I think these would look cute hanging over a desk with notes pinned to them.
What do you think?

Thanks for stopping by and God bless.

Blessed are You, O Lord!
Teach me Your statutes.
Psalm 119:12

 This post is linked to The Cottage Market, Tatertots and Jello, Craft-O-Maniac,
and Life With Lorelai.

Friday, February 26, 2016

Flashback Friday: DIY Projects Using Corks

I've started Flashback Friday on the last Friday of each month,
where we'll take a look back at five projects featuring the same theme.

This month, we're looking at projects using corks.
I scored two bins of corks at an estate sale sometime ago.
Follow the links to read more about each project.

This large cork heart wreath is nearly two feet tall and now hangs in the peak of our living room wall.


 A yard-o-corks is a great display for your child's drawings or even for Christmas cards.


I used beads and corks on these key rings.


I love how this cork covered letter turned out.


Go here to see how to make this cork heart
which looks cute on a shelf or can be used as a trivet.

Last month's Flashback Friday was chalkboard projects. Go here to see.

I hope you all have a lovely weekend!

Thanks for stopping by and God bless.

Wait for the Lord, and He will save you.
Proverbs 20:22


Friday, February 13, 2015

Cork Heart DIY

If you've got some corks and a glue gun,
 here's a quick project you can whip up for Valentine's Day.


This cork heart is cute and easy to make. 


Start with an 8 1/2"x 11" piece of paper and fold it in half.
Draw half a heart on it- just like we used to do in elementary school.


Then cut along the line and you'll have a heart.
This will be the template for our cork heart.


 Start by placing one cork at the top of the heart. Then, using a glue gun, glue along 
one edge of each cork and press it up against the previous cork.


Keep going while following along the edge of your template.


For the very last cork, I placed glue on two opposite sides and slid it in sideways in between the two on either side- so I wouldn't get glue along the tops of the corks.


 Your heart is done!
 I let mine sit for a few minutes until all the glue was set.


If you're wondering why I have so many corks, 
it's because I bought this huge container of them at an estate sale.


Now it's ready to set out on a shelf.

By the way, everything in this arrangement was a second hand purchase -
 the globe, the books, the basket- even the wooden spools in the basket!


I think it's cute enough that it can sit out not just for Valentine's Day, but all the time!

If you like this project, check out what else I used my stash of corks to make.
 You can go here to see a large cork heart and here to see a yardstick cork board.

I hope you all have a lovely Valentine's Day and your sweetie gets you something nice!

Thanks for stopping by and God bless.

 I will greatly rejoice in the Lord, 
my soul shall be joyful in my God
Isaiah 61:10


Monday, January 14, 2013

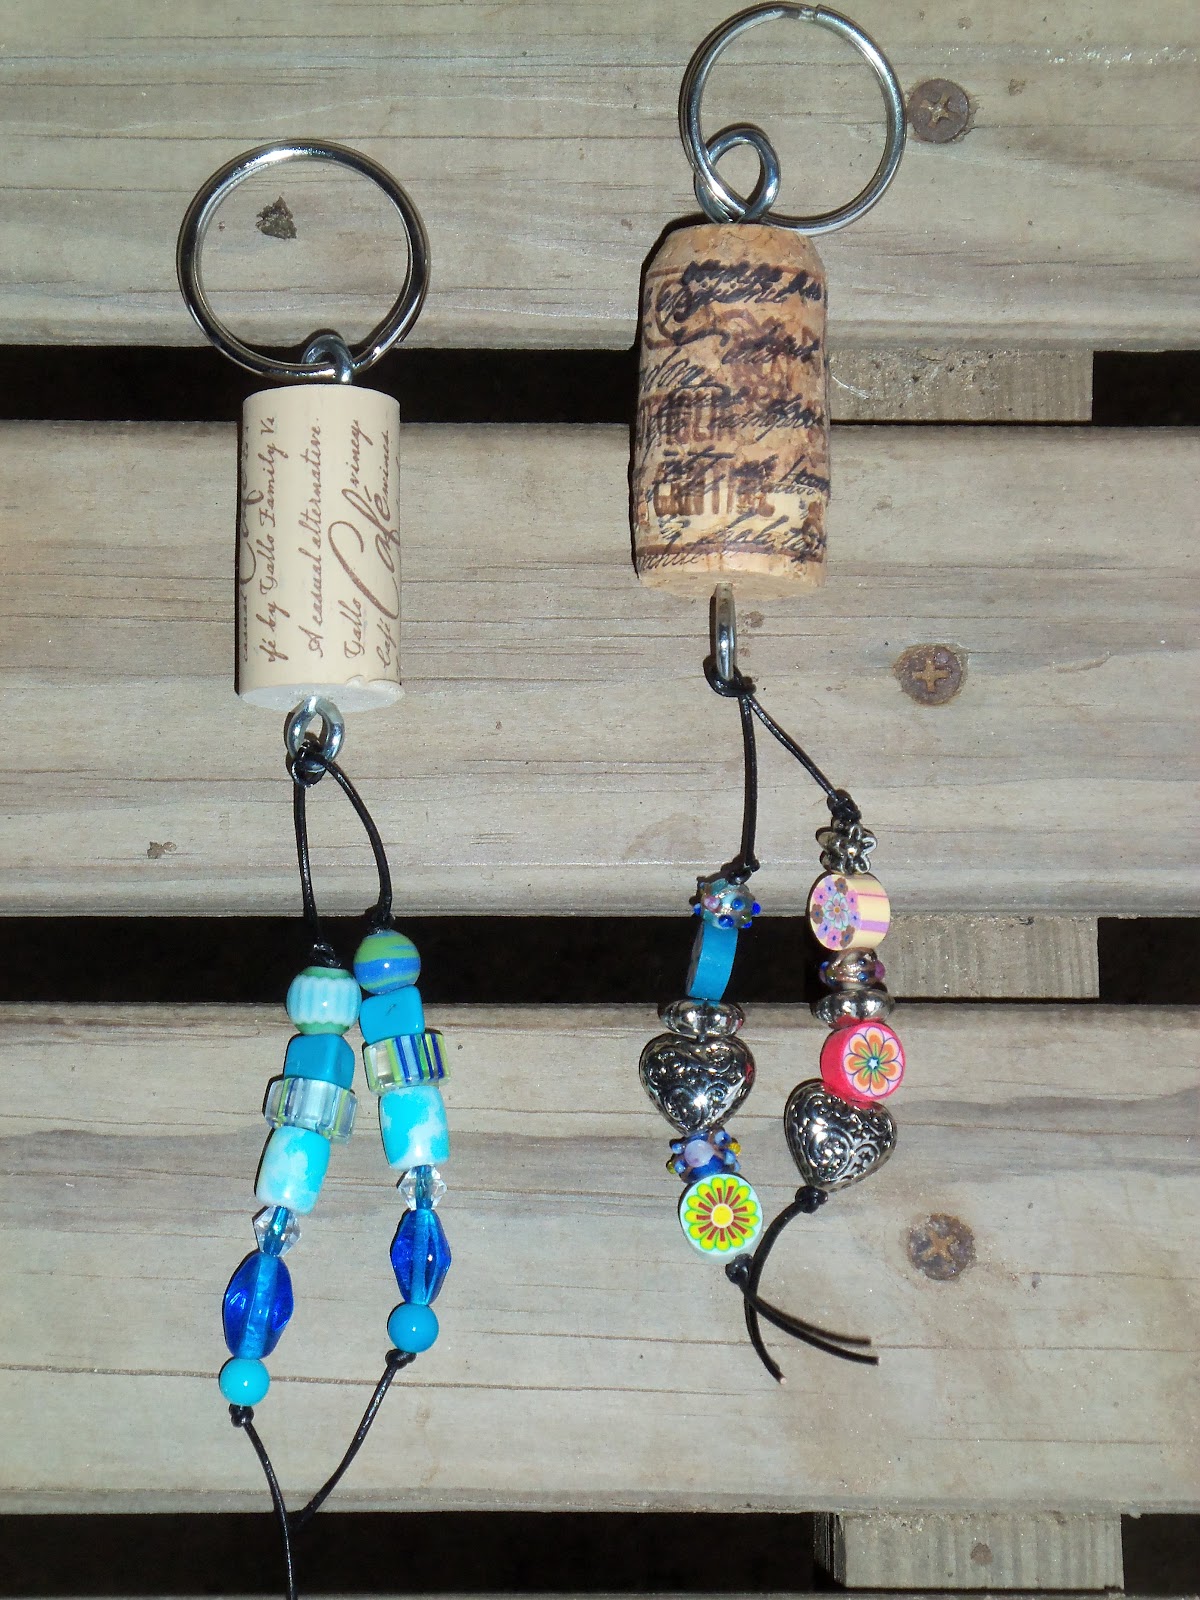
Cork Key Rings

    As I've mentioned before, I have a slew of wine corks- most of which I got from just one estate sale. That one couple provided me with enough corks to make today's project, two other projects - and I still have a lot left. I'm thinking this cork collection was years' worth of them saving.
     Anyway, I found this tutorial and thought it was the cutest use for corks.
 
 
Here are the key rings I made. This project is so quick and easy. The first one took me a little bit, but the rest I whipped up in about five minutes each. I got started making these and didn't want to stop. But how many key rings does one girl need?
 

The cork on the left, I stamped with a script stamp, but I liked the phrasing on the cork on the right, so I left it au natural.

 
Again, I stamped the cork on the right with a script stamp, but the cork on the left already had script writing on it so I left it as is.

     If you, like me, are not a wine drinker (or any kind of drinker, for that matter) and don't have your own supply of wine corks, you can often find them at yard sales and estate sales. Another idea would be to check with a local restaurant and ask them if they could save a few for you. You could also make a post on Craigslist or Freecycle requesting some.

      What do you think? Would you carry one of these around?

     If you like this project and would like to see other projects using corks, you can look here or here.

     Thanks for stopping by and God bless!

I will praise the Lord according to His righteousness,
and will sing praise to the name of the Lord Most High.
Psalm 7:17

This post is linked to Craft-O-Maniac, Between Naps on the Porch, and Making the World Cuter.


Monday, November 5, 2012

Yard-O-Corks

     Over the weekend I got out my glue gun, a yardstick, and my bin of corks
(I'm not teasing- I actually have two. No, I'm not a drinker, I'm a yard sale-er).
 
     I've seen strips of corks on Pinterest- at first I thought, for Heaven's sake, what on earth would you do with such a skinny corkboard? Then one day I looked at the edge of  a short wall in my kitchen and thought, You know what that needs? A skinny corkboard that I could fill with photos!

 
I got both my bins of corks at one estate sale and I guess the occupants were very fond of this one type because nearly all the corks are the same. It gave my strip a very unified look, although a bunch of different corks would be cute, too.
 
 
 If you have a skinny wall or even a narrow space that needs a little something, you may want to make one of these. All it takes is enough corks to cover a yardstick. A glue gun worked just fine to attach them. The most difficult part of the project is attaching a hanger to the back. My hubby just attached a hanger with a screw.
 
 
Here it is in all of its three feet of glory.

     This would be a great way to display your kids' school papers or hand drawn photos. It would also make a nice grandparent or teacher gift.

     Thanks for stopping by and God bless.

When the righteous rejoice, there is great glory.
Proverbs 28:12

This post is linked to Craft-O-Maniac, Between Naps on the Porch, and Brassy Apple.

Thursday, August 9, 2012

Thrifty Thursday #29

     I found the best yard sale this past weekend. There was so much stuff and it was priced so cheaply! I left with a full bag for less than $4.
     I got a brand new (still in the package) spring-loaded curtain rod for fifty cents. I don't have a specific need for it now, but when I do, I know I can't buy one brand new for fifty cents!
I love this burlap bag. I don't think it's old, but I've been on the lookout for one of these. Guess what I paid for it. . . ten cents!
I think it will make a cute throw pillow or padded seat cover. I've even seen these framed.

I believe this game is older than I am. I love the box!

This is a nice sized frame. It will look great with chickenwire in the center.

I got all 8 of these beautiful patterns for ten cents (not apiece- for ALL!) They're from the sixties and I just love the images.
The container that they're in was such a bargain, I couldn't pass it up. It holds the patterns perfectly. I think that's where I'll store all my old patterns in my craft room.

This cork is 12"x24" and came in a bundle of six- for fifty cents! I can't wait to come up with some cork projects!


I got both this unused sketch pad and this pack of 50 pink envelopes for ten cents each.

 I thought this blank recipe box would be a good replacement for my current recipe box which is on its last leg. The lady at the garage sale threw in the brand new recipe cards- I got them both for fifty cents. The Hobby Lobby price was still on these-they cost $6 new.


I stopped at one other yard sale and got this blanket for $2. It's in good shape. I've seen different projects using this type of material- I'm on the lookout for something to do with this one.

Well, I was out for less than an hour and didn't even spend $6 which left enough money for me to swing by Sonic for my favorite drink- Route 44 Diet Coke. That's what I call a good morning!:)

Good luck on your thrifting adventures!
Thanks for stopping by and God bless.

Finally, brothers, whatever is true, whatever is honorable, whatever is just,
whatever is pure, whatever is lovely, whatever is commendable, if there is any
excellence, if there is anything worthy of praise, think about these things.
Philippians 4:8


Monday, May 21, 2012

A "Corky" Kind of Love

     Today I have one last project made with wine corks. 
I've seen this project on Pinterest and have been wanting to make it.


I drew a heart on a large piece of cardboard and cut it out. Then I used a glue gun and glued on corks. The heart is about 2 feet tall.


I'm planning to use it as a cork board once I re-do my scrap space.

     Can you believe that I still didn't use up my collection of corks?
Which means more cork projects. . . later. I'll set them aside for awhile. :)
 
     Thanks for stopping by and God bless.


Today's Creative Blog

Friday, May 18, 2012

Fabric Covered Cork Boards and a Quilt Display

     Hi Guys! I've got a quick and easy project today. I took the four 12"x12" cork boards that I showed you yesterday, bought some fabric at Hobby Lobby and put the two together.


First I laid the cork square onto the fabric and cut the fabric so that there was enough to fold over to the back.


Then I folded the edges over like a present and glued the flaps down with a glue gun. I used four different fabrics for the four cork tiles.

Voila! Four functional cork boards that add a little color to the room. I made these to match my sister's bedroom.

     On another note, today a good friend gave me a quilt that she made. I don't know where it will permanently go, but for right now, I draped it over the top of one of the old doors in my livingroom. I think it looks like it belongs there!


toomuchtime


Photobucket

I Heart Nap Time

Thursday, May 17, 2012

Thrifty Thursday #17

     This week Thrifty Thursday is short and sweet. On my ventures, I may find many treasures or, like this week, I may only find a few.
    On Monday, I made a project using wine corks and decided that this week would be "Cork Week" on Live.Love.Scrap. Imagine my surprise when I found these during my weekly trip to the thrift store!
Four sheets of 12"x12" cork for fifty cents!!
     Come back tomorrow to see what I'm going to do with these. . .

     Thanks for stopping by and God bless.


Wednesday, May 16, 2012

Layout of the Week #13- Using Cork Paper

     Hi All! This layout is brought to you by the letter "C" for cork. Sticking with my cork theme for this week, I got out my cork scrapbook paper and came up with these two layouts.
     Here's how to make the first one:

You'll need
piece of cork paper (either real cork paper or paper printed to look like cork)
12"x12" pattern paper
letter stickers
journaling card (mine is an index card that I used a border punch on)
embellishments
optional: 8 1/2"x 11" piece of card stock
Note: I chose school themed supplies for my layout, but you can choose any subject you like. 
Cut your cork paper to 8 1/2" x 8 3/4". My pattern paper is pretty busy, so I matted my cork paper with white card stock.
Place your cork paper about 1/2 inch from the left side of the paper and about 1 1/2" from the top.


Add your photos. I used wallet size pictures, but you could use two 4"x 6" photos. I placed them closer to the left edge than the right.


Next, you can add your title to the bottom left corner of the cork paper. Then place your journaling card on the right corner of the cork paper.
Add your embellishments. I placed sticker strips on the top of the layout near the right corner, placed a sticker near the bottom left corner and placed three stars next to the top photo.
Ta-da! A layout using cork paper. Quick and simple:)


Cork paper isn't just for school themed layouts. Here I used it on a layout about my hubby and I going to Benihana's. There's some cork paper at the top of the layout and my title letters are made from cork.

The stuff on the left side of the paper was already printed on the paper, but I covered up two of the preprinted pictures with pieces from the Benihana chopstick wrapper. The two red strips are also pieces cut from a chopstick wrapper.
     Thanks so much for stopping by and God bless.

     This post is linked to Five Days Five Ways, The Crafted Sparrow, and


Follow my blog with Bloglovin