Showing posts with label DIY. Show all posts

Friday, July 29, 2016

Flashback Friday: DIY projects with a Beach Theme

It's the last Friday of the month, which means it's Flashback Friday where we look back
at past projects all featuring the same theme.
In the heat of the summer, I thought we'd look at beach themed projects.
 
 
For this project, I added sand and shells to make a beach shadowbox .
 
 
Here is a simple beach-y centerpiece I made.
 
 
I used clear Christmas ornaments to bring a little beach to Christmas.
Go here to see more about it.
 
 
So when you're hanging out at the beach this summer,
 bring home a bit of sand and make your own projects.
 
Thanks for stopping by and God bless.
 
Do not sorrow, for the joy of the Lord is your strength.
Nehemiah 8:10


Friday, June 24, 2016

Flashback Friday: Patriotic DIY's

It's the last Friday of the month,and that means we're gong to flashback
 to previous DIYs all keeping in the same theme.

This month I'm featuring patriotic projects since the Fourth is right around the corner.

(Does anybody else feel like this month just flew by?)


I totally love how these centerpieces using Pepsi cans turned out.
Go here to read more about them. 


I used a bit of fabric, lace, and a fabric flower to put together this patriotic cap.


For this project, I adhered two small flags to the outside of a glass vase.


This patriotic banner was made using paint chips and small flags 
attached to twine using tiny clothespins.
Cute and easy!


This simple project was made covering jars with sequined wristlets
that I found at a thrift store. If you have a daughter who has outgrown some of these,
this is the perfect way to use them!

Follow the links to read more about these projects.

I hope you all have a delightful weekend!
Thanks so much for stopping by and God bless.

Rejoice in the Lord always. 
Again I will say, rejoice!
Phil. 4:4

Friday, May 27, 2016

Flashback Friday: DIY's Using Old Books

It's the last Friday of the month, so we're going to flashback to some previous DIY's.
This time we're looking at five projects using old books.
I love vintage books, so I'm always up for projects using them.


I love how this vase cover turned out.
It's two book covers fastened with twine.
Go here to find out how to make it.


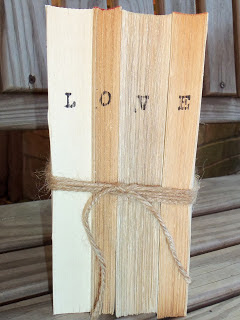
After cutting the covers off the books for the above project, 
here's something you can make using the leftover pages. 
I used twine to tie four books together and stamped the word love onto the pages.


A little chalkboard paint made this book into more than just a . . . book.
You can read more about it here.


I love using covers from old books and turning them into Junk Journals.
This baby girl themed one is one of my favorites.


This is a table runner made from book covers.
How cool is that?

What do you think?
Are you feeling like running out to a thrift store to find some cool old books?
Swing by my house. I can give you a few.:)

Thanks for stopping by and God bless.

This is the message you heard since the beginning: 
We should love one another.
1 John 3:11

Monday, February 1, 2016

Vintage Valentine Banner DIY

Banners are so easy to make.
Here's one I made for Valentine's Day using vintage Valentines,
book pages, old playing cards, and dollar store doilies.


The secret to making a garland is making it nice and full.
You can do it in steps. 
Watch how easy it is. . .


The first thing you need is a word.
I made my letter panels out of old book pages and large letter stickers.
I trimmed my pages into rectangles, then stacked them and cut a notch out of the bottoms.
Then I added the letters.
I folded the top over a piece of lace and stapled each piece on.


Then I used doilies in between the book page pieces.
I alternated round white doilies with red heart shaped doilies.
I used small clothespins to attach these to the lace.


Next, I added some playing cards overlapping the doilies.
(I used all hearts since this is for Valentine's Day.)
The cards had a pretty red and white vintage pattern on the backsides,
so I alternated using both sides of the cards.


Sometime ago, I picked up some vintage Valentines at an estate sale.
I placed these on the red heart doilies.
I attached them to the clothespins that were already holding the doilies.


Finally I added a string of red pom pom trim.
I think it gave it a nice finishing touch.

You can follow these steps to make any kind of garland.
Just replace the Valentines with photos for a birthday garland
or Christmas cards for a holiday banner
or even vintage postcards for a summer bunting.

Thanks for stopping by and God bless.

If you love Me, keep My commandments.
John 14:15

This post is linked to Skip to My LouSimple Nature Décor, Lil' Luna,
Funky Junk, and Tip Junkie

Friday, January 29, 2016

Flashback Friday: Chalkboard Project DIYs

I thought it would be fun to take a peek back at past projects,
so the last Friday of every month will be Flashback Friday
where I'll feature five projects with the same theme.

This month is chalkboard projects.
Who doesn't love chalkboard paint?


I turned this thrift store tray into a chalkboard.
Go here to read more about it.


This is a chalkboard necklace.
Cute, huh?


I painted a chalkboard panel onto a vintage suitcase.
Check it out here.


This cheese dome was another thrifted find.
I thought a chalkboard base would give it a little character.


I love making buntings, so I was tickled to turn chalkboard paper into a banner.

Makes you want to break out some chalk, doesn't it?

I hope you have a fantastic weekend! Thanks for stopping by and God bless.

A new commandment that I give to you,
that you love one another;
as I have loved you, that you also love one another.
John 13:34

 This post is linked to Too Much Time, A Morning Cup of Joe, My Salvaged Treasures,
 Funky Junk, and I Heart Naptime.

Friday, January 8, 2016

A "Box" of Memories--- Memory Shadowbox

I am a huge fan of saving memories, and although I am an avid scrapbooker,
I don't think that's the one and only way to document our lives.
I also keep photo albums and a Memory Jar for each year.

I've shown how you can keep a large office ring to keep your cards and memories in one place.
I've also shown you how to use index divider cards to do the same thing.

Today I'm going to put a different twist on this idea. . .


by turning a shadowbox into a Memory Box.


All you need is a shadowbox.
I got this 5"x 7" shadowbox at Michaels.
You don't want to go too big or it may feel a bit overwhelming.

Then you just need to start filling it with mementos: love notes, business cards from places you've been, fortune cookie notes, ticket stubs, receipts, souvenir pennies, and anything else that will fit.

If you like, you can place a title on the front- I placed a scripture.
 You could add your name and the year.


This was my inspiration.
I just looovvveeee how full it looks!

I made this one for a young friend who left home and got her first apartment.
I can't wait to see what she puts in it.
What I wouldn't give to have one of these from my first year away from home!
Or to see one from my mom or grandma's first year away.

Can you see how excited I get to document life?

Thanks for stopping by and God bless.

The Lord my God will enlighten my darkness
Psalm 18:28

This post is linked to Life With Lorelai, I Heart Naptime, and The Crafted Sparrow.

Friday, January 1, 2016

Top 5 Viewed DIY Projects of 2015

If you like a quick and easy DIY, take a look at these projects.
They're my top five viewed DIY posts of 2015.


This is a super simple idea for Doctors' or Nurses' Appreciation Day.


This post shows a slew of ideas for projects using vinyl records.


Go here to see how these vintage fruit crates were turned into storage.


This is a quick gift idea using office clips as a recipe card/photo holder.

Here's to making this new year extra creative.:)
Thanks for stopping by and God bless.

Whenever I am afraid, I will trust in You.
Psalm 56:3

This post is linked to The Crafted Sparrow and Tatertots and Jello.

Friday, December 4, 2015

Christmas Ornaments

I love all kinds of ornaments.
I could never go with just one theme on our Christmas tree 
because we have too many precious ornaments that we've collected over the years. 
We have some that my mother-in-law sewed, 
some that my boys made in preschool, 
and we even have one that my husband painted when he was in kindergarten!

I've made a few over the years that I thought we could take a look back at. . . 


For this one, I used a clear ornament and filled it with punched paper hearts.


You can have a little paradise on your tree with this one.
It's a glass ball filled with sand and tiny shells.


This one is covered with pieces of map.
I made several and stamped words on them like "peace," "love," and "joy."
You can go here to read more about them.

What kind of ornaments have you created over the years?

Thanks for stopping by and God bless.

Therefore be merciful, just as your Father also is merciful.
Luke 6:36

This post is linked to Too Much TimeLife With Lorelai, Funky Junk, and Lil' Luna.

Monday, November 9, 2015

Easy Patriotic Vase DIY

There are several times a year that we can use patriotic decor.
Since Veteran's Day is this Wednesday,
I thought I'd share a simple DIY for a patriotic vase. . .

I started with two small flags that measure 4"x 6" and a nice glass candle holder 
that I found in the candle section at Walmart. I believe it cost around $5.


I covered the back of each flag with Mod Podge, then pressed them firmly to the glass.
(I think spray adhesive may work a little better 
which is what I will use the next time I do a project like this.)


It would work to hold forks and spoons at a picnic
or flowers in a centerpiece.


Thanks for stopping by and God bless.

Commit your way to the Lord,
 trust also in Him, 
and He shall bring it to pass.
Psalm 37:5

This post is linked to Plucky's Second ThoughtSimple Nature Decor, and Natasha In Oz.

Friday, September 11, 2015

Rock On!

Today's project is super easy-
all you need is a rock with a flat surface, a Sharpie marker, and your favorite quote.


I found two rocks with nice smooth surfaces (thanks to my brother's rock garden).


I chose scripture that has the word rock in it.
You could do the same thing with a quote if you rather.

I lightly wrote my words in pencil to get the size and spacing right before using my marker.
Once the marker dried, I went back over with an eraser to get rid of the stray pencil marks.

This one says, "When my heart is overwhelmed,
lead me to the rock that is higher than I." Psalm 61:2.

I made this to give to a young friend who was leaving home after graduation.
I thought she could set it on a shelf in her new apartment.


This one says, "But the Lord has become my fortress,
and my God the rock in whom I take refuge." Psalm 94:22.

I think this is a unique gift idea.
You could buy a bag of river rock and set the rocks in a nice dish for guests to sign at a wedding or graduation party. I think it would rock to get a gift like this:)

I got my inspiration from here.


You can go here to see a smaller version of inspiration rocks. . .

Thanks for stopping by and God bless.

Create in me a clean heart, O God, 
and renew a steadfast spirit within me.
Psalm 51:10

This post is linked to The Crafted Sparrow, The Dedicated House,
Life With Lorelai, and Tatertots and Jello.

Monday, August 31, 2015

"Orange" You Glad?

Do you have that one person who is difficult to buy for?
Or maybe that person that you'd like to give a gift to, but don't know just what to get?


How about an orange themed gift basket with a tag that says,
 "Orange you glad it's your birthday?"


Just get a clear or orange container and fill it with orange products.
I included a notebook, pen, nail polish, lip gloss,
 Ice Breaker mints, gum, and a can of orange Crush.
Then I tied a ribbon around it all and attached a tag.

You could do this and customize it to anything really. . .
Orange you glad school is starting/ending?
Orange you glad that test is over?
Orange you glad you work here?
Orange you glad to be my friend? :)

You can go here to see how to build a basket full of sunshine.

Thanks so much for stopping by and God bless.

I will be glad and rejoice in You; 
I will sing praise to Your name, O Most High.
Psalm 9:2

Monday, June 1, 2015

DIY: Chalkboard Trunk Round

I just love chalkboards- especially when they're made from something one wouldn't expect.
Today I have a fun chalkboard DIY to share.


It's a trunk round.
Cute, huh?


I started with a trunk round
a foam brush
and chalkboard paint.


I painted two coats of chalkboard paint on the wood.
I used the outer ring as a guide and painted along the inside of the edge.

I gave it 24 hours to dry, then I conditioned it (cover the entire painted surface with chalk,
 then wiped it off.)


Ta-da! A darling chalkboard.

Now, what to do with it. . . ?


Thanks for stopping by and God bless.

The Lord is my helper; 
I will not fear. 
What can man do to me?
Hebrews 13: 6

Monday, April 27, 2015

Personalized Burlap Banner DIY

I recently got the opportunity to make a burlap banner for a baby shower.


The baby's name is Hedessah.
Obviously we couldn't find a pre-made banner for her:)


I used this photo as inspiration to make my banner.


I started by making a triangle template.
I took a square 6"x 6" piece cardstock and made a fold  right in the center at one end.
Then I cut from that mark to the opposite two corners creating a triangle.
Once I had this, I used it to draw triangles with a Sharpie marker on a large piece of burlap.
I cut just inside the lines.


I made a total of 10 triangles- one for each letter of the name and two for hearts.
Then I used foam stamps and acrylic paint to paint the letters and hearts.


Once the paint dried, I used my glue gun to attach the burlap triangles to a long strand of twine.
I left a little bit of space in between each triangle.
 I added 3-4 fabric strips in between each triangle.


It turned out better than I thought it would.
As a matter of fact, I am thinking of making another one for a graduation party that
I'm helping to prepare for!

If you like this look, but would rather skip the step of cutting out your own pennants,
you can actually buy pre-cut burlap triangles at Hobby Lobby.
 Then all you have to do is stamp the letters and glue the pieces to twine.

Thanks for stopping by and God bless.

Now may the Lord of peace Himself give you peace always in every way. 
The Lord be with you all.
1 Thes. 3:16

This post is linked to Plucky's Second Thought, Tip Junkie, and Between Naps on the Porch.