Showing posts with label burlap. Show all posts

Monday, April 11, 2016

Burlap Banner

I love making banners.
Sometimes I make them with pretty paper,
but my favorite ones have been made from burlap.


I made this one for my friend's baby shower.
The shower had a moustache theme and the color was turquoise.


I started by deciding what size triangle I wanted the letter panels to be.
I cut a triangle out of cardstock and used it as a pattern.
Using a Sharpie marker, I traced around the template for a total of six burlap triangles.


Then I cut out along the inside of my lines (that way the lines wouldn't be visible).
I used foam stamps and black paint for my letters.
On two triangles, I used a heart stamp.
To keep it with the moustache theme, I added moustache stickers to the hearts.
(I liked that they were stickers- that way my friend can peel them off
and use the banner in the nursery if she decides to.)


Then I glued the burlap triangles to a long piece of twine leaving just a little space in between them.
My final step was to add pieces of turquoise ribbon in those spaces.

Easy and cute.
You could make a personalized banner like this for any celebration.

Thanks for stopping by and God bless.

Be still and know that I am God
Psalm 46:10

 This post is linked to USS CraftyGingersnap Crafts, I Gotta Create, and Wow Me Wednesday.  

Monday, April 27, 2015

Personalized Burlap Banner DIY

I recently got the opportunity to make a burlap banner for a baby shower.


The baby's name is Hedessah.
Obviously we couldn't find a pre-made banner for her:)


I used this photo as inspiration to make my banner.


I started by making a triangle template.
I took a square 6"x 6" piece cardstock and made a fold  right in the center at one end.
Then I cut from that mark to the opposite two corners creating a triangle.
Once I had this, I used it to draw triangles with a Sharpie marker on a large piece of burlap.
I cut just inside the lines.


I made a total of 10 triangles- one for each letter of the name and two for hearts.
Then I used foam stamps and acrylic paint to paint the letters and hearts.


Once the paint dried, I used my glue gun to attach the burlap triangles to a long strand of twine.
I left a little bit of space in between each triangle.
 I added 3-4 fabric strips in between each triangle.


It turned out better than I thought it would.
As a matter of fact, I am thinking of making another one for a graduation party that
I'm helping to prepare for!

If you like this look, but would rather skip the step of cutting out your own pennants,
you can actually buy pre-cut burlap triangles at Hobby Lobby.
 Then all you have to do is stamp the letters and glue the pieces to twine.

Thanks for stopping by and God bless.

Now may the Lord of peace Himself give you peace always in every way. 
The Lord be with you all.
1 Thes. 3:16

This post is linked to Plucky's Second Thought, Tip Junkie, and Between Naps on the Porch.

Monday, December 23, 2013

Christmas Centerpieces and Vintage Decor

Last week I got to help two of my good friends decorate for a Christmas banquet. 
We had seven tables and two counter tops that needed to be made pretty.
We wanted to keep it low cost, but highly cute.
We planned for a shabby, old-fashioned Christmas look by bringing stuff from our houses and blending it together for these centerpieces.
Take a look and see what you think. . .

 
This was on the main counter top amid the fixings for fajitas.
We used lots of mason jars filled with cranberries, greens, and floating candles.

 
Hanging along the bottom edge of the counter was this tea-stained vintage lace garland and a garland of cranberries.

 
This was arranged on the dessert bar.
Don't you just love those large lanterns?
See the book page garland strewn throughout the arrangement?
The red candles were painted with Mod Podge and rolled in Epsom salts to get that "snowy" look.

 
The kids had made the paper bag angels, so we made them the focus of several of the arrangements.
You'll notice more cranberries here.
In each arrangement, we used Scrabble tiles spelling out words in tile holders.
 
 
This was on the table as you first entered.
There's three candles and a vintage book photo holder displaying two old postcards.
We used lots of burlap and old doilies and lace throughout.

 
For smaller arrangements, we paired up vintage books with teacups that we used as candle holders.
One of my friends thought up the idea of using teacups like that and I just love that look!

 
I adore the look of the wood rounds and the green moss.

 
We used Scrabble tiles like confetti and sprinkled them around all the arrangements.
 Sweet and simple, huh?

 
More vintage books

 
We incorporated an old film canister as a tray beneath this arrangement.

 
This is my old yard sale birdhouse that we used for a centerpiece.
How cute is it paired with old books and candles?

 
Most the centerpieces contained similar items, just arranged differently.

 
We used maroon and white tablecloths and beautiful burlap table runners.

 
This buffet is beautiful on its own, but we upped it's loveliness with a vintage book table runner, candles, and this awesome typewriter (which isn't mine, but I wish it was!).

 
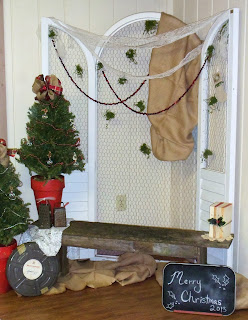
Finally, this is the corner that was set up for family photos.
I love the vintage feel between the burlap, cranberries, lace, and old books.
 
When we finished decorating, I told my friends that they need to come to my house and decorate my living room like this!
 
P.S. Want to know how much of this stuff came from thrift stores and yard sales?
Well, I'll tell you: the film canisters, all the old books, the Christmas blocks in the first photo, the tall silver candle sticks, the vegetable graters (in the above photo), all the tea cups, one of the wooden bowls, the Scrabble tiles, the jar of keys, and the large green bird house!
Who says you can't decorate with stuff from secondhand stores?!? :)
 
Thanks for stopping by and God bless.

Yet I will rejoice in the Lord, I will joy in the God of my salvation.
Habakkuk 3:18

This post is linked to Funky Junk, Between Naps on the PorchThe Dedicated House, My Girlish Whims, and Craft-O-Maniac.

Friday, December 6, 2013

Hung By the Chimney With Care


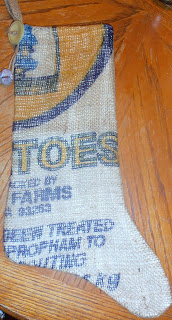
Every year, my mom hangs stockings at her house for everybody in the family. This year she decided to get all new stockings. She had me pick out mine. I decided on one made from a burlap potato sack. I found it on Ebay.

 
This is what it looked like when we got it in the mail.
It's cute, but I thought it could be cuter.

 
So I started by cutting off the large button and jingle bell.
 
 
Then I hot glued some 1" beige lace along the top.

 
I added a second trim- a burlap band that has pearl loops (which are hard to see in this photo).

 
Then I made a rosette out of dark blue fabric.
Unfortunately, it was not quite the same shade of blue as the printing on the burlap.

 
I thought about tea staining it, but I didn't want to allow for the extra drying time.
Instead I sprayed it with some walnut ink spray.
It only took a few moments to dry.

 
Then I attached it to the stocking.

 
My final touch was a tan button that I glued to the center of the rosette.

 
Ta-da! What do you think?
Don't you just love printed burlap?!?
 
If you see a stocking, but it isn't quite what you want, make your own adjustments. If you use a glue gun, it's easy! No sewing machine needed:)
 
Thanks for stopping by and God bless.
 
Let us not love in word or in tongue, but in deed and in truth.
1 John3:18
 

Friday, August 30, 2013

Bag of Pinto Beans. . . Or A Pillow?

I'm so glad you stopped by! I have a quirky and fun project to share with you today.


It's a pillow- made from a pinto bean bag!

I got the bag for ten cents at a yard sale last year. No joke.
It's been folded up on a shelf since I bought it. Then I recently tried making a pillow and was so pleased with the results that I started looking around to see what else I could turn into a pillow. And I remembered this beautiful burlap bag.
So I dug through my ribbon collection and found this delightful blue pom-pom trim
and knew it was meant to be.

Now, let me tell you that I'm by no means a seamstress. I remember tips my mom has taught me over the years and bits and pieces from Home Ec. Lucky for me it doesn't take too much to sew two rectangles together!

If you like this project, you may want to take a look at another pillow I made.
Thanks for stopping by and God bless.
For the Lord is good;
His mercy is everlasting, and
His truth endures to all generations.
Psalm 100:5

Monday, November 19, 2012

Thanksgiving Centerpieces

     Over the weekend I had the opportunity to help decorate for the Thanksgiving dinner at our church. When I was asked to help, I was at a loss. Now, if you've read my blog for any length of time, you know that I am not a fancy girl. I live with 3 males- we just don't do centerpieces at my house.  I can fumble my way around playing with scrapbooking paper, but table centerpieces?
     Luckily, my good friend was in charge and she was full of ideas. I just followed her directions. We did seven different tablescapes and each one was as cute as the next. Take a look. . .

 
This is a Crepe Myrtle branch with five holes drilled out for tea light candles.

 
These floral arrangements were placed in two large Ball jars. The four small jars on either side are full of rice with tea light candles peeking out of the rims.

 
I love the look of the pecans in the water. The raffia was the finishing touch!

 
My friend got a slew of pumpkins for free from a local garden center that was getting rid of them after Halloween. The pumpkins finished off our harvest arrangements perfectly.
 
 
The candlestick holders are made of acorns. We had quite a few of them (they were made by the kids in Children's Church). You'll see them in other arrangements as well.

 
Here we have three cakestands filled with acorns. They each have tealight candles in them. (We later went back and replaced the acorns with a mixture of dried split peas and blackeyed peas for more color contrast.)
I don't know if you noticed, but all the table runners are made from burlap with tea-stained lace on the ends. Absolutely beautiful!

 
Each tealight has a little bit of trim wrapped around the outer edge-so easy.
Each cakestand was made by gluing a candlestick to a plate. You can see a tutorial on how to do that here.

 
This is a platter with acorns, pumpkins, and a couple of acorn candlesticks. One pumpkin is placed up on a small pillar.

 
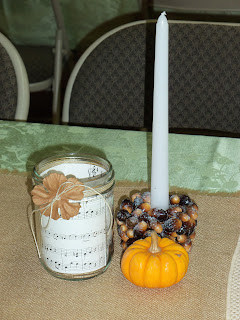
Here we have three Mason jars with battery operated tealights and two acorn candlesticks.

 
Here's a close up view.
To make the decorative Mason jar, just trim sheet music to fit inside the jar. Then wrap the mouth with ribbon or twine and a flower. Because the sheet music is inside the jar, you will need to use a battery operated tealight candle.
To make the acorn candlesticks, place acorns in an old plastic container, add enough Elmer's Glue to make them stick together, then place the candlestick in the center. This way it will dry with a hole for the candlestick. Super cute and super easy.

 
For this large jar with the three pillar candles, my friend layered different dried beans, coffee beans, and popcorn kernals. Once again, a very easy and very affordable decoration.

 
Finally, my friend made letter stencils with her Cricut and used them to paint on the burlap flags.
Super cute, huh?
 
So many different centerpieces that were not only cute, but affordable as well. That speaks to my creative and frugal sides!
 
I have to say, I learned quite a bit about putting together centerpieces. Now I may be able to bring a little fancy into my house:)
 
Thanks for stopping by and God bless.

And whatever you do, whether in word or deed, do it all in the name of the
Lord Jesus, giving thanks to God the Father through Him.
 Colossians 3:17

This post is linked to Brassy Apple, Craft-O-Maniac, Between Naps on the Porch, Skip to My Lou, and Making the World Cuter.


Friday, October 26, 2012

My Fall Wreath

     Recently, I made this jute wreath with interchangeable rosettes so I could change the rosettes with the seasons. This way I always have a pretty wreath to hang on my door.

     I wanted to share my fall version with you.

 
I dug through my material looking for fabric with natural colors to use on the rosettes.

 
The green one is fabric from an old McCoy's handkerchief, the next one is made from burlap (who doesn't love burlap?), the third one is made from tulle, and the last one is brown fabric with off white dots (who doesn't love polka dots?).
I attached these to alligator clips so they will come off easily when I replace them with Christmas themed rosettes. . .

 
If you'd like to make a simple wreath like this for yourself, you can go here for a tutorial.
 
 
Thanks for stopping by and God bless.
 
For you yourselves are taught by God to love one another.
1 Thel.4:9