Showing posts with label re-do. Show all posts

Monday, September 8, 2014

Old, Chippy, Chalkboard Door

Well, I didn't get as many projects done over the summer as I had hoped,
but there is one big thing that I tackled.
I sanded and painted this old door.
 
 
I just love old solid wood doors.
 
I have three in a display in my livingroom,
one in my kitchen,
and one as my headboard in the bedroom.
That's a lot of old doors!
 
 
Here's what it looked like.
I got this from my neighbor's driveway.
It had a sign on it that said, "For free."
The sign may as well have just said, "Laura, come get me!"

 
I started by painting the center panels with three coats of chalkboard paint.
Then I painted the rest of it with one coat of a lemon-y yellow.
It already had an awesome old, chippy look. There was one small area that looked like it had tape over it when it was painted with the white, so I hoped the yellow would cover that area.
It did- well enough anyway!

 
Once that dried, I sanded it, and applied a brown antiquing wax to give it this aged look.
I also conditioned the chalkboard sections.

 
What do you think?
Pretty cute, huh?
I'm thinking it would look good hung lengthwise in my kitchen as a message center.
 
Thanks for stopping by and God bless.
 
For the Lord your God is gracious and merciful,
and will not turn His face from you if you return to Him.
2 Chron. 30:9


Monday, July 22, 2013

Please Stay Seated. . .

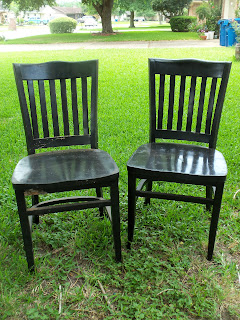
     This post has been a long time in the making. Right before summer started, I showed you an awesome roadside find. . . two black chairs. Right away, I knew just what I was going to do with them. It took me much longer than I thought -not the actual work on the chairs, just finding the time to work on them- but without further ado, here they are!

 
I used a hand sander along all the edges.

 
I don't know what kind of paint was originally used on these, but it didn't come off easily- especially on the seats!

 
Here's a close-up of Chair A.
 
 
Here's Chair B.

 
And a close up of the back.
 
 
This is what they started out looking like.
Can you believe somebody just threw these away?
 
Thanks for stopping by and God bless.
 
If you're stopping by from Roadkill Rescue, I am so excited to have you here! Please become a follower!
 
 
In the day of my trouble I will call upon You, for You will answer me.
Psalm 86:7

Friday, June 21, 2013

Plate + Glass= Plate Stand

     I really wanted to show you my distressed black chairs today, but I'm still working on them. They aren't quite looking the way I want them to yet. . . just about, though.
     Instead I'm featuring a quick and easy tutorial that requires only a decorative glass and a pretty plate- oh, and some E6000 glue.

 
I made this pretty plate stand and it took only moments.
These are so fun to make because you can pair together a plate with anything to give it height- a small vase, a candlestick, or a pretty glass.

 
This is how it looks from the side.

 
I used one of these plates. I love the little turquoise flowers.

 
And I chose this pretty brown glass. I thought it coordinated nicely with the brown in the pattern on the plate.
I got both the plate and glass at the thrift store. You can see that post here.
This project didn't even cost me two dollars.
 
If you want to make one, all you need to do is glue your two pieces together using E6000 adhesive. Then allow 24 hours to dry.
 
You can use this as a cake or dessert stand or you could use it to hold your bracelets. I think it would make a darling display for a craft show or would be a nice hostess or housewarming gift.
 Cute, huh?
 
Imagine if you used a plate or vase that once belonged to your grandma.
What a treasure that would be!
 
I hope you all have a wonderful weekend! Thanks for stopping by and God bless.
 
Pleasant words are like a honeycomb,
sweetness to the soul and health to the bones.
Proverbs 16:24
 

Wednesday, April 24, 2013

Layout of the Week #51- Using Preprinted Backgrounds

     I love to buy scrapbooking supplies. . . especially pretty papers. I'm really drawn to pieces with preprinted backgrounds. Even though I have quite a collection, I still buy more. Surely I'm not the only one who does that!
      Today we're going to create a layout using a page with preprinted text. While following these steps, you may have to make slight modifications depending on where your background text is printed.
 
Here's the basic layout we'll be creating.
We'll be placing photos and strips of paper around the preprinted text.

 
To create a layout like this, you'll need:
one piece of pattern paper with printed text on the background (if you don't have one but want to create the layout, use a piece of Kraft cardstock)
three strips of pattern paper- measurements noted below
coordinating embellishments (I used three tickets and I cut out a small piece of pattern paper)
letter stickers for the title
three or four photos
paper trimmer
adhesive

 
First trim the excess background from your photos if needed.
Adhere two photos vertically one above the other about 1" from the left edge of the page.
Adhere one or two next to those horizontally almost making a sideways "T" with the photos.
Keep in mind that you may need to make slight variations depending on your background text. For instance, you may need to stack two photos near the right edge and do a mirror image of this layout.
 
 
Now take the three pattern paper strips. Trim them to:
1/2" x 5 3/4"
1/2" x 6 1/4
1/2" x 5 1/2"
Adhere them in that order in the lower right hand corner.

 
Place three short strips above the top left photo.
I used the leftover scraps from my other strips. They measure:
1/2" x 2 1/4"
1/2" x 2 3/4"
1/2" x 2 1/4"
Place your title below the horizontal row of photos.

 
Now add a few embellishments. I placed three tickets to the right of the photos.(I use tickets often in my scrapbooking. You can get a roll of them for around $5 at both Wal-mart and Target. One roll will last a lifetime and you'll be surprised how often you use them!)
 I also placed a diagram above the bottom paper strips (I cut this from a large piece of patten paper; it's a moustache which goes with the theme of my layout.)
 
 
Add journaling to the lower left corner.
And we're done.
What do you think? Were you able to follow along with your own papers I hope?
 
Thanks for stopping by and God bless.
 
 "For my thoughts are not your thoughts, neither are your ways my ways,"
declares the Lord. "As the heavens are higher than the earth,
so are my ways higher than your ways and my thoughts than your thoughts."
Isaiah 55:8-9
 
 
This post is linked to 52 Mantles and Shabby Creek Cottage

Monday, December 10, 2012

Hand Tool Turned Jewely Organizer

     I'd like to introduce you to my newest re-do of a thrifted purchase . . .drum roll, please. . .


this handy necklace holder.
Do you recognize it?


     A few Thrifty Thursdays ago, I picked up this cultivator for a dime (see the post here).

I knew from the get-go that I wouldn't be digging in the dirt with it. I had other plans for this little fella.


     I painted the handle white and sanded it. Then my hubby placed the end in between two pieces of wood, held them tight in a vise, and bent them all at once- that way they were equally bent. (Isn't he so sweet to help me?)


     How cute is this to hold some necklaces? I only placed a few on there, but you can see that many more would fit.

     Not only is it handy, but it's cute, too. Next time you spot a hand tool, look at it in a different light. You may be able to use it for something other than the obvious!

     Thanks for stopping by and God bless.

I will praise You, for I am fearfully and wonderfully made
Psalm 139:14
 
     This post is linked to Funky JunkBrassy Apple, Craft-O-Maniac, Todays Creative Blog, and Skip to My Lou.


Monday, November 26, 2012

Earrings Turned Necklace and Ring

     I have had this pair of heart earrings with a quote inscribed on them for awhile, but never worn them. I'm pretty much a silver hoops kind of girl. I hated that these were just sitting because they're really cute. So one day while digging through my jewelry box, I thought, how about if I turn them into a necklace and ring set?

 
This is how they turned out.

 
This is what I started with.
I clipped off the earring hoops and sanded the back where they were attached.

 
For the necklace, I glued on a bale (which is a flat piece that attaches to the back of the charm and has a loop to connect it to a necklace) with some E-6000 glue. I let it sit for 24 hours before I placed it on a necklace.

 
For the ring, I simply glued the charm to a ring back.
So very simple- and cheap!
Cute necklaces like this are all over the web and usually cost a pretty penny. Now I have a ring and a necklace for the price of one pair of earrings!
 
This would be a great gift idea for Christmas. You could buy one pair of earrings and have two gifts! You could make two necklaces or two rings or a necklace and a ring. . .
I, personally, would love to receive something like this as a gift.:)
 
Thanks for stopping by and God bless. 


Do not forget to entertain strangers, for by so
doing some have unwittingly entertained angels.
Hebrews 13:2


This post is linked to Brassy Apple , Between Naps on the Porch, Five Days Five Ways and Making the World Cuter.

Friday, November 16, 2012

Harvest Wreath Worth Raking For . . .

     Yesterday I showed you an old rickety rake that I picked up at a thrift store. I had big plans for this guy. I took the handle off, wiped off the rake part, and went to work. This is what I ended up with. . .

 
a rake wreath- has quite a harvest-y look, huh?

 
I hung it on my front door.
What do you think?
 
Hope you all have a fantastic weekend. Thanks for stopping by and God bless.
    

The Lord has done great things for us, and we are glad.
Psalm 126:3
 
This post is linked to Funky JunkGlitter, Glue, and Paint, Todays Creative Blog, Too Much Time On My Hands, Be Different Act Normal, Tater Tots and Jello, At the Picket Fence, and Embracing Change.

Monday, November 12, 2012

Chunky Beaded Necklace

     I love big chunky beads and I love to wear necklaces of all kinds. I found a tutorial at the Design Stash blog showing how to make a necklace using beads and ribbon and I was sold! The directions are so easy to follow, I felt I couldn't go wrong.

 
This is how it turned out. The beads are on a length of ribbon with a knot tied in between each bead. Then I tied on a toggle clasp.

 
I got these bracelets at a scrapbooking store years ago. I love the color of the beads and how large they are. I don't know if you've ever worn a bracelet with beads this big, but it's a little clunky and gets in the way of. .. well, everything. So I decided these would be perfect to turn into a necklace.
 
 
I remembered that I had gotten this flower pendant some time ago and never used it, and I thought it would be a nice addition to the necklace. I used a toothpick and model paint to make the dots in the center red.
 
 
I'm really pleased with how it turned out. I think the colors are so happy.
I have never strung beads on ribbon for jewelry before, but after trying it with this, I will be using this technique again.

     Here's where I found the tutorial to make this necklace on the Design Stash blog.

     Happy Veteran's Day to all you veterans out there. Thank you so much for your service.

     Thanks for stopping by and God bless.

Whoever dwells in the shelter of the Most High will rest in the shadow of the Almighty.
I will say of the Lord, 'He is my refuge and my fortress, my God, in whom I trust.
Psalm 91:1-2

This post is linked to Brassy Apple, Craft-O-Maniac, Between Naps on the Porch, Skip To My Lou, and Make the World Cuter.

Friday, October 19, 2012

Potato Masher. . . or Photo Holder?

     Yesterday I showed you an old potato masher that I found at a thrift store. When I saw it, I knew right away that I was going to turn it into a photo holder.


What do you think? It could also be used in the kitchen to hold a recipe.


Here it is before.


Here it is after: I took a 2" clothespin, tied a strip of fabric to it, and glued a button to the center. Then I glued the clothespin to the handle of the masher. Easy-peasy.

     If you like this, you might like this vegetable/cheese grater that I turned into a photo holder.

     Thanks for stopping by and God bless.

Blessed is the man who trusts in the Lord,
and whose hope is the Lord.
Jer. 17:7

This post is linked to Funky Junk, Knick of Time, Do Small Things With Love, At the Picket Fence, Be Different Act Normal, Too Much Time on My Hands, Five Days Five Ways, My Girlish Whims, and I Heart Naptime.

Monday, October 8, 2012

My Wheels Have Been Turning. . .

     A few weeks ago while browsing at a yard sale, I spotted an old wheel. Well, that got my wheels turning as I've seen photos on Pinterest and in the Flea Market Style magazine of how people are incorporating these into their home decor.


     I got this guy for the bargain price of $1. I had to scrub him really good because there was old mud caked in his treads. Now- I am ok with hanging an old wheel in my house, but I draw the line at hanging a muddy old wheel in my house.:)


     I think he'll be pretty cool hanging in my new and improved craft space as an inspiration board. What do you think?
(I really like that he's all rusty.)

 
He even adds an interesting element to a wall arrangement.
 
If you like this look, you could use it to focus on one person with photos and mementos of that person.
It would also be cool in a boy's room displaying favorite playing cards or ribbons that he's won.
Or it would look pretty unique displaying photos at a birthday party.

    
     Thanks for stopping by and God bless.

Grace be with all those who love our Lord Jesus Christ in sincerity.
Eph. 6:24


Friday, September 21, 2012

Vegetable Grater Photo Holders as Centerpieces

     Just yesterday I showed you these old, somewhat rusty, vegetable graters that I got for a dime apiece at an estate sale.

     From the moment I saw them, I knew what I wanted to do with them. . .
 

 turn them into photo holders!
 
I just wiped them clean- leaving most the rust to add to the "vintage" look- and used a glue gun to adhdere a bull clip. (I used Tim Holtz's Hinge Clips- they were just the right shade of gunmetal.)
Then I tied a piece or ribbon to the handle, and voila!
 
Wouldn't these be cute as centerpieces for an anniversary party, wedding, or bridal shower? You could glue a bull clip to both the front and back sides and place an electric tealight inside.
 
 
They look good with recent photos or 

 
with older photos.

 
Since I don't have any type of party coming up, anniversary or otherwise, I placed mine in my livingroom on my piano.
 
What do you think?
 
 
     Thanks for stopping by and God bless.
 
 
I praise you because I am fearfully and wonderfully made;
your works are wonderful, I know that full well.
Psalm 139:14


Monday, June 4, 2012

Lamp Shade Re-do

     Recently I was browsing in a cute gift store that we have here in town. They always have the neastest stuff. I get lots of ideas for things to make, but like with Pinterest, these ideas usually just stay in my head. But not this time! I found something that I decided that I had to make--a lace lampshade.

This is the lampshade that I made. It turned out a lot like the one in the store; unfortunately, I don't have a photo of that inspiration project. 


I bought this lampshade at the thrift store for $2. Then I paired it up to a lamp that I had at home that was in need of a shade. I stripped off the old shade from the frame-I made slices with a box cutter and peeled it off.


Then I got out my drawer of lace and tied strips all around the frame. I trimmed the tails to be the same length. I'm pretty pleased with how it turned out. It didn't take too long to do and the price was just right! (This item at the gift store was $90!)
If you want to make one and don't have a large supply of lace, you can watch for lace at thrift stores or yard sales (I've found plenty like that) or you could always get your 40% off coupon and head over to Hobby Lobby!


Thanks for stopping by and God bless.
This post is linked to Making the World Cuter and


Today's Creative Blog
I Heart Nap Time
Skip To My Lou


Too Much Time On My Hands

Funky Junk's Saturday Nite Special