Friday, August 24, 2012

A Weekend Retreat

     Last weekend was my annual "Girls' Weekend" with two of my very close friends. Every year we venture out to someplace different. We've spent weekends in Corpus Christi, Fredricksburg, and San Marcos, to name a few. This year we stayed local and made reservations at Premier Estates, a B&B in Wallis that caters to scrap bookers. My, what a treat!
We stayed as part of a group of twelve, but the house accommodates up to sixteen. They have two rooms set up for crafters complete with sixteen 3'x5' tables. Each table has its own lamp, cup holder, and trash can.
All meals were catered and were fantastic! We were served dishes like Cream Cheese Stuffed Strawberry French Toast, Avocado Wraps, and Asian Salad. I tried things that I've never eaten before and I loved them all! 
The ladies who ran the B&B would get the tables set with our meals and come and get us to eat. Then they would clear our dishes afterwards.
There were plenty of snacks and a fridge full of sodas and waters in case we felt like snacking.
It's such fun to get spoiled like this:)
 

The B&B was a house built in the early 1900s. I just adored it. Old houses have such charm! I loved all the nooks and crannies like you see here.
 
The ladies who run it have decorated it with beautiful pieces like this. It's done in just the way you'd think a B&B should be:)
 
     Over the weekend, I was able to complete three mini albums made with old book covers (like these) and work on a few layouts.  My friends and I had a great time and we were so glad that we got to try out this place.

     I treasure my time with these two ladies. We met back in nursing school in 1998. We set up study groups and carpooled together. We've been with each other through the births of three children (two of them mine), a marriage, numerous job changes, and children leaving the nest. I am blessed to know them.

     Thanks for stopping by and God bless. I hope you all have a wonderful weekend.


For the Lord is good; His mercy is everlasting,
and His truth endures to all generations.
Psalm 100:5


Thursday, August 23, 2012

Thrifty Thursday #31

     I'm here with my weekly score of secondhand treasures. One gal's trash is this gal's treasure!

     My hubby and I went to an estate sale that started on a Thursday. Usually, we don't go until the last day, but I wasn't going to be home over the weekend, so we went on the first day shortly after it opened. It was very neatly organized and nearly everything was priced.

     I found this old Bingo game which is in Spanish. I'm always on the lookout for vintage paper products to use in scrap booking. I paid $2 for this.
Normally, I don't pay over a dollar for an old game,

but this had bingo cards plus the smaller cards. Score!


I got this darling tea towel for $2. I love it. I'll either find a frame for it or use it as a seat cover on an old chair.


I spent the weekend with some friends and we stopped by a few antique stores. I love to look at them, but I usually cringe at the prices (I prefer to find my antiques on my own:).
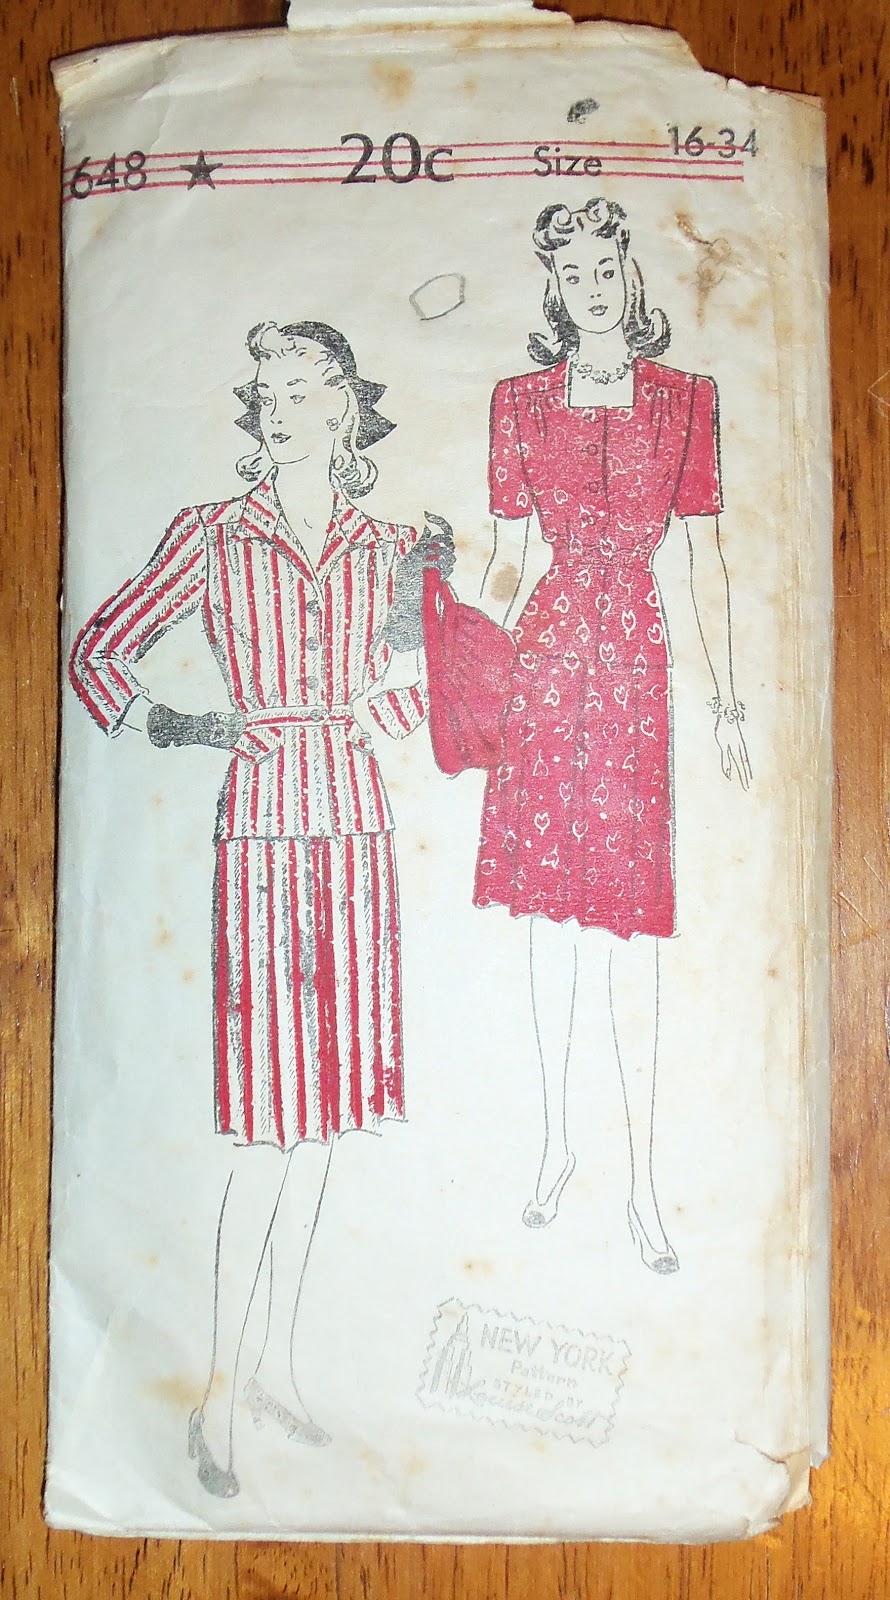
I found these old patterns and paid fifty cent apiece for them. The lady said she thinks they're from the forties!

I just love vintage graphics!


      Happy thrifting to you all. Thanks for stopping by and God bless.


Praise the Lord, my soul, and forget not all his benefits
Psalm 103:2

Photobucket
This post is linked to Apron Thrift Girl.

Wednesday, August 22, 2012

Layout of the Week #25- Using Stamps to Create Embellishments

     If you're anything like me, you are easily enticed by rubber stamps which are some of my favorite scrapbooking supplies. I've told myself that I simply cannot buy any more until I use the ones I have.
     Today we're going to use stamps on pattern paper to create embellishments for our layouts.

Here is the layout we're going to create.

To make this layout, you'll need:
2 pieces of 12"x12"pattern paper
1 piece of 12"x12" card stock
4-6 smaller pieces of pattern paper (for photo mats and for the stamped embellishments)
letter stickers for the title
rubber stamps (shaped like stars, hearts, or arrows and some for journaling)
ink
adhesive
trimmer

Choose which piece of pattern paper you want for the background. Then trim 1" off the right side and the bottom of your card stock. Adhere it to the background paper leaving 1/2" border.
Ink the edges if you'd like.

Next, trim a 4"x12" strip off of another pattern paper. Adhere it about 1" from the left side of the card stock.

Now, mat your photos on some coordinating paper and place them overlapping as seen above.

Here's where our stamps come in.
Place a journaling stamp on a piece of your scrap pattern paper. Depending on what type of stamps you have, yours will look slightly different. It's ok- you're trying something new:)


Then, using your letter stickers, place the title above your stamp.
Mat this title/journaling block on some coordinating paper.

Place it to the right of the top photo.

Using your shaped stamps- whatever the shape may be- stamp on some of your scrap pattern paper. Then trim around the shape which will create an embellishment.
P.S. I'm using the big stamp pad I recently bought at the thrift store and it works great! I don't think it was ever used!


Place your stamped embellishements at the lower right corner of the layout slightly overlapping your bottom photo.
Optional: Place a flower on the bottom left corner of the top photo. This was a basic silk flower that I stamped.
And, you're done!

Here's another layout where I used stamps to create embellishments: the journaling stamp (which is right above the title) and the star on the white paper.

So, now that I've used some of my stamps, I think I may need to go out and possibly buy a new set. . .

Thanks for stopping by and God bless.


The Lord is near to all who call on Him,
to all who call on Him in truth
Psalm 145:18

This post is linked to Today's Creative Blog, Happy Hour ProjectsToo Much Time On My Hands, and At the Picket Fence.

Tuesday, August 21, 2012

Recipe of the Week #31- Snickerdoodle Cookies


Snickerdoodles
1 cup oleo, softened
1 1/2 cup sugar
2 eggs
2 3/4 cup flour
2 tsp cream of tartar
1 tsp soda
1/2 tsp salt

Cream butter and sugar. Add eggs. Mix in the rest of the ingredients. Place dough in the fridge for a few hours until the dough is firm.
Make into balls and roll in a mixture of cinnamon and sugar. Place them on a greased cookie sheet and press them flat with a fork or bottom of a cup.
Bake at 350 until golden brown.

These cookies are melt-in-your-mouth fantastic! I got this recipe from my mother-in-law. She always claimed she wasn't a good cook, but all her recipes that I have are amazing!

Thanks for stopping by and God bless.

Be completely humble and gentle; be patient,
bearing with one another in love.
Ephesians 4:2
 
 
This post is linked to Happy Hour Projects and Five Days Five Ways.


Monday, August 20, 2012

Turn Mini Spools into a Bracelet

     I was looking through a magazine and saw a picture of a darling bracelet made from little wooden spools. I love unique pieces of jewelry, so I set this photo aside in my "someday" pile. Well, guess what? Someday has arrived! Take a look at the bracelet I made from little wooden spools. . .

If you'd like to make one, you need
16-18 half-inch wooden spools (I got mine in the wood section at Hobby Lobby)
tiny strips of paper to cover the spools
Mod Podge
stretch elastic for making bracelets

The first thing you'll do is cover the spools with the pattern paper. You could go with a monochromatic color scheme or just use all kinds of papers which is what I did.
Then you need to cut a length of elastic about 20-22 inches long. With the first spool, you need to string the spool onto the center of the spool. For each spool after that, you need to cross both ends of the elastic through opposite ends of the spool. It will make an X with the elastic.

Then pull both ends of the elastic tight which will draw the spool down next to the previous spool.

Like this.
You'll end up with a line of spools. When you reach the sixteenth spool, measure it around your wrist to see if it will fit. If needed, add more spools until it fits around your wrist.
When you have enough spools, you need to cross the elastic through the first spool which will turn your line of spools into a circle. Tie a knot.

Ta-da! You have a one-of-a-kind piece of jewelry.

Next time I may stain the spools a darker shade before covering them with paper.


What do you think?

     Thanks for stopping by and God bless.

Teach me your way, O Lord, and I will walk in your truth;
give me an undivided heart, that I may fear your name.
Psalm 86:11

Friday, August 17, 2012

More Back-to-School Teacher Gift Ideas

     Hi Guys- this is part two of gift ideas for your kids' teachers. School will be here before you know it!

     This first idea is SUPER easy- all you do is get some extra large binder clips and cover them with decorative paper. Add a sticker and tie a ribbon to it, and you've got yourself a darling gift card and/or photo holder. This project is so affordable and easy, it would be good to use if you have to make several gifts.

Here are a few more ideas from gifts I've given over the years. . .
This gift card/ photo holder made from a wooden spool wrapped with school-themed paper would make a unique gift. Even after they use the gift card, they still have the spool for a photo holder. Here are directions for making these.

I featured these chocolate covered gummy bears here. Just dip gummy bears in melted chocolate (I used chocolate almond bark), let them cool, then place them in a baggie. You could label this, "It's sweet to be back at school!"

Here's another simple idea. Get a small bucket and fill it with candy and school supplies.
I covered these buckets with strips of map, but the gift would work with plain buckets as well.

     You can go here to see some of my other teacher gift ideas.

     If you don't have time to make anything, I don't think you could go wrong with a gift card. Starbucks, Sonic, or Barnes and Noble would surely make the teacher's day!

     Note: I am mentioning these gift ideas with a school theme, but they would work for any holiday.  
         -Imagine making a few of the binder clips with a Halloween theme and use them to display favorite photos from past Halloweens.
-The buckets would make cute "goody bags" for a birthday party.
 -The wooden spool photo holders would make great Christmas gifts for extended family or the
 girls at work.

     Thanks for stopping by and God bless.

God is our refuge and strength, an ever-present help in trouble.
Psalm 46:1

     This post is linked to Happy Hour Projects, Shabby Creek Cottage, and
Photobucket
Making
Today's Creative Blog

Thursday, August 16, 2012

Thrifty Thursday #30

     Good morning!

     A friend once told me about a tip that she read stating that when you get something new, you should get rid of something you have. This keeps you from having too much. For the last month, I have been putting stuff to get rid of in a box - little things that are just sitting around that we no longer need. I took this box to the thrift store while I was out and about. Then I went in the thrift store to see what they had. And I picked up a few things. . . since I had just gotten rid of a box of stuff!:)


I found this pack of planks- I believe it was a shelf board that somebody cut up. These will make perfect canvases for a project I've been wanting to do. The edges are nice and straight and don't even need to be sanded. I got 5 of them for a quarter.


I was browsing and found this old muffin tin in the middle of a pile of plates. Only 50 cents. Isn't it a beauty?


There was something about the print on this container that called out to me. I was reluctant to claim it because I didn't want to spend $4 on it, but when I asked, the thrift store lady gave me a discount and let me get it for $3. It looks like it's covered in a bunch of foreign labels, but it's fabric. I'll use it to hold supplies in my craft room.

     I've started another box so as I'm cleaning and sorting, I can get rid of some more stuff. Isn't the saying, if you haven't used an item in a year (or  5 years) you don't need it anymore?

    Thanks for stopping by and God bless.

    This post is linked to Apron Thrift Girl.

Therefore let us not judge one another anymore, but rather resolve this,
not to put a stumbling block or a cause to fall in our brother's way.
Romans 14:13