Wednesday, January 16, 2013

Layout of the Week #40- Using Punches to Make a Decorative Border

     This week I'm going to show how you can use a punch to make a decorative edge on your layout. It's a very easy concept that you can adapt using punches of all shapes.

     When I plan the theme for layout of the week, I intend for you to be able to use products that you already have rather than having to go out and buy them. I know everybody loves to buy new stuff, but it's so nice to use up current supplies. . .which then gives us reason to go out shopping:)

 
Here's the layout we'll be creating.
Follow these easy steps, and yours will end up looking similar to this.
 
 
To create this, you'll need:
one piece of cardstock
one piece of 12"x12" pattern paper
three or four pieces of coordinating scrap paper (you'll be cutting 2" squares from these)
paper punch (any shape- I'll be using a 1 5/8" circle)
letter stickers for the title
journaling pen
button (or some other 1" embellishment)
paper trimmer
adhesive
 
 
To begin, trim 1/2" off the right side and bottom of the pattern paper. Do not adhere yet.

 
Using your punch on the lower right hand corner, punch out two shapes- one right above the other. Only place the pattern paper halfway in the punch- this will give you a half-circle (or half-square or whatever shape punch you're using).

 
Do the same thing at the upper left corner. When you're done, it should look like this.
Do not adhere the pattern paper yet.

 
Now cut four 2" squares from the scrap pattern paper. Adhere them to the back of the punched out shapes. I used regular Scotch tape for this step.
Leave the top shape empty.

 
This is how it should look. See how the pattern paper is peeking out of the punched out shapes?
Now adhere this to the card stock.

 
Place two or three vertical photos about 1/2" from the top of the layout.

 
Now place your title beneath the top photos.
Then adhere two more vertical photos below the title.
Place your 1" embellishment in the space of the punched out shape at the top left corner. I used a heart punched from pattern paper.

 
Finally, add your journaling below the bottom photos. Mine is hard to see because I used purple ink.
 
This layout is so quick and easy. You could do this with any shaped punch and a border punch would work, too.
 
     If you liked working with punches, you can go here, here, or here to see other Layouts of the Week using them.
 
     For my Layout of the Week series, I try to come up with simple layouts using directions that are easy to follow. I usually post a tutorial every Wednesday. If you have gotten into a scrapbooking slump or simply just fallen behind, try my tutorial. You could complete one page a week!
 
 
     Thanks for stopping by and God bless.


Happy is the man who finds wisdom.
Proverbs 3:13
 
This post is linked to 52 Mantles and Tip Junkie.


Tuesday, January 15, 2013

Recipe of the Week #50- Black Bean Salsa


Black Bean Salsa

1 (14.5 oz) can black beans, drained and rinsed
1 (14.5 oz) can light red kidney beans, drained and rinsed
1 (14.5 oz) can whole kernel corn
1 can white shoe peg corn
1/2 red pepper, chopped
1/2 red onion, finely diced
2 Tbsp. fresh cilantro, chopped
1 small bottle (12 oz.) Zesty Italian Dressing

Mix all ingredients in a large bowl. Toss to coat. Refrigerate for 1 hour before serving. Serve with tortilla chips.

This recipe is so easy and so very good! I think the next time I make it, I'll serve it on top of a tossed salad.

Note: I couldn't find white shoe peg corn, but it tasted fine without it.

I got this recipe from this rockin' blog.

Thanks for stopping by and God bless.

Blessed are the merciful, for they shall obtain mercy.
Matthew 5:7

This post is linked to My Girlish Whims.

Monday, January 14, 2013

Cork Key Rings

    As I've mentioned before, I have a slew of wine corks- most of which I got from just one estate sale. That one couple provided me with enough corks to make today's project, two other projects - and I still have a lot left. I'm thinking this cork collection was years' worth of them saving.
     Anyway, I found this tutorial and thought it was the cutest use for corks.
 
 
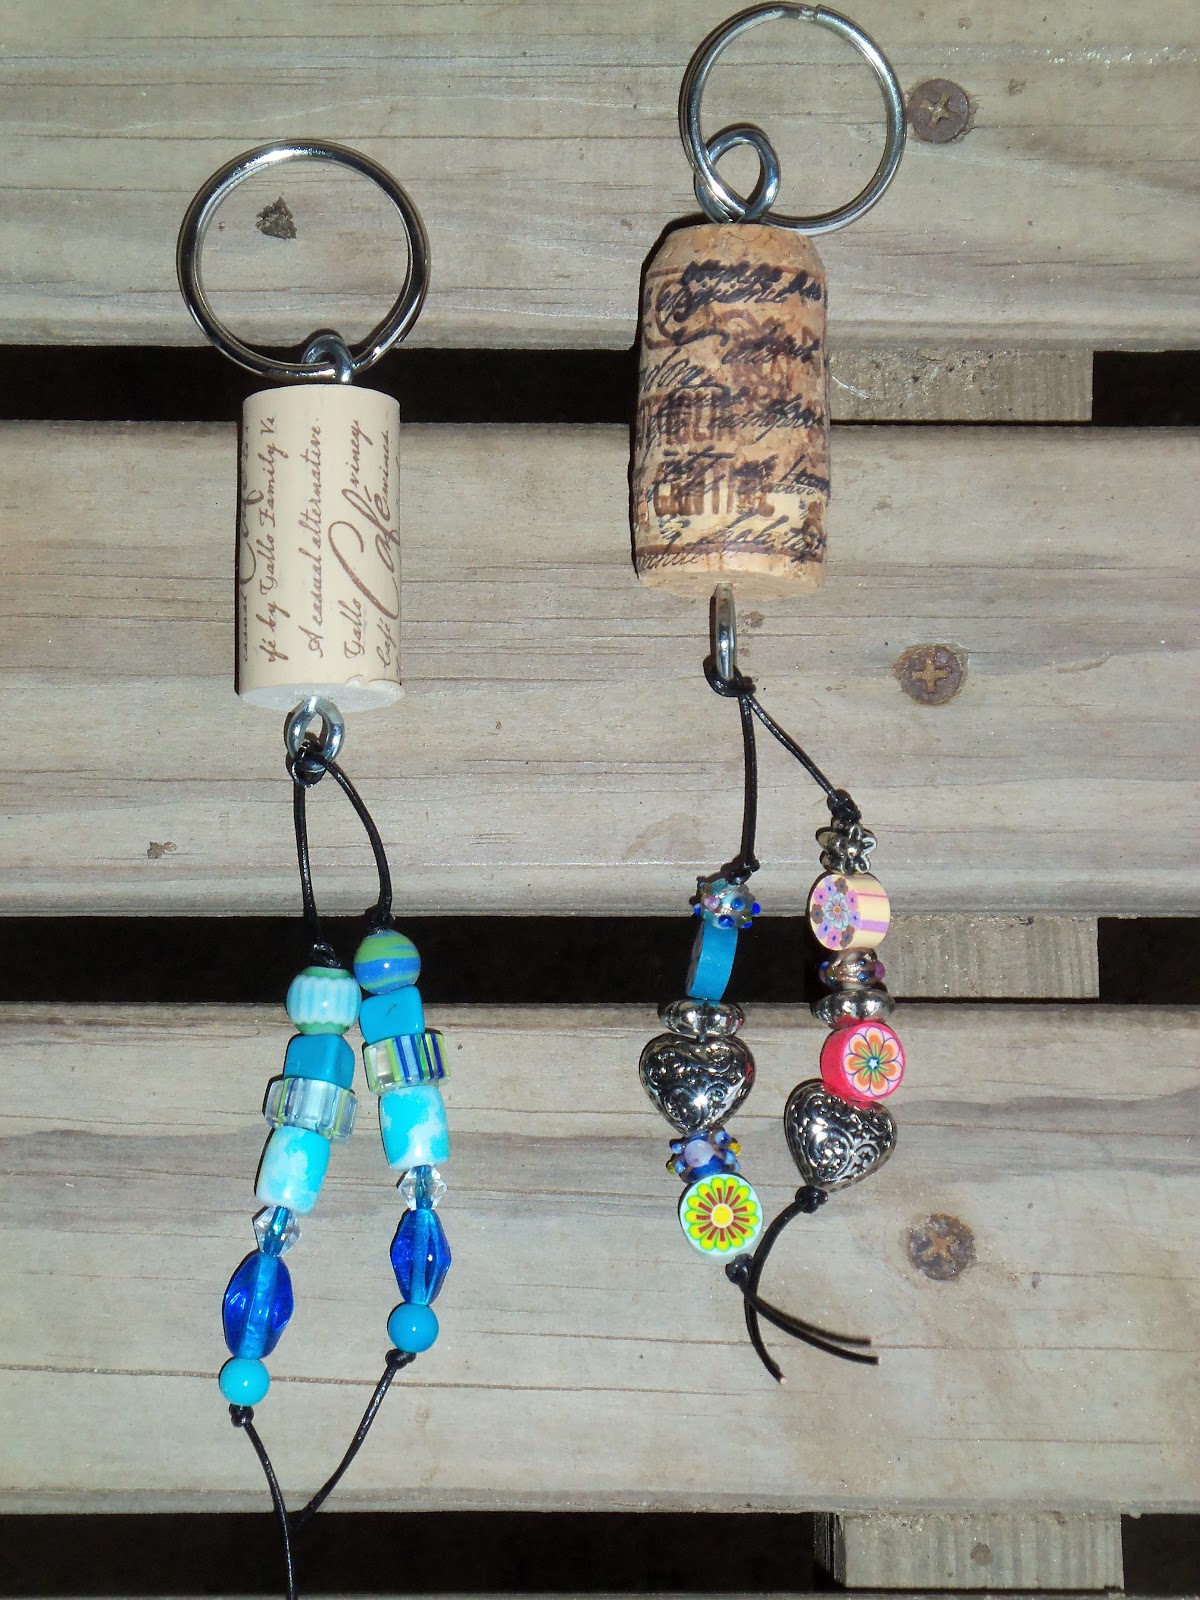
Here are the key rings I made. This project is so quick and easy. The first one took me a little bit, but the rest I whipped up in about five minutes each. I got started making these and didn't want to stop. But how many key rings does one girl need?
 

The cork on the left, I stamped with a script stamp, but I liked the phrasing on the cork on the right, so I left it au natural.

 
Again, I stamped the cork on the right with a script stamp, but the cork on the left already had script writing on it so I left it as is.

     If you, like me, are not a wine drinker (or any kind of drinker, for that matter) and don't have your own supply of wine corks, you can often find them at yard sales and estate sales. Another idea would be to check with a local restaurant and ask them if they could save a few for you. You could also make a post on Craigslist or Freecycle requesting some.

      What do you think? Would you carry one of these around?

     If you like this project and would like to see other projects using corks, you can look here or here.

     Thanks for stopping by and God bless!

I will praise the Lord according to His righteousness,
and will sing praise to the name of the Lord Most High.
Psalm 7:17

This post is linked to Craft-O-Maniac, Between Naps on the Porch, and Making the World Cuter.


Friday, January 11, 2013

All Keyed Up

     For Christmas my hubby and boys got me a pack of Tim Holtz keys. Love these things. I'm not sure what I'm going to do with all of them yet, but I have come up with one use for them.

A key bracelet

 
All the keys have a different word engraved on them. I chose the one that says Life because it was a smaller key and I thought it would work better for this project.
    
 
I asked my sweet, sweet hubby to drill a hole at the end of the key- and he did. Then I just attached it to a chain.

 
I just added a jump ring to either side and placed a latch at the back of the bracelet.
 
I think this will be cute to pair with some of my other bracelets.
 
Thanks for stopping by and God bless.
 

But You, O Lord, are a shield for me.
Psalm 3:3

This post is linked to Happy Hour Projects, My Repurposed Life, 52 Mantles, Brassy Apple, and Tater Tots and Jello.

Thursday, January 10, 2013

Thrifty Thursday #50

     Here we are with my fiftieth Thrifty Thursday. Some of you are probably thinking, "My word, this girl likes thrift stores. She is one serious secondhand shopper." And, yes, I would have to agree with you.
     But today, my friends, while I was at the thrift store, I saw a lady who is even more serious than I am about thrifting. She was walking through the store with her oxygen tank on her back!!! I am not kidding y'all. She was breathing very heavily and walking very slowly. Now, I'm a nurse and keenly observant (my hubby would say nosy), so I kept an eye on her and even offered her a chair to sit on at one point. But she seemed very happy to be digging through treasures.
     Although I was keeping watch on her, I was still able to find a few things.

 
Picked up this old Monopoly game for $1.
Earlier this week I showed you a scrapbook that I made from a Scrabble board. I am going to teach that album in a class, and I will need several board games to cut up, so that's probably what I'll do with this guy. 

 
It's hard to tell in this photo, but this is a bag full of binder clips for $.75.
I love binder clips. There's just so much you can do with them. Couldn't pass up this bargain!

 
I found another dinner plate- for only $1. I'm up to five now. Almost have my mismatched set!
 
 
Here is the best find of the day. I got these two slide holders for a dime each! Whoo-wee! I saw these boxes on a bottom shelf and snatched them up. I couldn't believe my luck. I'm not quite sure what I'll do with them, but I'm thinking one of them may become a wreath of some sort.
I just love that black one!
 
I wish you luck on all your thrifty adventures. Thanks for stopping by and God bless.
 
Ask, and it will be given to you;
seek, and you will find;
knock, and it will be opened to you.
Matthew 7:7
 
This post is linked to Embracing Change, Apron Thrift Girl, and My Girlish Whims. 
 

Wednesday, January 9, 2013

Layout of the Week #39- Scrapbooking a Top Ten List

     For the Layout of the Week this week, I thought I'd show how you can scrapbook a top ten list. Lists are pretty easy to come up with (if you're like me, you have all kinds of lists:) and they make for easy journaling.
     Today I'm scrapbooking my family's top ten memories from 2012.
    
 
Here's the layout we'll be creating. Yours will turn out similar to this if you follow these easy steps.
 
 
You will need:
two pieces of pattern paper (for the background)
three pieces of coordinating 12" x 12" cardstock
two or three index cards for the journaling
letter stickers for the title
number stickers from 1-10
paper trimmer
adhesive

 
Trim two strips measuring 3 1/2" x 10" from all three pieces of cardstock. This will create six strips.
Lay them side by side on the background paper.
I had photos that were both vertical and horizontal, so I lined mine up like this.
If all your photos are vertical, adhere all your strips vertically. If all your photos are horizontal, adhere all the strips horizontally.

 
Trim your photos to fit in the strips. There should be two photos on every strip.
Allow a little room in between the photos for the journaling strips.
Leave the strip on the far left blank- this will be for our title.

 
Place your number stickers 1-10 on each photo.

 
Place your title in the far left strip. Trim your index cards to overlap your photos. Add your journaling.
We're done!
 
This could be used for any type of countdown: ten things I love about you, ten vacations we've taken, ten of my closest friends. . . the possibilities are endless!
 
Thanks for stopping by and God bless.
 

Therefore, whatever you want men to do to you,
 do also to them, for this is the Law and the Prophets.
Matthew 7:12
This post is linked to Shabby Creek Cottage.
    

Tuesday, January 8, 2013

Recipe of the Week #49- Chocolate Caramel Covered Butterfinger Potato Chips

 
     Yep, you read right, today's recipe is potato chips dipped in caramel and chocolate topped with crushed Butterfingers. This recipe mixes salty and sweet and it is yummy! 
     I'll be honest with you. . .when I first made these, nobody at my house would try them- not my sons, not my hubby. I had to make them try them and they did so with scrunched faces and poor attitudes. They were pleasantly surprised. As a matter of fact, they really liked them.
 
Caramel Chocolate Dipped Potato Chips
 
1 bag crinkle cut potato chips
1 bag Kraft caramels
2 Tbsp water
Approximately 2 cups melting chocolate (I used chocolate Almond Bark)
2 whole Butterfinger candy bars, crushed
 
Cover work space with wax paper. Unwrap caramels, place in bowl (deeper is better for dipping), and coat the caramels with water. Microwave for 1 minute. Stir until smooth. Microwave for another 30 seconds if needed.
Dip the chips and let cool on wax paper.
Melt chocolate. Once caramel is cool, dip chips in chocolate, then sprinkle with Butterfingers. Let cool on wax paper.
 
I found this recipe at this fantastic blog.
 
Thanks for stopping by and God bless.
 
 
Blessed are all those who put their trust in Him.
Psalm 2:12
 
 This post is linked to Tip Junkie and Between Naps on the Porch.